background image

3

www.observint.com

© 2014 Observint Technologies. All rights reserved.

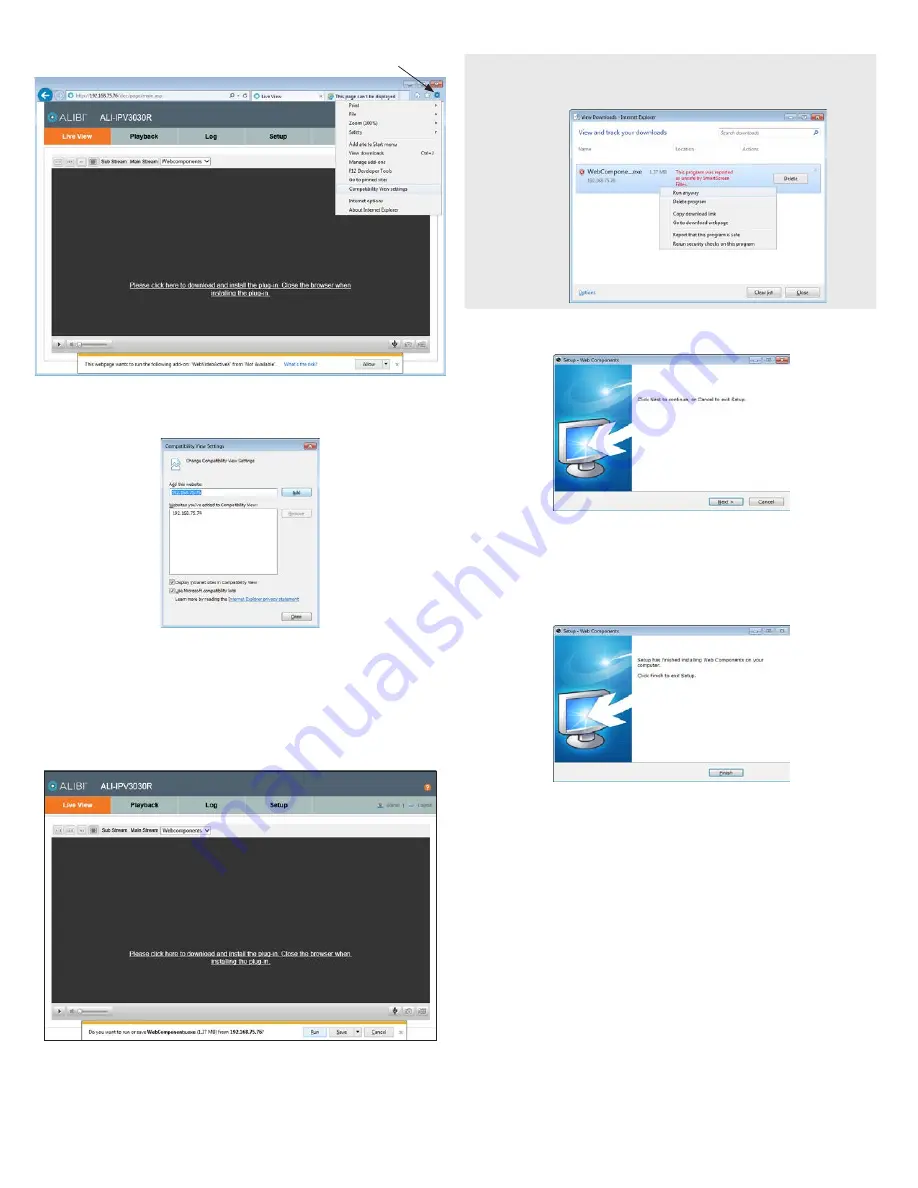
Tools icon

b. 

In the Compatibility View Settings window, ensure that the IP address of your camera is in the 

Add this website

 field, then click 

Add

c. 

After clicking 

Add

, the IP address will appear in the Websites list. Click 

Close

4. 

If this login is the first login to an Alibi camera from your computer and browser, continue with the 
following sub-steps to install WebComponents: 

a. 

After a successful login to the NVR, a message will appear in the middle of the Live View 
window requiring you to load a plug-in. Click on the message to continue, then click 

Run

 in 

the pop-up block at the bottom of the screen. 


NOTE

Some computer security software may attempt to block you from running 

WebComponents.exe

. If 

necessary, open the Internet Explorer downloads list, right click on the WebComponents.exe file name, 
then click 

Run Anyway

b. 

In the 

Setup - WebComponents

 window opens, click 

Next

 to continue. 

Installing the WebComponents plugin may require that you close the browser. Follow the 
on-screen instructions, then restart your browser after the installation is finished. 

c. 

Allow the plug-in installation to complete. When the following window appears, click 

Finish

Summary of Contents for ALI-IPV30

Page 1: ...ontamination Apply power to the cable to power on the camera Step 3 Install the Alibi Discover Tool The Alibi Discover Tool is a software utility used to discover Alibi cameras and NVRs DVRs installed on the LAN and change their network settings The tool is provided on the CD with your camera To use the tool 1 Insert the software CD provided with your camera into an optical drive on the Microsoft ...

Page 2: ...ras is 1111 d Click the Save button The new IP address port etc settings will appear in the list with the device you modified 6 Close the Alibi Discover Tool by clicking the Close icon T in the upper right corner of the screen Step 4 Remote login To access the camera from a computer on the LAN 1 Open your Microsoft Internet Explorer browser on your compute and enter the IP address of the camera in...

Page 3: ...ll appear in the middle of the Live View window requiring you to load a plug in Click on the message to continue then click Run in the pop up block at the bottom of the screen NOTE SomecomputersecuritysoftwaremayattempttoblockyoufromrunningWebComponents exe If necessary opentheInternetExplorerdownloadslist rightclickontheWebComponents exefilename thenclickRunAnyway b In the Setup WebComponents win...

Page 4: ... to a level of 0 100 either by moving the slider or entering the value in the box on the right The effect of the adjustment will appear in the Live View image in the menu Exposure Settings submenu In this submenu set the following for the best performance Iris Mode Select Auto or Manual Some cameras may not offer both options Exposure Time Value ranges from 1 3 to 1 100 000 s The nominal value is ...

Page 5: ...16 Mbps Bit Rate Mode CBR VBR Features Motion Detection Yes Event Notification Email FTP Privacy Mask Yes Video Analytics Tamper Detection Interface Ethernet RJ 45 10 100BASE T Network Protocols TCP IP HTTP DHCP DNS DDNS RTP RTSP PPPoE SMTP NTP UPnP ICMP IGMP SNMP FTP 802 1X QoS HTTPS ONVIF PSIA Security Password Protection Number of Connections Up to 15 General Power Requirements PoE IEEE802 3af ...

Reviews: