background image

English

English

1     

Components

5     

2     

Assembling your eleCtro wind

3     

4     

Batteries Required: 2 X AA (not included)

  1.  1 x Fan Blade
  2.  1 x Motor
  3.  1 x Motor Holder

  4.  1 x Stand
  5.  1 x Base Plate
  6.  1 x LED Light

•  Install three spring connectors (10) with the Switch plate (8) and Metal plate (9) on the Base plate 

(5) narrow end down, push the spring as far as it will go. Connect the red battery wire to the spring 
connector at position (1) and black battery wire to position (3) as shown (Fig. 2). Bend the spring over to 
create a gap into which the metal wire is inserted.

•  Insert the Motor (2) into the  
        Motor Holder (3) as shown in Fig. 4.

•  As shown in Figure 3, install another spring connector on the base and connect the Resistor (7) and LED 

light (6)  to the spring connectors as follows:

        Resistor red wires – 2,4
        LED red wire – 4
        LED black wire  – 3

  7.  1 x Resistor
  8.  1 x Switch Plate
  9.  1 x Metal Plate

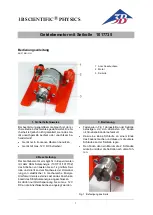
•  Install Motor with the holder to the Stand (4) as shown in Fig. 5.

 10.  4 x Spring Connector

1

  Colours and contents may vary

Summary of Contents for ELECTROWIND

Page 1: ...lar radio and learn about solar energy Set the radio to listen to your favourite programme Contents and instructions in English Also runs on 2 AA 1 5 V batteries not included Bygg en solcellsdri ven r...

Page 2: ...3 6 7 4 5 Fig 3 Fig 6 Fig 7 Fig 4 Fig 5...

Page 3: ...y batteries of the same or equivalent type as recommended are to be used Batteries are to be inserted with the correct polarity Exhausted batteries are to be removed from the toy The supply terminals...

Page 4: ...ing connector at position 1 and black battery wire to position 3 as shown Fig 2 Bend the spring over to create a gap into which the metal wire is inserted Insert the Motor 2 into the Motor Holder 3 as...

Page 5: ...addningsbara batterier ska plockas ur leksaken f re laddning Laddningsbara batterier f r endast laddas under uppsikt av vuxen Blanda aldrig olika batterityper Blanda inte heller nya batterier med gaml...

Page 6: ...ll fj derkontakten vid punkt 1 och den svarta batteritr den till punkt 3 enligt fig 2 B j fj dern f r att skapa ett mellanrum d r metalltr den ska f ras in F r in motorn 2 i motorh llaren 3 enligt fig...

Page 7: ...ng i fremtiden trenger kaste dette produktet m du v re oppmerksom p at elektrisk avfall ikke skal kastes sammen med husholdningsavfallet Elektrisk avfall skal leveres til et godkjent mottakssenter Kon...

Page 8: ...tteriledningen med fj rklemmen ved pos 1 og den sorte batteriledningen ved pos 3 som vist fig 2 B y fj ren for lage en pning som metalltr den kan stikkes inn i Sett motoren 2 inn i motorholderen 3 som...

Page 9: ...ugsplads S danne produkter m ikke smides ud sammen med almindeligt husholdningsaffald Hvis du p et tidspunkt f r brug for at bortskaffe dette produkt skal du v re opm rksom p at det ikke er tilladt at...

Page 10: ...d fjederforbindelsesklemmen ved pos 1 og den sorte batteriledning ved pos 3 som vist fig 2 B j fjederen for at lave en bning som metaltr den kan f res ind i Inds t motoren 2 i motorholderen 3 som vist...

Page 11: ...t t m n tuotteen ota huomioon ett s hk tuotteita ei saa h vitt talousj tteen mukana Huolehdi kierr tyksest paikallisten edellytysten mukaan Pyyd kierr tysohjeita paikallisilta viranomaisilta tai j lle...

Page 12: ...siliittimeen joka on kohdassa 1 ja musta pariston johto kohtaan 3 kuten kuvassa 2 Taita jousi yli siten ett syntyy aukko johon metallijohto asetetaan Aseta moottori 2 moottoripidikkeeseen 3 kuvan 4 mu...

Page 13: ...suus on oikein S hk tuuletin on nyt valmis Paina kytkint kohdassa A niin tuuletin alkaa py ri ja tunnet ilmavirran Punainen LED valo syttyy my s ilmoittaen virran olevan p ll P st irti kytkimest A sam...

Reviews:

Related manuals for ELECTROWIND