background image


 5 


8.


Tempo:

 Tap this button at the desired rate to enter a new tempo. 

Important:

 This feature does not work when the VI25 is set to 

External

 sync. 

9.


Roll:

 Press this button to activate or deactivate Roll Mode. In this mode, pressing and 

holding a pad (that is set to send Note On messages) causes the pad to retrigger at a rate 
based on the current Tempo and Time Division settings. This button can function as a 
toggle (latching) or momentary button. 

In Roll Mode, some controls have different functions: 


Press one of 

Assignable Buttons 17–24

 to select the current Time Division, which 

determines the rate of the Roll feature.  


Turn 

Assignable Knob 1

 to adjust the Gate, which determines the length of the 

repeated note. 


Turn 

Assignable Knob 2

 to adjust the Swing, which determines how much swing (a 

"shuffle" feel) is applied to the repeated note. 

10.


Transport Buttons:

 These six buttons are dedicated buttons for sending conventional 

transport control commands: Rewind, Fast-Forward, Stop, Play, Loop, and Record.  

You can also use the VI Editor software to set each button to send MIDI CC messages to 
your software or external MIDI device. See the VI Editor's 

User Guide

 to learn how to do 

this. 

11.


Display:

 Use this LCD screen to view parameter values relevant to VI25's current 

operation. 

12.


Preset Down/Up (



):

 Use these arrow buttons to change the preset of VI25. 


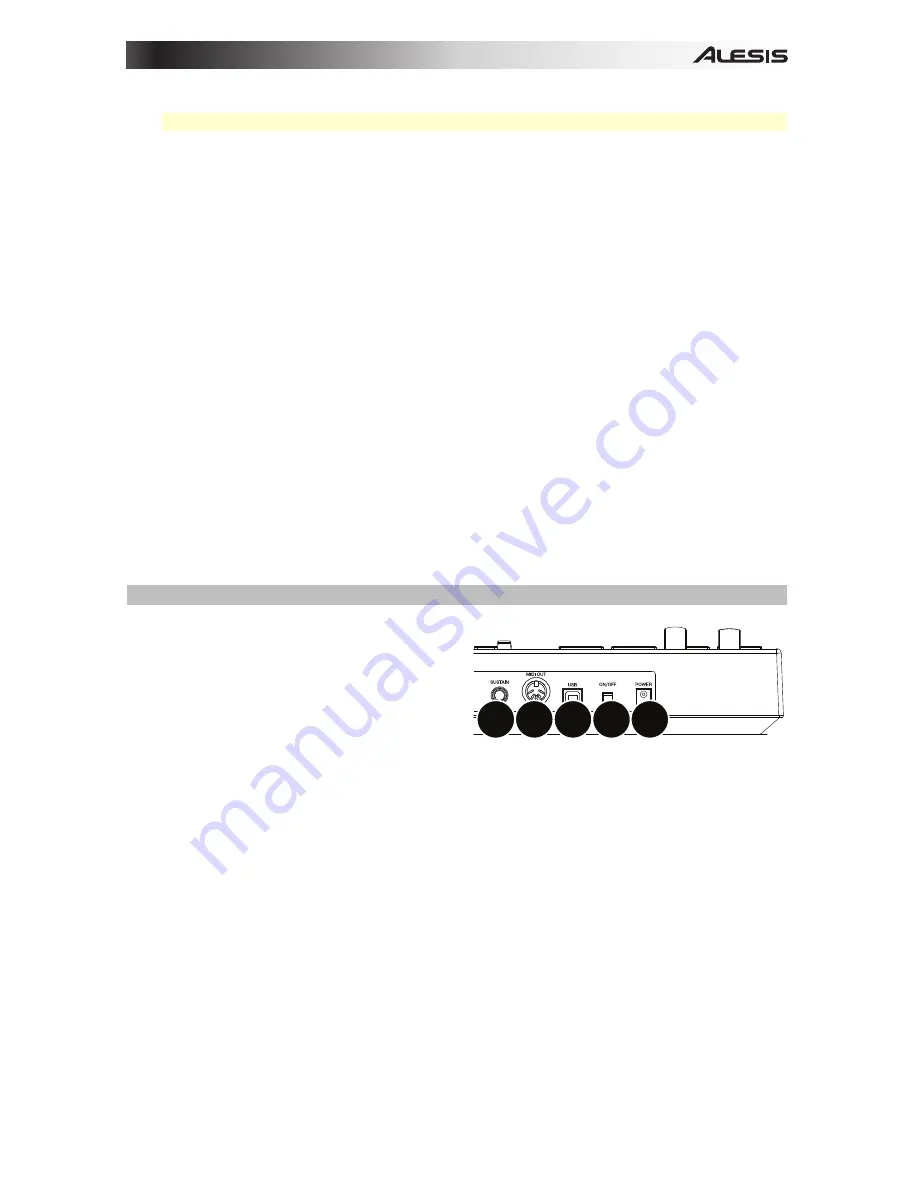
Rear Panel 

 
1.


Power Input:

 If you do not want to use a 

computer in your setup (i.e., if you are 
using VI25 to control an external MIDI 
module), connect VI25's power input to a 
power outlet using an optional power 
adapter (9 V DC, 500 mA, center-positive, 
sold separately). Alternatively, you can 
connect VI25's USB Port to a power 
outlet using a standard USB charger (sold 
separately). 

2.


Power Switch:

 Press this button to power the VI25 on or off. 

3.


USB Port:

 Use a standard USB cable to connect this USB port to your computer. The 

computer's USB port provides ample power to VI25. This connection is also used to send 
and receive MIDI data to and from your computer. 

If an external device is connected to the MIDI Out, your computer can send MIDI 
messages via USB to the VI25, which will then send the message to the external device.  

4.


MIDI Out:

 Use a standard five-pin MIDI cable to connect this MIDI Out to the MIDI In of 

an external MIDI device (e.g., a synthesizer, sequencer, drum machine, etc.). 

5.


Sustain Input:

 Connect an optional 1/4" TS sustain pedal to this input. 

You can also use the VI Editor software to set the sustain pedal to send other MIDI CC 
messages to your software or external MIDI device. See the VI Editor's 

User Guide

 to 

learn how to do this. 

1

2

3

4

5

Summary of Contents for v125

Page 1: ...User Guide English 3 5 Gu a del usuario Espa ol 6 8 Guide d utilisation Fran ais 9 11 Guida per l uso Italiano 12 14 Benutzerhandbuch Deutsch 15 17 Appendix English 18...

Page 2: ......

Page 3: ...etc and product registration visit alesis com vi25 For additional product support visit alesis com support Quick Start Connection Diagram MIDI PIANO ORGAN GUITAR BASS BRASS ORCH SYNTH PAD RHYTHM SPECI...

Page 4: ...e of the Roll feature 1 4 note 1 4 note triplet 1 4T 1 8 note 1 8 note triplet 1 8T 1 16 note 1 16 note triplet 1 16T 1 32 note or 1 32 note triplet 1 32T You can also use the VI Editor software to se...

Page 5: ...CD screen to view parameter values relevant to VI25 s current operation 12 Preset Down Up Use these arrow buttons to change the preset of VI25 Rear Panel 1 Power Input If you do not want to use a comp...

Page 6: ...ad etc y registro del producto visite alesis com vi25 Para soporte adicional del producto visite alesis com support Diagrama de instalaci n y conexi n r pida MIDI PIANO ORGAN GUITAR BASS BRASS ORCH SY...

Page 7: ...i n Redoble 1 4 negras tresillo de negras 1 4T 1 8 corcheas tresillo de corcheas 1 8T 1 16 semicorcheas tresillo de semicorcheas 1 16T 1 32 fusas o tresillo de fusas 1 32T Tambi n puede utilizar el so...

Page 8: ...es al funcionamiento actual del VI25 12 Subir bajar preset Utilice estos botones de flecha para cambiar el preset actual del VI25 Panel trasero 1 Entrada de corriente Si no desea utilizar un ordenador...

Page 9: ...ibilit etc et l enregistrement du produit veuillez visitez le site alesis com vi25 Pour de plus amples informations visitez alesis com support Utilisation rapide sch ma de connexion MIDI PIANO ORGAN G...

Page 10: ...oll noire 1 4 triolet de noires 1 4T croche 1 8 triolet de croches 1 8T double croche 1 16 triolet de doubles croches 1 16T triple croche 1 32 ou triolet de triples croches 1 32T Vous pouvez galement...

Page 11: ...param tres des op rations en cours du VI25 12 Touches des pr r glages Ces touches permettent de modifier le pr r glage en cours du VI25 Panneau arri re 1 Entr e d alimentation Si vous ne souhaitez pas...

Page 12: ...r la registrazione del prodotto recarsi alla pagina alesis com vi25 Per ulteriore assistenza recarsi alla pagina alesis com support Inizio rapido schema dei collegamenti MIDI PIANO ORGAN GUITAR BASS B...

Page 13: ...frequenza della funzione Roll 1 4 1 4 di croma 1 4 T 1 8 1 8 di croma 1 8 T 1 16 1 16 di croma 1 16 T 1 32 o 1 32 di croma 1 32 T inoltre possibile utilizzare il software VI Editor per configurare cia...

Page 14: ...i di parametri specifici all operazione corrente del VI25 12 Preset Down Up preset gi su servirsi di questi tasti freccia per modificare il preset corrente del VI25 Pannello posteriore 1 Ingresso di a...

Page 15: ...Registrierung Ihres Produkts finden Sie auf alesis com vi25 F r zus tzlichen Produkt Support besuchen Sie alesis com support Schnellstart Anschlussdiagramm MIDI PIANO ORGAN GUITAR BASS BRASS ORCH SYN...

Page 16: ...Note 1 8 Triole 1 8T 1 16 Note 1 16 Triole 1 16T 1 32 Note oder 1 32 Triole 1 32T Sie k nnen auch die VI Editor Software verwenden um jede Taste so einzustellen dass Programmwechselnachrichten an Ihre...

Page 17: ...telligen k nnen 11 Display Dieser LCD Bildschirm zeit Parameterwerte zum aktuellen Betrieb des VI25 an 12 Preset Aufw rts Abw rts Verwenden Sie diese Pfeiltasten um das aktuelle VI25 Preset zu ver nde...

Page 18: ...backlit 1 Tempo button blue backlit 1 Roll Mode button blue backlit Inputs Outputs 1 USB port 1 1 4 6 35mm TS footswitch input 1 5 pin MIDI out Display 3 digit 7 segment LCD Power via computer USB bus...

Page 19: ......

Page 20: ...alesis com Manual Version 1 0...

Reviews: