16
ASSEMBLING THE CAR JACK
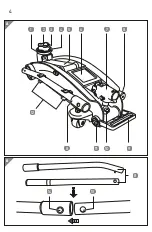
Fitting the carry handle
On each side of the jack handle
7
sleeve is a nut, where the
carry handle is attached
9
�
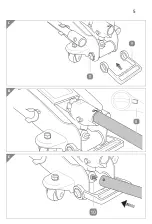
1� Place one of the “eyes” of the carry handle over the carry hand-
le nut
11
(see
picture C)�
2� Carefully extend and adjust the second eye of the carry handle
in the appropriate place� Some force may have to be applied in
order to place the second eye of the carry handle in the correct
position� The carry handle should now fit (see
picture A)�
3� Before moving the car jack, ensure that the carry handle is
correctly attached� This is done by pushing the car jack for-
wards and backwards� The carry handle should be safely
attached at this time� Otherwise, reattach the carry handle�
Assembling the jack handle
1� Align two halves of the jack handle
8
with the pin
13
on
one part and with the drilled hole
14
on the other part
(see
picture B)�
2� Press both parts together until you hear the pin click into place
(see
picture B)�
To take apart the jack handle, remove the jack handle from
the car jack� Press the pin down to separate both halves,
then press each half into the jack handle clips
12
on both
sides of the car jack (see
picture A and B)�
Attaching the jack handle
1� Take the assembled jack handle
8
and align the end with the
hole (see
picture D) with the handle sleeve
7
(see
picture A)�
2� Press the jack handle into the jack handle sleeve and turn it so
as to activate the bayonet closing (see
picture D)� Ensure that it
is firmly attached�
Assembling the car jack
Summary of Contents for Auto XS FLX-WH-01
Page 1: ...HYDRAULIC TROLLEY JACK Original Instructions ...
Page 2: ......
Page 4: ...A 1 2 5 6 7 9 11 12 8 8 10 3 4 8 14 13 B 4 ...
Page 5: ...11 9 10 8 C D E 5 ...
Page 7: ...7 ...
Page 26: ...26 DECLARATION OF CONFORMITY Declaration of conformity ...
Page 27: ...27 ...


