background image

                140cc 4 Stroke Petrol Lawn Mower 

AFTER SALES SUPPORT

e-mail: [email protected]

1800 909 909

MODEL: №. 52371  •  03/2016  •  52371

(toll free)

14

AFTER SALES SUPPORT

(toll free)

140cc 4 Stroke Petrol Lawn Mower 

e-mail: [email protected]

1800 909 909

MODEL: №. 52371  •  03/2016  •  52371

Assembly 

WARNING: 

Stop the engine and unplug the spark plug before any 

repairs or maintenance operations.

WARNING: 

DO NOT attempt to start this mower without first adding 

0.6L of SAE 10W-30 engine oil to the Engine. Refer to the oil chart on 

page 16 to confirm the correct oil for various conditions.

WARNING: 

Do Not attempt to start this mower without the mower 

first being FULLY assembled.
It is necessary to fit the lower handles (6), upper handle and bar (1), 

and the 60L hard catcher (7) to the mower before use.

Attaching the Lower Handles

NOTE: 

 When preparing for this assembly, slowly and carefully raise the 

handles without pulling or putting any strain on the cable. Ensure the cable 

is not tangled or crossing over.
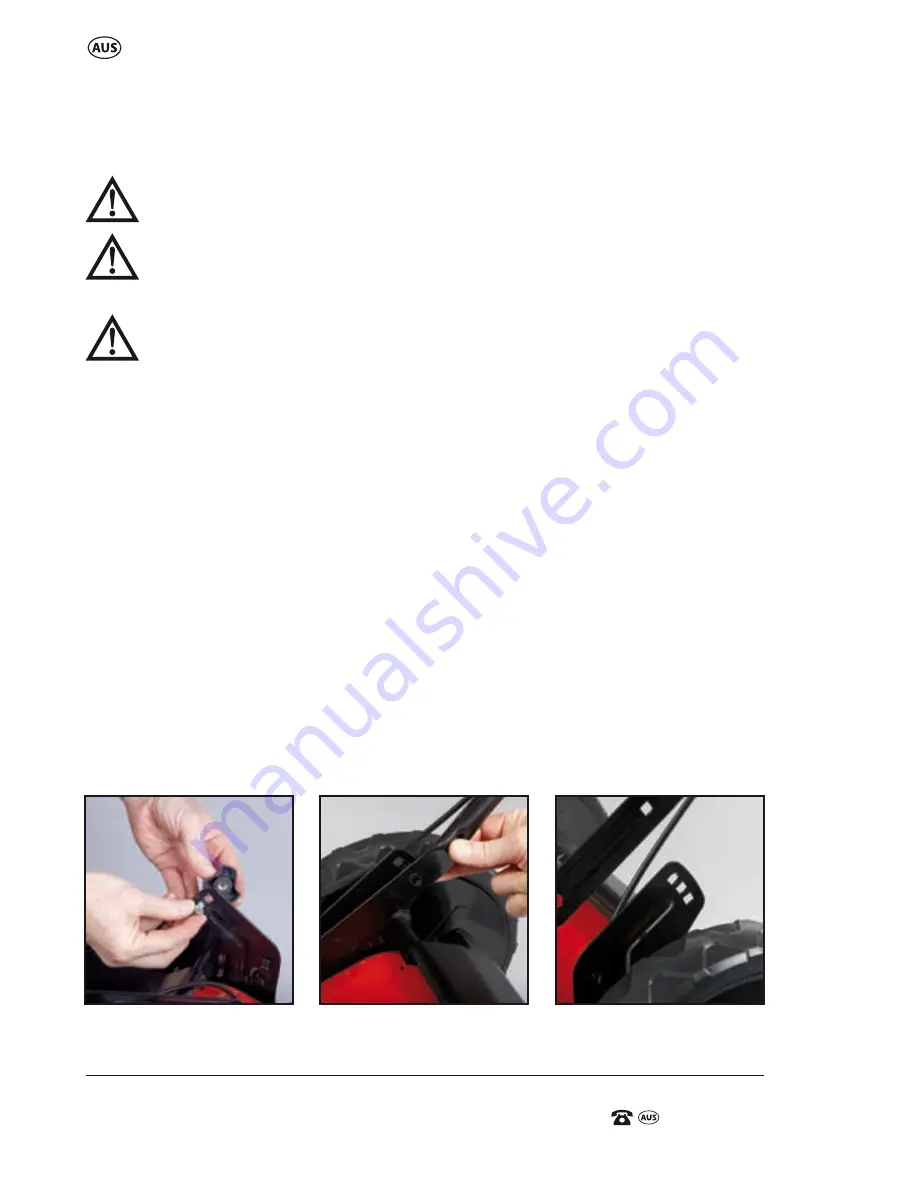
1.   Remove the lower handle locking knobs (8) from the lower handle 

mounting plates (10). (Fig A)

2.   Position each of the lower handles (6) on the inside of the lower handle 

mounting plate (10),  and locate the circle hole on each end of the lower 

handles (6) onto the large locating pins (one each side) on the lower 

handle mounting plates (10) on each side. (Fig B)

3.   This mower has a 3 height adjustment for the positioning of the handles, 

with the lowest notch positioning the handle bars closer to the ground, 
and the highest notch raising the handle bars up towards the user. (Fig C)

C.

B.

A.

Summary of Contents for 52371

Page 1: ... LAWN MOWER User Manual Product Info www powertoolsupport com Read all safety warnings and all instructions thoroughly before operating this product Ensure you keep your manual in a safe place for future reference IM ed6 12 2015 ...

Page 2: ... website or contact details for example Advantage You are not required to manually enter a website address or contact details How it works To scan the QR code all you need is a smartphone with QR codes reader software and an Internet connection This type of software can be downloaded for free from your smartphone s app store Try it out now Just scan the QR code with your smartphone and find out mo...

Page 3: ...0L Hard Catcher 16 Attaching the 60L Hard Catcher 16 Adding and Checking the oil 17 Fuelling 18 Adjusting the Cutting Height 19 Starting the engine 20 Stopping the engine Emergency Stopping 21 Engine tipping Poor Engine Performance 22 Maintenance Replacing the Blades 23 Air cleaner Maintenance 25 Spark plug 26 Storage andTransporting 27 Warranty Environmental protection 28 What your 3 year warrant...

Page 4: ...is not suitable for commercial industrial or trade use This product is suitable for private home use i e for use in home and gardening environments for the application of mowing IMPORTANT INFORMATION NOTE This is a 4 stroke Lawn Mower The motor MUST be filled with 470ml of SAE 10W 30 BEFORE starting Fresh unleaded fuel must be used in this unit Do NOT use Ethanol based fuels Do NOT mix oil with fu...

Page 5: ...ning Read these instructions for use carefully Use at a distance of at least 15m from other people Thrown objects can cause severe injury Explosive material Extremely hot surface Do not touch a hot muffler gear box or cylinder you may get burned These parts get extremely hot from operation and remain hot for a short time after the unit is turned off Before carrying out any operation stop the engin...

Page 6: ...ds gases or dust Power tools create sparks which may ignite the dust or fumes Ensure all animals children and bystanders are at least 20m away while operating this lawn mower Distractions can cause you to lose control Personal safety Stay alert watch what you are doing and use common sense when operating a power tool Do not use a power tool while you are tired or under the influence of drugs alcoh...

Page 7: ...sures reduce the risk of starting the power tool accidentally Store idle power tools out of the reach of children and do not allow persons unfamiliar with the power tool or these instructions to operate the power tool Power tools are dangerous in the hands of untrained users Maintain power tools Check for misalignment or binding of moving parts breakage of parts and any other condition that may af...

Page 8: ...eact and concentrate Remember that the operator or user is responsible for accidents or hazards occurring to other people or their property Preparation While mowing always wear sturdy footwear and long trousers Do not operate the equipment when barefoot or wearing open sandals Thoroughly inspect the area where the equipment is to be used and remove all objects which may be thrown by the machine or...

Page 9: ...dangerous carbon monoxide fumes can collect Mow only in daylight or good artificial light If possible avoid operating the equipment in wet grass Always be sure of your footing on slopes Walk never run and do not allow yourself to be pulled along by the lawn mower Mow across the face of slopes never up and down Exercise extreme caution when changing direction on slopes Do not mow on slopes of more ...

Page 10: ...re restarting and operating the lawn mower If the lawn mower starts to vibrate abnormally find and remove the cause of the vibration immediately Stop the engine Whenever you leave the lawn mower unattended Before refuelling Every time you remove or replace the grass catcher When mowing always keep to a safe distance from the rotating blade This distance is the length of the handle Never cut grass ...

Page 11: ...ard and grass catcher frequently for wear and deterioration and replace if damaged If the fuel tank has to be drained this should be done outdoors and when the engine is cool Wear strong work gloves when removing and reassembling the blade Check the blade s balance after sharpening For reasons of safety do not use the equipment with worn or damaged parts Parts are to be replaced and not repaired P...

Page 12: ...never down or up Turn off the engine if you must leave the lawn mower unattended Never lift the rear of the mower while starting the engine and never place your hands and feet underneath the deck while the engine is running If working on high grass adjust the mowing height to reduce the friction and prevent over loading The optimal mowing height should be 1 3 the height of the grass It would affec...

Page 13: ...pecially made for this purpose Fill the fuel tank with a funnel and outside Do not smoke or use a mobile phone during this process Fill with fuel and oil before starting the engine Never open the cap of the fuel tank to add gasoline while the engine is running or still hot Do not start the engine if there is spilt fuel on the mower or in the area surrounding Take the mower away from the zone where...

Page 14: ... 8 Lower handle locking knob x 2 9 Cable holder clip x 1 10 Lower handle mounting plate with 3 height position 11 Catcher attachment tabs 12 Rear discharge guard 13 8 Height adjustment lever 14 Rear wheels 15 Recoil starter 16 Fuel tank 17 Fuel tank cap 18 Motor 19 Oil filler cap dipstick 20 Spark plug cover Spark Plug located under cover 21 Air filter 22 Air filter cover 23 2 x swing Blades 24 Bl...

Page 15: ...AFTER SALES SUPPORT toll free 140cc 4 Stroke Petrol Lawn Mower e mail help powertoolsupport com 1800 909 909 MODEL 52371 03 2016 52371 13 30 29 27 19 15 10 13 14 6 7 5 4 2 3 9 5 8 28 20 22 18 17 12 1 16 ...

Page 16: ...d catcher 7 to the mower before use Attaching the Lower Handles NOTE When preparing for this assembly slowly and carefully raise the handles without pulling or putting any strain on the cable Ensure the cable is not tangled or crossing over 1 Remove the lower handle locking knobs 8 from the lower handle mounting plates 10 Fig A 2 Position each of the lower handles 6 on the inside of the lower hand...

Page 17: ...n the lower handle locking knob 8 onto the screw on the external side of the lower handle mounting plate 10 Fig E 6 Secure the lower handle locking knob 8 until finger tight 7 Repeat on the opposite side ensuring both of the handle locking knobs are firm and secure Attaching the Upper Handles With the lower handles now in position the upper handles and bar 1 can now be secured in position 1 When t...

Page 18: ... H Attaching the 60L Hard Catcher 1 Lift the rear discharge guard 12 in order to position the assembled 60L hard catcher 7 NOTE Do NOT ever start the lawn mower if the rear discharge guard does not fully return to the close position if the catcher is not fitted 2 With the rear discharge guard 12 raised align the 2 hooks one on each side onto the rear discharge chute with the 2 tabs one on each sid...

Page 19: ...ce Clean the area directly around the oil filler cap 19 2 Remove the oil filler cap dipstick 19 by turning approximately half a turn in an anti clockwise direction and lift the cap outwards Clean the oil dipstick 19 with a clean cloth cleaning away any visual oil Fig K 3 FOR A NEW LAWN MOWER add 470ml of SAE 10W 30 engine oil 4 Insert the oil dipstick back and secure the oil filler cap 19 by turni...

Page 20: ...irt water or other foreign objects into the fuel Wipe off spilt fuel thoroughly before starting engine Ensure you DO NOT fuel the lawn mower in close proximity to any open flames lit cigarettes or hot objects 1 Unscrew the fuel tank cap 19 and pour fresh unleaded fuel into the tank with the aid of a funnel Fig M 2 Fill the tank to approximately 2 5 cm below the lowest portion of the neck to allow ...

Page 21: ... area of grass you plan to mow It is recommended to start on a higher setting and mow a trial area of lawn before deciding on the final cutting height position 1 To increase the cutting height pull the height adjustment lever 13 outward towards the wheel and move it up a notch towards the rear of the lawn mower Fig N 2 To decrease the cutting height pull the height adjustment lever 13 outward towa...

Page 22: ...l levels For starting ensure the mower is set to the height setting so the blades are not resting deep into the grass 1 Move the motor throttle control 2 to the START position Fig P 2 Depress the priming bulb 29 fully 3 times 3 Firmly hold the recoil starter 15 pull slowly until resistance is felt then pull rapidly Fig Q 4 Once the lawn mower has started and warmed up approximately 20 30 seconds m...

Page 23: ...ixed by an authorised Service Agent If the above method cannot be used wheel the lawn mower to a safe area and allow the lawn mower to continue to run until the fuel has been all used up Do NOT lift the lawn mower Do NOT tilt the lawn mower Do NOT leave the running lawn mower unattended Do NOT put hands under the running lawn mower under any circumstances Mowing advice 1 Before mowing always check...

Page 24: ...wer is ONLY tipped backwards FigT Failing to do so will result in the engine damage Should this occur the mower should be taken to a lawn mower repair shop which is not covered under warranty Poor engine performance Should the engine idle or run rough at full speed with excessive bluey black smoke emanating from the muffler it is possible that either the engine was slightly tipped incorrectly refe...

Page 25: ...ds 2 Remove the blade bolt 25 using a 17mm spanner not supplied by turning in an anti clockwise direction Fig U then remove the outer flange 26 FigV This allows you to be able to remove the blade mounting plate 24 from the lawn mower 3 To remove a single blade from the blade mounting plate 24 again use a 17mm spanner not supplied to loosen and remove the nut screw and washers FigW X NOTE There is ...

Page 26: ...50 59Nm NOTE Use a wooden block to stop the blade from turning The 2 blades should be tightened fully but check to ensure they can still swing back if they were to hit a solid object Where required tighten the bolts with a torque wrench the centre disc blade bolt torque 50 59Nm and the four blades torque 20 25Nm If you do not have a torque wrench ask a mower service dealer to tighten the blade bol...

Page 27: ...lds the filter cover 22 Fig Z 2 Open the air filter cover 22 and remove the air filter 21 Fig AA 3 To loosen debris gently tap the air filter 21 on a hard surface If the filter is excessively dirty replace with a new filter 4 Wash the filter in liquid detergent and water Then allow it to thoroughly air dry Do not oil the filter 5 Re install the air filter 21 6 Close the air filter cover 22 and sec...

Page 28: ...r damp cloth 2 Visually inspect the spark plug 20 Discard the spark plug 20 if there is apparent wear or if the insulator is cracked or chipped 3 Check that the end of the spark plug 20 is not blackened by carbon build up Clean with a soft wire brush if necessary 4 Measure the plug gap with a feeler gauge Correct as necessary by bending the side electrode The gap should be 0 7 0 8mm 5 Thread the s...

Page 29: ...xplosive under certain conditions Do not smoke or allow flames or sparks in the area Note Be aware to not hit or cut the fuel tank while you are transporting Storage When you finish working clean the engine completely making sure there is no grass or dirt on the engine Store the engine away from direct sunlight At the end of the season give the engine an overall cleaning and a thorough check Whene...

Page 30: ...ons and Warnings Your Gardenline 140cc 4 Stroke Petrol Lawn Mower has many features that will make your job faster and easier Safety performance and dependability have been given top priority in the development of this 140cc 4 Stroke Petrol Lawn Mower making it easy to maintain and operate Use only Gardenline replacement parts for your product Non conforming parts or modifications made to parts wi...

Page 31: ... services details of which can be found in this manual and on the product itself After Sales Support TEL 1800 909 909 Service Support If you have any issues with the operation of your product please take it with a copy of your receipt to one of our National Service Agents for repair A listing of our Service Agents is included with your product however you can also find our most updated listing by ...

Page 32: ... Engine performance decreases Cutting height 2 x swing blades 23 are dull or blunt 60L hard catcher 7 is full Increase the cutting height using the 8 height adjustment lever 13 Replace the blades with new sharp blades Empty 60L hard catcher 7 60L hard catcher is not filling up to optimum level Cutting height too low Grass is wet 2 x swing blades 23 are dull or blunt Rear discharge chute 12 is bloc...

Page 33: ...ol OilType 4 Stroke Motor Oil SAE 10W 30 FuelTank Capacity 0 8L 800ml OilTank Capacity 0 47L 470ml Width of cut 48cm 480mm 19 Blades 2 x Swing Blades Height adjustment 8 Levels 20 65mm Spark PlugType Champion RC12YC Catcher Capacity 60 Litres Weight GW 32 kg Noise label rating 69dBA taken at 7 5 metres You must wear ear protection at all times Product Dimensions 1430 X 1030 X 540mm 10 L x W x H Th...

Page 34: ...ts are developed to our stringent quality specifications If you are not entirely satisfied with this product please return it to your nearest ALDI store within 60 days from the date of purchase for a full refund or replacement or take advantage of our after sales support by calling the supplier s Customer Service Hotline Made in China Gardenline is a registered trademark of ALDI Stores DISTRIBUTED...

Reviews: