Alcatel ONE TOUCH 5022D Quick Start Manual Download Page 3

5

6

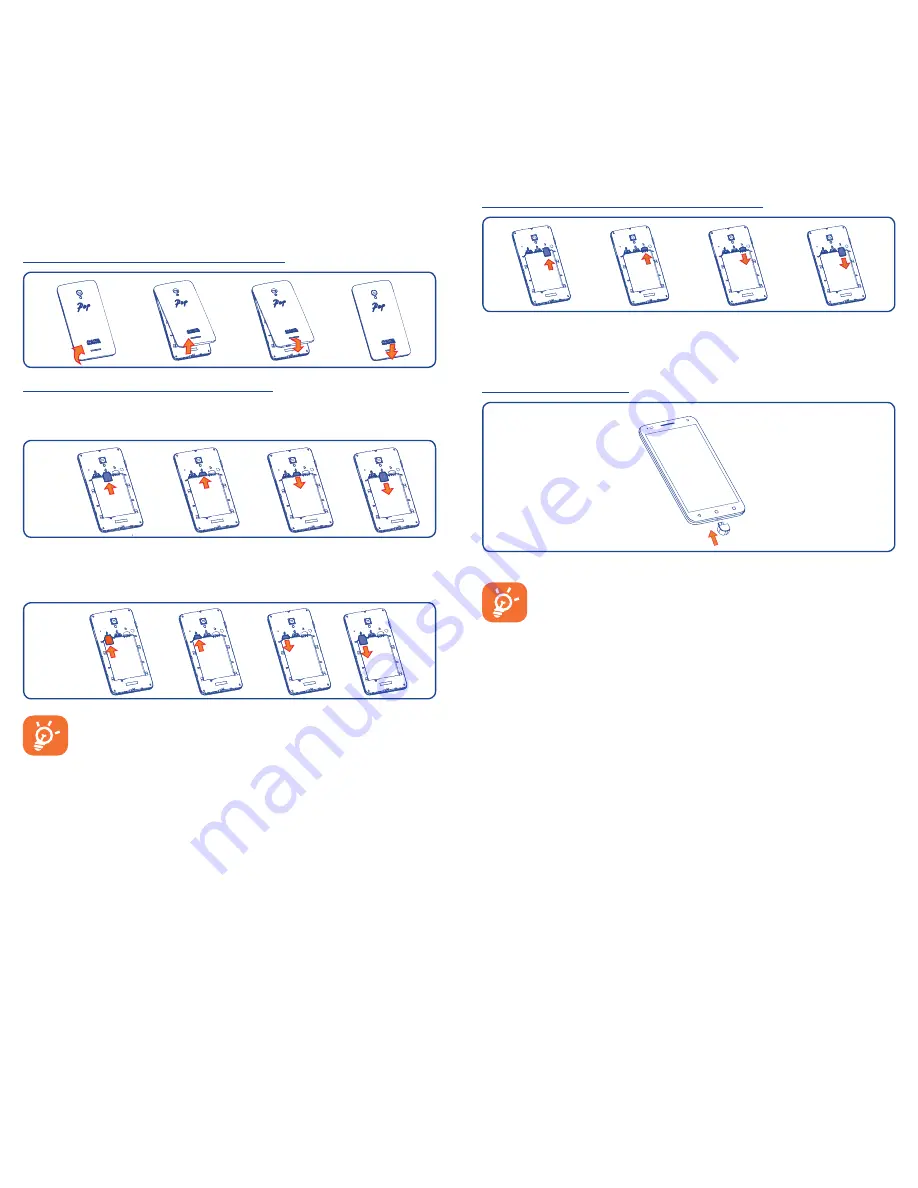
Installing or removing the microSD card

To install, insert the microSD card first, and then place it into the slot 
with the gold contact facing down. To remove the external microSD 
card, slide and take it out from the slot.

Charging the battery

Connect battery charger to your phone and plug into the socket.


If the battery is very low, there will be no indication that 
power is being received until the charge is sufficient to show 
the charging status bar. To reduce power consumption and 
energy waste, once the battery is fully charged, disconnect 
your charger from the plug; switch off Wi-Fi, GPS, Bluetooth 
or background-running applications when not in use; reduce 
the backlight time, etc.

1�2 

Getting started

1�2�1 

Set up

Removing or installing the back cover

Inserting or removing the SIM card 

You must insert your SIM card to make phone calls. Power off your 
phone before inserting or removing the SIM card.

SIM1

Place the SIM card with the chip facing downwards and slide it into 
its housing. Make sure that it is correctly inserted. To remove the 
card, press and slide it out.

SIM2 

(1)


For dual SIM models, both SIM1 and SIM2 can support 2G 
and 3G networks. If both of them are 3G SIM cards, only one 
card can support 3G network 

(1)

. Your phone only supports 

micro-SIM card. Do not attempt to insert other SIM types 
like mini and nano cards, otherwise you may damage your 
phone.

(1)

  5022D only.

Summary of Contents for ONE TOUCH 5022D

Page 1: ...ing even if you are not making a phone call English CJB1DH2ALAAA Quick Start Guide For more information about how to use your phone please visit www alcatelonetouch com to download the complete user m...

Page 2: ...media volume In general mode adjusts the ringtone volume Mutes the ringtone of an incoming call Volume up Volume down Camera Flash Torch Power key Recents key Recent apps Touch to open a list of thum...

Page 3: ...i GPS Bluetooth or background running applications when not in use reduce the backlight time etc 1 2 Getting started 1 2 1 Set up Removing or installing the back cover Inserting or removing the SIM ca...

Page 4: ...phone you should set the following options Language Google account etc Even if no SIM card is installed your phone will still power on and you will be able to connect to a Wi Fi network 1 2 3 Power o...

Page 5: ...cted via USB cable USB tethering is on System update available Portable Wi Fi hotspot is on Operator data use threshold approaching or exceeded More notifications are hidden Status icons GPRS connecte...

Page 6: ...tion Touch Settings on the applications screen then touch Display Wallpaper to customise wallpaper 1 3 5 Volume adjustment You can set the ringer media and phone ringtone volumes to your preference by...

Page 7: ...lications you can touch the Recents key Touch a thumbnail in the window to open the related application Touch one thumbnail and slide left or right to delete it 2 Text input 2 1 Using Onscreen Keyboar...

Page 8: ...touching RECENTS tab from the Phone screen to see Missed calls Outgoing calls and Incoming calls 3 Phone call 3 1 Placing a call To make a call when the phone is active go to the Home screen and touc...

Page 9: ...s and sounds to other compatible phones and email addresses An SMS will be converted to MMS automatically when media files image video audio slides etc are attached or Subject or email addresses added...

Page 10: ...sides your Gmail account you can also set up external POP3 or IMAP email accounts in your phone To open Email go to the Home screen and touch the Email icon in the Favourites tray An email setup wizar...

Page 11: ...er the address of the web page and then confirm 7 3 Connecting to a computer With the USB cable you can transfer media files and other files between micro SD card internal storage and a computer Befor...

Page 12: ...e phone will erase all of your personal data from internal phone storage including information about your Google account any other accounts your system and application settings and any downloaded appl...

Page 13: ...ld turn on data connection or Wi Fi before searching for updates Settings for auto check frequency is also available once you restart the phone If you have chosen auto check when the system discovers...

Page 14: ...comfort in your hands arms shoulders neck or other parts of your body Follow the instructions to avoid problems such as tendinitis carpal tunnel syndrome or other musculoskeletal disorders Safety and...

Page 15: ...under the ICNIRP guidelines for this device model are PROTECTYOUR HEARING To prevent possible hearing damage do not listen at high volume levels for long periods Exercise caution when holding your dev...

Page 16: ...dit or delete your personal data we may ask you to provide us with evidence of your identity before we can act on your request 5022X 5022D Maximum SAR for this model and conditions under which it was...

Page 17: ...son from using it even with a different SIM card 1 Contact your network operator to check service availability LICENCES microSD Logo is a trademark The Bluetooth word mark and logos are owned by the B...

Page 18: ...ommunication shall not be held legally responsible for such differences if any nor for their potential consequences which responsibility shall be borne by the operator exclusively This handset may con...

Page 19: ...cting at a later time or another location Your phone will not be repaired in case labels or serial numbers IMEI have been removed or altered There are no express warranties whether written oral or imp...

Page 20: ...d files Check your subscription status with your operator Invalid SIM card Make sure the SIM card has been correctly inserted see Inserting or removing the SIM card Make sure the chip on your SIM card...

Page 21: ...ual demand or increase their auto check interval Exit background running applications if they are not being used for a long time Deactivate Bluetooth Wi Fi or GPS when not in use The phone will become...

Reviews: