background image

............................................................................................................................................................................................................................................................

LAN Setting

Network

6-2

 3EQ-10422-AAAA-TCZZA

Edition 01 February 2011

............................................................................................................................................................................................................................................................

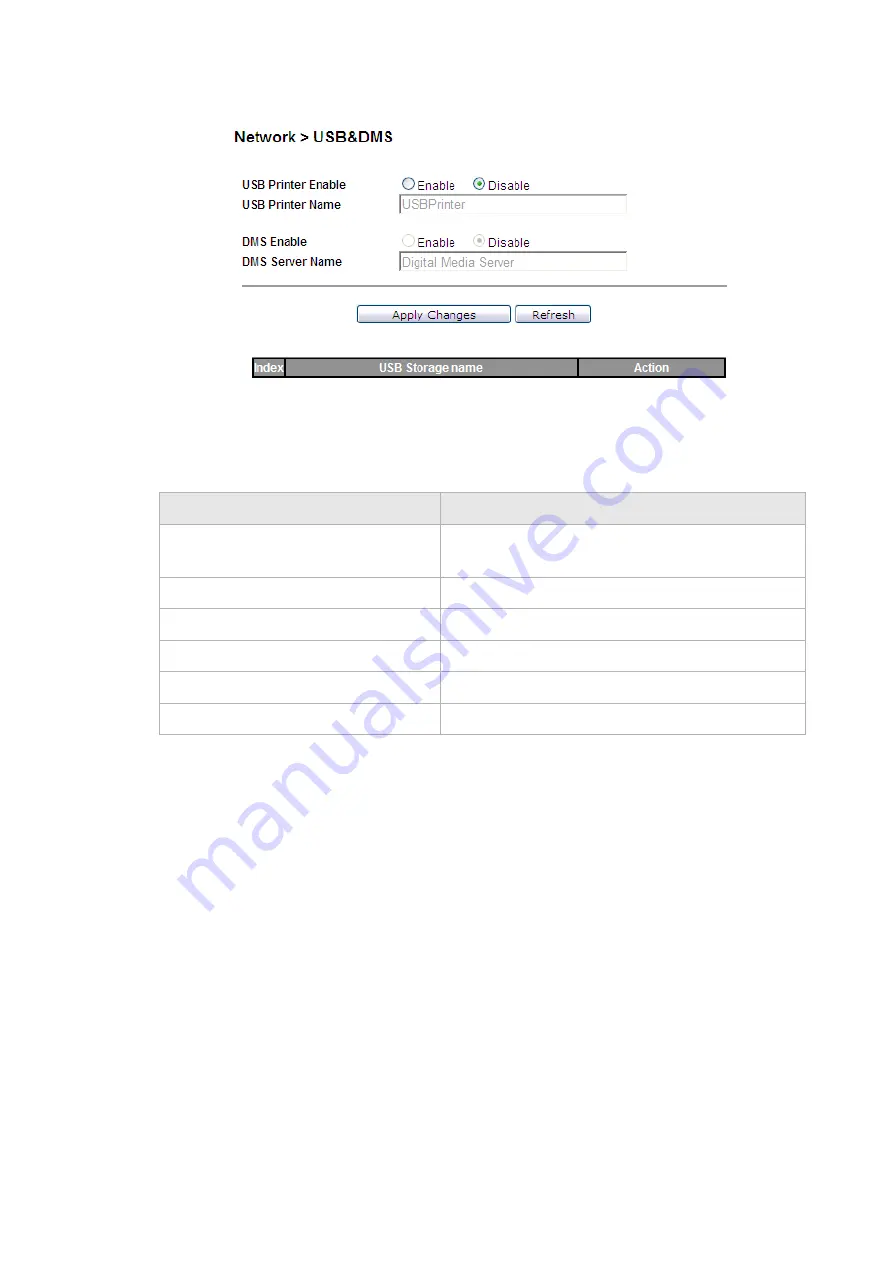
Figure 6-1 USB window

Table 6-1

 describes the fields of the USB window.

Table 6-1 Field descriptions

LAN Setting

The LAN Settings include the IP address, subnet mask, DHCP settings, DHCP relay, and 
static IP lease.

Select 

LAN Setting

 in the 

Network

 menu to access the LAN Setting window; see 

Figure 6-2

.

Field

Description

USB Printer Enable

Click the radio button to enable or disable USB 
Printer.

USB Printer Name

Enter a USB printer name.

DMS Enable

Click the radio button to enable or disable DMS.

DMS Server Name

Enter a DMS Server name.

Apply Changes

Click to save your changes.

Refresh

Click to refresh the state of USB device.

Summary of Contents for CellPipe 7130

Page 1: ...CellPipe 7130 Residential Gateway 6Ve A4111 6Vz A4111 Release 01 USER GUIDE 3EQ 10422 AAAA TCZZA EDITION 01 FEBRUARY 2011...

Page 2: ...suant to Europe CE CB FCC and Canadian These limits of different regulations are designed provide reasonable protection against harmful interference or damage in a residential installation Security st...

Page 3: ...document introduces the CellPipe 7130 RG 6Ve A4111 and 6Vz A4111 hardware connections and setup It also covers the Web configuration interface and provides parameter definitions for the fields on thos...

Page 4: ...onal injury symbol Indicates the potential for personal injury optional 2 Hazard type symbol Indicates hazard type optional 3 Signal word Indicates the severity of the hazard 4 Hazard type Describes t...

Page 5: ...ress and phone number for information on obtaining service or repairs Alcatel Lucent 600 700 Mountain Avenue Murray Hill NJ 07974 1 908 508 8080 Signal word Meaning DANGER Indicates an imminently haza...

Page 6: ...About this document iv 3EQ 10422 AAAA TCZZA Edition 01 February 2011...

Page 7: ...onfiguration 4 Accessing the CellPipe 7130 RG web configuration tool To access the CellPipe 7130 RG web configuration tool 4 1 5 Status System Usage 5 1 WAN PTM Status 5 3 DSL Link Status 5 4 Device T...

Page 8: ...3 Dynamic DNS 9 4 System Log 9 5 IGMP Proxy Snooping 9 6 802 1x Config 9 7 10 QoS PTM Setup QoS Overview 10 1 QoS Scheduler 10 2 QoS Policy 10 4 QoS Phone 10 7 QoS ALG 10 9 QoS Defaults 10 11 QoS MAC...

Page 9: ...ccount Line Table 12 11 Call History 12 11 Other Settings 12 12 13 USB Service File sharing 13 1 Printer Server 13 4 14 FCC and IC Statement Federal Communication Commission Interference Statement 14...

Page 10: ...Contents 4 3EQ 10422 AAAA TCZZA Edition 01 February 2011...

Page 11: ...This CellPipe 7130 RG supports Ethernet over VDSL2 using one Ethernet data link that is rated up to 100 Mb s symmetrically With its bridge functionality it can connect to any device equipped with a 10...

Page 12: ...tronic product unless our customer engineers or your ISP instructs you to do so incorrect connections may cause fires Do not place the CellPipe 7130 RG on an unstable surface or support Do not place h...

Page 13: ...indows 2000 Windows NT Windows ME Windows XP Microsoft Vista Windows 7 or Mac OS Internet Explorer v4 0 or higher Netscape v4 0 or higher or Mozilla Firefox v1 5 or higher Note For optimal display qua...

Page 14: ...to any HPNA device WLAN On Wireless function is enabled Flashing Data is being transmitted on the wireless link Off Wireless function is disabled WPS On WPS is enabled Off WPS is disabled LAN 1 to 4 O...

Page 15: ...duct overview 3EQ 10422 AAAA TCZZA Edition 01 February 2011 1 5 Figure 1 2 Rear panel of 6Vz A4111 Figure 1 3 Rear panel of 6Ve A4111 Table 1 2 Rear panel items Item Description Wireless Antenna Anten...

Page 16: ...Four RJ 45 ports to connect up to four PCs or Hub USB Port 1 to 2 Support USB 2 0 file sharing and printer server HPNA interface Only for 6Vz A4111 One HPNA interface to connect to a HPNA device Phon...

Page 17: ...Anchors Screws Drill Drill bit 1 Locate a high position on the wall that is free of obstructions 2 Connect two screws in the wall 5 cm 2 in apart Do not screw the screws all the way into the wall Impo...

Page 18: ...side of the CellPipe 7130 RG and then place it on a desk so that LEDs are visible To install the CellPipe 7130 RG Supplies CellPipe 7130 RG RJ 11 telephone cable Two RJ 45 category 5 Ethernet cable P...

Page 19: ...d the other end to your telephone DSL service connection 3 Connect one end of the RJ 45 Ethernet cable to one of the Ethernet LAN port 1 to 4 on the CellPipe 7130 RG and the other end to the ethernet...

Page 20: ...To install the CellPipe 7130 RG Hardware installation 2 4 3EQ 10422 AAAA TCZZA Edition 01 February 2011...

Page 21: ...radio button 6 Select the Obtain DNS server address automatically radio button 7 Click OK to save the settings E N D O F S T E P S Windows Vista 1 Open Network and sharing Center from the Control Pan...

Page 22: ...o button 5 Select the Obtain DNS server address automatically radio button 6 Click OK to save the settings E N D O F S T E P S Windows NT 1 Open Network from the Control Panel 2 From the Protocol tab...

Page 23: ...cedure to access the web configuration interface of the CellPipe 7130 RG The configuration interface enables you to secure the CellPipe 7130 RG limit access set traffic routes modify passwords and cha...

Page 24: ...ress and subnet mask please refer to the TCP IP Appendix or the Quick Installation Guide for more information Procedure 1 Open a web browser and type in the IP address of the CellPipe 7130 RG in the a...

Page 25: ...ged in for the first time you should change your login password See the System Setting section in the Utilities chapter for instructions E N D O F S T E P S Configuration menus All configuration and m...

Page 26: ...To access the CellPipe 7130 RG web configuration tool Accessing the CellPipe 7130 RG web configuration tool 4 4 3EQ 10422 AAAA TCZZA Edition 01 February 2011...

Page 27: ...to open the Status menu Contents This chapter covers the following topics System Usage The System Usage window displays the current status of the software system time memory WAN connection and LAN con...

Page 28: ...rmware Version The current version of the firmware Release Date The release date of the firmware System Usage System Up Time The amount of time the system has been operational System Loading Average T...

Page 29: ...ss The IP address of the LAN interface LAN NetMask The subnet mask of the LAN interface LAN MAC The MAC address of the LAN interface DHCP Enable The status of the LAN DHCP WLAN MAC The WLAN MAC addres...

Page 30: ...on status and data Select DSL Link Status in the Status menu to access the DSL Link window see Figure 5 3 Figure 5 3 DSL Link Status window Table 5 3 describes the fields of the DSL Link Status window...

Page 31: ...s This is the maximum achievable downstream rate Rate Kbps The actual rate at which data is flowing in both directions MSGc of bytes in overhead channel message Number of bytes in overhead channel mes...

Page 32: ...ber of super frames received that had errors RS Words This is the total number of Reed Solomon code words RS Correctable Errors The number of Reed Solomon code words with correctable errors RS Uncorre...

Page 33: ...CP Lease Table see Figure 5 5 Figure 5 5 DHCP Lease window Table 5 5 describes the fields of the DHCP Lease Table window Table 5 5 Field descriptions Field Description Host Name The name of the device...

Page 34: ...ield descriptions WAN W LAN Statistics The WAN W LAN Statistics window displays the number of bytes that have been received or transmitted by the WAN LAN and WLAN interfaces Select WAN W LAN Statistic...

Page 35: ...ield descriptions Field Description RX bytes The number of bytes that have been received RX Packets The number of packets that have been received RX Errors The number of packets that have been receive...

Page 36: ...the IGMP membership window Table 5 8 Field descriptions IGMP Statistic The IGMP Statistic shows the IGMP Internet Group Membership Protocol Statistic TX Errors The number of packets that have been tr...

Page 37: ...ess the IGMP Membership windows see Figure 5 9 Figure 5 9 IGMP Statistic window Table 5 9 describes the IGMP Statistic window Table 5 9 Field descriptions Field Description Period Select a time period...

Page 38: ...IGMP Statistic Status 5 12 3EQ 10422 AAAA TCZZA Edition 01 February 2011...

Page 39: ...e 7130 RG from the Network menu Click the Network drop down menu to open the Network menu Contents This chapter covers the following topics USB The USB window enables you to configure the USB storage...

Page 40: ...ngs DHCP relay and static IP lease Select LAN Setting in the Network menu to access the LAN Setting window see Figure 6 2 Field Description USB Printer Enable Click the radio button to enable or disab...

Page 41: ...ndow Table 6 2 describes the fields of the LAN Setting window Table 6 2 Field descriptions Field Description IP Address The IP address of the LAN interface in dotted decimal notation The default is 19...

Page 42: ...AC based binding No LAN WLAN binding The four following types of connections can be used Static IP DHCP Mode PPPoE Mode Bridge Mode Subnet Mask The subnet mask of the IP addresses in your LAN for exam...

Page 43: ...M Connection window Table 6 3 Field descriptions Field Description Interface Name Enter an appropriate name for your new connection Mode Click the drop down menu and select either Static IP DHCP PPPoE...

Page 44: ...already have a connection with Port based binding you can not select MAC based binding for any other connections The following WAN modes support port based binding Static IP DHCP PPPoE Bridge Static I...

Page 45: ...LAN Binding Select Lan port HPNA Only for 6Vz A4111 port and WLAN port to bind the connection Wan Untagged Select this option if VLAN ID is not being used Always Use ID Select this option if VLAN ID...

Page 46: ...Figure 6 5 Options MTU Select Auto to set the maximum transfer unit to the default 1500 or select Manual to manually enter a value Next Click to go to next step Back Click to go back to previous page...

Page 47: ...Field descriptions Field Description LAN Binding Select LAN port HPNA Only for 6Vz A4111 port and WLAN port to bind the connection WAN Untagged Select this option if VLAN ID is not being used Always...

Page 48: ...rmation Vender Class ID Client ID You may also need to set the Client ID or Vender Class ID to obtain its lease from the DHCP server Please consult with your ISP for more information MTU Bytes Enable...

Page 49: ...able 6 6 Field descriptions Fields Description LAN Binding Select LAN port HPNA Only for 6Vz A4111 port and WLAN port to bind the connection WAN Untagged Select this option if VLAN ID is not being use...

Page 50: ...he specified period Max idle time the gateway will disconnect the connection Always on Select this option to let the gateway always connected to the Internet Manual Select and then click Connect to ma...

Page 51: ...for 6Vz A4111 port and WLAN port to bind the connection WAN Untagged Select this option if VLAN ID is not being used Always Use ID Select this option if VLAN ID is used and enter the VLAN ID number b...

Page 52: ...on for each WAN mode and then click Add to enter the next configuration window You can set a maximum of 20 connections in MAC based binding Note If you already have a connection with MAC based binding...

Page 53: ...fault After you have a default rule you can choose the other options For example you can select DHCP Option 60 Ethernet Type Source MAC or Destination MAC DHCP Option 60 Select the radio button and en...

Page 54: ...02 1x Please consult your ISP for more information Host Name Enter the host name provided by your ISP Please consult with your ISP for more information Domain Name Enter the domain name provided by yo...

Page 55: ...you have a default connection you can choose the WAN Mode you want and click Add to add a new connection You can only choose Bridge mode with MAC based binding Click Add to set the configurations Bri...

Page 56: ...rule you can choose the other options For example you can select DHCP Option 60 Ethernet Type Source MAC or Destination MAC DHCP Option 60 Select the radio button and enter the applicable alphanumeric...

Page 57: ...verview table VLAN Select Untagged if VLAN tagging is not to be used for this WAN connection Select Always use ID if VLAN tagging is to be used and enter the VLAN ID number between 0 and 4094 CoS Rema...

Page 58: ...inding No LAN WLAN binding enables you to configure your connection with local service CWMP and VoIP In order to avoid other connections using CWMP and VoIP No LAN WLAN Binding is specifically for CWM...

Page 59: ...not being used Always Use ID Select this option if VLAN ID is used and enter the VLAN ID number between 2 and 4094 IP Address Enter the IP address provided by your ISP NetMask Enter the subnet mask p...

Page 60: ...is option if VLAN ID is not being used Always Use ID Select this option if VLAN ID is used and enter the VLAN ID number between 2 and 4094 802 1x Select Enable to enable 802 1x or select Disable to di...

Page 61: ...re 6 14 PPPoE Mode settings window with No LAN WLAN Binding Table 6 12 describes the fields of PPPoE Mode setting window with No LAN WLAN Binding Table 6 12 Field descriptions MTU Bytes Enable Auto to...

Page 62: ...ion Mode Connect on demand Max idle time Select this option to let the gateway connect to Internet only when your trying to access it If there are no activities in the specified period Max idle time g...

Page 63: ...dow Table 6 13 Field descriptions Field Description QoS Classification Queue Original ToS Tag First 3 bits of DSCP Select Original ToS Tag to assign the queue according to the ToS value of the packet...

Page 64: ...d enter a DSCP value 0 to 63 CoS p bit Remarking Keep CoS Value Select Keep CoS Value to retain the original CoS value New CoS Value Select New CoS Value to assign CoS for network traffic Align CoS wi...

Page 65: ...setup menu Click the WiFi Setup drop down menu to open the WiFi Setup menu Contents This chapter covers the following topics WiFi Setting The WiFi Setting window enables you to configure the common wi...

Page 66: ...ble 7 1 describes the fields of the WiFi Setting window Table 7 1 Field descriptions Field Description Common WiFi Select Enable to turn wireless on and configure the wireless settings Or select Disab...

Page 67: ...t messages Bandwidth Click the drop down menu and select either 20 40Mhz or 20Mhz as the transmitting frequency for 802 11n Select 20 40Mhz can provide double the data transmitting rate of 20Mhz Exten...

Page 68: ...ty window see Figure 7 2 Figure 7 2 WiFi Security window Table 7 2 describes the fields of the WiFi Security settings window Table 7 2 Field descriptions Notes 1 If you enable WDS check that all other...

Page 69: ...sisting of 8 to 63 alphanumeric characters and click Generate Key 1 to 4 Select either Key1 Key2 Key3 Key4 Enter a WEP key in the respective field The WEP key must contain letters from A to F and numb...

Page 70: ...iFi Access in the WiFi Setup menu to access the WiFi Access Filter window see Figure 7 3 Figure 7 3 WiFi Access Filter window Table 7 3 describes the fields of the WiFi Access Filter window Table 7 3...

Page 71: ...Fi Access Filter WiFi Setup 3EQ 10422 AAAA TCZZA Edition 01 February 2011 7 7 MAC 1 to 32 Enter up to 32 MAC addresses to control their access Apply Changes Click to save your changes Field Descriptio...

Page 72: ...WiFi Access Filter WiFi Setup 7 8 3EQ 10422 AAAA TCZZA Edition 01 February 2011...

Page 73: ...u to control the incoming requests from the Internet to pass through the port to your local computer and acts as a gateway to pass your service request using a different port or port range other than...

Page 74: ...window see Figure 8 1 Figure 8 1 Port Forwarding window Table 8 1 describes the fields of the Port Forwarding window Table 8 1 Field descriptions Field Description Name Enter a name for the applicati...

Page 75: ...red for certain applications It is recommended that you contact your ISP for assistance Select Demilitarized Zone in the Firewall Setup menu to access the demilitarized zone window see Figure 8 2 Port...

Page 76: ...soles to function properly using NAT See Table 8 3 below Note It is recommended that you contact your ISP for assistance Field Description Demilitarized Zone DMZ Select Enable to turn on the demilitar...

Page 77: ...access the Layer 2 Filter window see Figure 8 4 Field Description UPnP Select Enable to enable the UPnP function Select Disable to disable the UPnP function UPnP Log Select Enable to enable the loggin...

Page 78: ...yer 2 Filter window Table 8 4 describes the fields of the Filter window Table 8 4 Field descriptions Field Description Filter Policy Select the policy for filters Allow Deny Disable Ethernet Type Sele...

Page 79: ...elds of the Filter window Table 8 5 Field descriptions Source Mac Address 1 to 10 Select and then enter the source MAC address of the device Destination Mac Address 1 to 10 Select and then enter the d...

Page 80: ...ocol s used by this application TCP UDP Both Port Type Select Dest destination or Source depending on the type of application Starting Port Ending Port Enter the range of the ports used by this applic...

Page 81: ...to access specific websites Select URL Blocking in the Firewall Setup menu to access the URL Blocking window see Figure 8 7 Field Description IPSec Passthrough Select Enable to allow IPSec passthroug...

Page 82: ...n the website content and content screening is enabled firewall will block user from accessing this website Select Content Screening in the Firewall Setup menu to access the Content Screening window s...

Page 83: ...their contents Select Disable to disable content screening Key Words Enter a keyword you are blocking If the keyword is too general you might inadvertently block other websites Type in only one keywo...

Page 84: ...k Select Parental Control in the Firewall Setup menu to access the Parental Control window see Figure 8 9 Figure 8 9 Parental Control window Table 8 9 describes the fields for the Parental Control win...

Page 85: ...ntrol Firewall Setup 3EQ 10422 AAAA TCZZA Edition 01 February 2011 8 13 Time Enter a time period in hours and minutes to limit the Internet connection Add Click to add rule in Parental control Field D...

Page 86: ...Parental Control Firewall Setup 8 14 3EQ 10422 AAAA TCZZA Edition 01 February 2011...

Page 87: ...d Setup drop down menu to open the Advanced Setup menu Contents This chapter covers the following topics Route Setting The Route Setting window enables you to configure static and dynamic routes for r...

Page 88: ...IP address of the destination network IP Netmask Select the subnet mask of the destination network Gateway Enter the IP address of the gateway for the destination network Metric In order to determine...

Page 89: ...9 2 describes the fields of the Dynamic DNS window Table 9 2 Field descriptions Dynamic Route WAN Select Enable to use dynamic routing instead of static Dynamic routing enables the router to adapt to...

Page 90: ...providers see DynDNS org or ChangeIP com Click on Dynamic DNS in the Advanced Setup menu to access the dynamic DNS window see Figure 9 3 Figure 9 3 Dynamic DNS window Table 9 3 describes the fields of...

Page 91: ...m Log window Table 9 4 Field descriptions Field Description Log Size Lines Select the number of lines to display in your log Remote Logging Select LAN or WAN for the remote logging server Select Disab...

Page 92: ...orting which enable LAN side user to receive multicast traffic Click on IGMP Settings in the Advanced Setup menu to access the system log window see Figure 9 5 Figure 9 5 IGMP Proxy Snooping window Ta...

Page 93: ...nced Setup menu to access the 802 1x Config window see Figure 9 6 Figure 9 6 802 1x Config window Table 9 6 describes the fields of the 802 1x Config window Table 9 6 Field descriptions Field Descript...

Page 94: ...802 1x Config Advanced Setup 9 8 3EQ 10422 AAAA TCZZA Edition 01 February 2011 Apply Changes Click to save your changes Field Description...

Page 95: ...a flows Click the QoS PTM Setup drop down menu to open the QoS PTM Setup menu Contents This chapter covers the following topics QoS Overview The QoS overview window allows you to see all current QoS s...

Page 96: ...ription Precedence The Precedence presents the priority of each QoS rule Precedence 1 is the highest priority Source IP address of source host Destination IP address of destination host Protocol The p...

Page 97: ...ype The QoS scheduler type is either Strict Priority Strict Priority scheduling delivers high priority 7 Urgent queue is the highest traffic first and then lower priority traffic when higher ones are...

Page 98: ...port Select QoS Policy in the QoS PTM Setup menu to access the QoS Policy window see Figure 10 3 4 Low Specify the minimum and maximum bandwidth for the Low queue 3 Premium Specify the minimum and max...

Page 99: ...ition 01 February 2011 10 5 Figure 10 3 QoS Policy window Table 10 3 describes the fields of the QoS Policy window Table 10 3 Field descriptions Field Description Source IP Address Select the radio bu...

Page 100: ...nter a queue number 0 to 7 to assign to the incoming traffic ToS DSCP Remarking Select one of the following Keep Original ToS DSCP to retain the original value New ToS Value and enter a queue number 0...

Page 101: ...otocol The protocol type for this QoS policy Priority The priority queue 0 to 7 used by the traffic CoS CoS value of the QoS policy ToS DSCP ToS DSCP marking setting for incoming traffic Change Preced...

Page 102: ...hone window Table 10 4 Field descriptions Field Description SIP Sessions Check DSCP Value Diffserv Code Point and enter a DSCP value 0 to 63 Check CoS class of service and set a value RIP Sessions Che...

Page 103: ...ay ALG window enables you to configure the session initiated protocol SIP and the real time transport protocol RTP SIP is used by VoIP and RTP is the protocol for transferring real time data such as i...

Page 104: ...QoS ALG QoS PTM Setup 10 10 3EQ 10422 AAAA TCZZA Edition 01 February 2011 Figure 10 5 QoS ALG window...

Page 105: ...s Tag type of service to assign the queue according to the incoming Tos value Specified Queue Select Specified Queue and enter a queue number 0 to 7 to assign to the incoming traffic Keep Original ToS...

Page 106: ...Field Description Interface Select a WAN connection to configure its default QoS policy Original Tos Tag First 3 bits of DSCP Select Original Tos Tag type of service to assign the queue according to...

Page 107: ...in the original value New Cos Value Select New Cos Value to set a new CoS class of service value for incoming traffic Align Cos with Tos Value Select Align Cos with Tos value to assign CoS class of se...

Page 108: ...s of the QoS ALG window Table 10 7 Field descriptions Field Description Bridge Destination MAC Address Specify the MAC address of QoS service user Queue Specify which queue 0 7 will be assigned for th...

Page 109: ...Configuration Backup window enables you to backup your configuration of the CellPipe 7130 RG to a file and stored it on your computer Select Configuration Backup in the Utilities menu to access the C...

Page 110: ...uration Configuration Restore The Configuration Restore window enables you to restore your configuration of the CellPipe 7130 RG from a backup file Select Configuration Restore in the Utilities menu t...

Page 111: ...G Do not turn off the power or disturb the system during firmware upgrade Select Firmware Upgrade in the Utilities menu to access the Firmware Upgrade window see Figure 11 3 Figure 11 3 Firmware Upgra...

Page 112: ...d that you change the administrator s default username and password and the Telnet default username and password for telnet Select System Setting in the Utilities menu to access the System Setting win...

Page 113: ...Edition 01 February 2011 11 5 Figure 11 4 System Setting window Table 11 3 describes the fields of the System Setting window Table 11 3 Field descriptions Field Description GUI Setting Administrator...

Page 114: ...e first time the root password is changed the default root password is admin Root New Password Enter a new password Root Password Confirmation Retype the new password to confirm Date Time Setting Loca...

Page 115: ...gement Access window see Figure 11 5 Figure 11 5 Management Access Control window Table 11 4 describes the fields of the Management Access window Table 11 4 Field descriptions Field Description HTTP A...

Page 116: ...gement window see Figure 11 6 Figure 11 6 CWMP Management window Table 11 5 describes the fields of the CWMP Management window Table 11 5 Field descriptions Firewall Stealth Mode Select Enable to allo...

Page 117: ...the auto configuration server Select Disable not to send the information to the auto configuration server Inform Message Interval s Enter an interval of sending inform message in seconds Connection R...

Page 118: ...enabled Then you can use this Utility to uploaded a CA that will be used to authenticate with your ISP and get DHCP service Select 802 1x CA Upload in the Utilities menu to access the 802 1x CA Uploa...

Page 119: ...e CellPipe 7130 RG Select Restore Factory Defaults in the Utilities menu to access the Restore Factory Defaults window see Figure 11 9 Figure 11 9 Restore Factory Defaults window Click on Restore Defa...

Page 120: ...Reboot Gateway window enables you to reboot the CellPipe 7130 RG Rebooting the gateway does not reset your settings Select Reboot Gateway in the Utilities menu to access the Reboot Gateway window see...

Page 121: ...s Account Setup Your VoIP account settings can be configured here Note Some account information such as the phone number and username is provided by your VoIP service provider Please have all the prov...

Page 122: ...2 AAAA TCZZA Edition 01 February 2011 Figure 12 1 Account Setup window Table 12 1 describes the fields of the Account Setup window Table 12 1 Field descriptions Field Description Configuration of Acco...

Page 123: ...splay name for the account User Name Enter the user name for the account Authentication User Name Enter the account s username Authentication Password Enter the username s password Don t Disturb Check...

Page 124: ...Service Settings Telephony 12 4 3EQ 10422 AAAA TCZZA Edition 01 February 2011 Figure 12 2 Service Settings window...

Page 125: ...as your MWI method Unsolicited Notify The RG is able to receive unsolicited message wait NOTIFY messages No SUBSCRIBE is used Solicited Subscribe Notify The RG will initiate a SUBSCRIBE NOTIFY dialogu...

Page 126: ...umber of seconds as the minimal session expire This value will be the minimum refresh timer you can accept from the caller Refresh Method Select INVITE or UPDATE from the drop down menu This will be t...

Page 127: ...Call Forwarding service Interrogate The interrogate code for your Unconditional Call Forwarding service On Busy Service Code Activate The activation code for your On Busy Call Forwarding service Deac...

Page 128: ...P registration server Outbound Proxy Enter the location of the outbound proxy server Outbound Proxy Port Enter the port number of the outbound proxy server Register Expires Enter the number of seconds...

Page 129: ...tings The RTP Codecs settings window allows you to setup the codecs and ports for your voice traffic Select RTP Codecs settings in the Telephony menu to access the RTP Codecs window see Figure 12 4 Fi...

Page 130: ...x message Rate Management Select the data rate management method Local data rate management requires that the training signal be generated locally Network data rate management requires that the traini...

Page 131: ...riptions Call History The Call List window displays the call statistics and call log of your VoIP accounts Select Call History in the Telephony menu to access the Call History window see Figure 12 6 F...

Page 132: ...ndow allows you to change the profile for various countries in order for that country s telephone to operate Select Other Settings in the Telephony menu to access the Other Setting window see Figure 1...

Page 133: ...ntry from the list It will change ring cadence impedance and DC feed settings to meet the requirements of that country You must reboot the CellPipe 7130 RG for changes to take effect DTMF Only one pro...

Page 134: ...Other Settings Telephony 12 14 3EQ 10422 AAAA TCZZA Edition 01 February 2011...

Page 135: ...USB storage devices Use one of the procedures to configure USB file sharing Access the USB device directly from a browser Access the USB device by setting a Network device Access the USB device direc...

Page 136: ...changed by user configuration E N D O F S T E P S Access the USB device by setting a Network device The following procedures explain how to access the USB device by setting a Network device using Wind...

Page 137: ...File sharing E N D O F S T E P S Mac OS 1 Plug the USB storage device into the CellPipe 7130 RG USB port 2 Open Network from the Control Panel named Go 3 Access the USB device by clicking on the devi...

Page 138: ...intranet 6 Enter the URL of the printer using the following format http Gateway_IP_address Printserver_port printers share_name Here are the explanation for each field Gateway_IP_address see Table 6 2...

Page 139: ...Printer Server USB Service 3EQ 10422 AAAA TCZZA Edition 01 February 2011 13 5 Figure 13 3 Printer setting on Mac E N D O F S T E P S...

Page 140: ...Printer Server USB Service 13 6 3EQ 10422 AAAA TCZZA Edition 01 February 2011...

Page 141: ...this equipment does cause harmful interference to radio or television reception which can be determined by turning the equipment off and on the user is encouraged to try to correct the interference by...

Page 142: ...o be certain of the number of devices that may be connected to a line as determined by the total RENs contact the local telephone company For products approved after July 23 2001 the REN for this prod...

Page 143: ...o compliant See installation instructions for details Industry Canada statement This device complies with RSS 210 of the Industry Canada Rules Operation is subject to the following two conditions 1 Th...

Page 144: ...f Conformity indicating that Industry Canada technical specifications were met It does not imply that Industry Canada approved the equipment NOTICE The Ringer Equivalence Number REN for this terminal...

Page 145: ...device to the vendor VDSL Link LED flashes slowly after connection is established then it quickly stats to flash slowly again The DSL port on the gateway or the cable might be defective Switch the pow...

Page 146: ...that a firmware upgrade is in progress Wait until the firmware upgrade is finished Intenet LED is off Your CellPipe 7130 RG is unable to connect to the Internet or CellPipe 7130 RG is not power on Ve...

Page 147: ...ions or the reference levels related to human exposure to radio frequency electromagnetic fields 110MHz 40 GHz General public EN 300 328 V1 7 1 2006 10 Electromagnetic compatibility and Radio spectrum...

Page 148: ...hould apply for a license at the national spectrum authorities in order to obtain authorization to use the device for setting up outdoor radio links and or for supplying public access to telecommunica...

Page 149: ...ntly share the same physical network link without leakage of information between networks A ACS Auto Configuration Server ALG Application Level Gateway AP Access Point API Application Programming Inte...

Page 150: ...system in response to a change in conditions E Ethernet A family of frame based computer networking technologies for local area networks LANs F Firewall An integrated collection of security measures...

Page 151: ...lation Netmask The designated IP address routing prefix for a network of computers and devices NIC Network Interface Controller NTP Network Time Protocol O OUI Organizationally Unique Identifier Outbo...

Page 152: ...handles voice data transfer making VOIP call using SIP S SSH Secure Shell SIP Session Initiation Protocol an application layer control protocol that handles the setting up altering and tearing down of...

Page 153: ...DSL Very High Bitrate Digital Subscriber Line VLAN Virtual Local Area Network VoIP Voice over Internet Protocol W WAN Wide Area Network WDS Wireless Distribution System WEP Wired Equivalent Privacy Wi...

Page 154: ...Glossary GL 6 3EQ 10422 AAAA TCZZA Edition 01 Frbruary 2011...

Reviews: