Alburraq vs200 User Manual Download Page 14

7Tech (www.alburraq.com)VS200 User Manual 

1

1

0

0


C

C

a

a

l

l

l

l


+

+

9

9

7

7

1

1

5

5

5

5

5

5

1

1

1

1

7

7

2

2

7

7

3

3


w

w

w

w

w

w

.

.

a

a

l

l

b

b

u

u

r

r

r

r

a

a

q

q

.

.

c

c

o

o

m

m


i

i

n

n

f

f

o

o

@

@

a

a

l

l

b

b

u

u

r

r

r

r

a

a

q

q

.

.

c

c

o

o

m

m

,

,


w

w

w

w

w

w

.

.

f

f

a

a

c

c

e

e

b

b

o

o

o

o

k

k

.

.

c

c

o

o

m

m

/

/

a

a

l

l

b

b

u

u

r

r

r

r

a

a

q

q


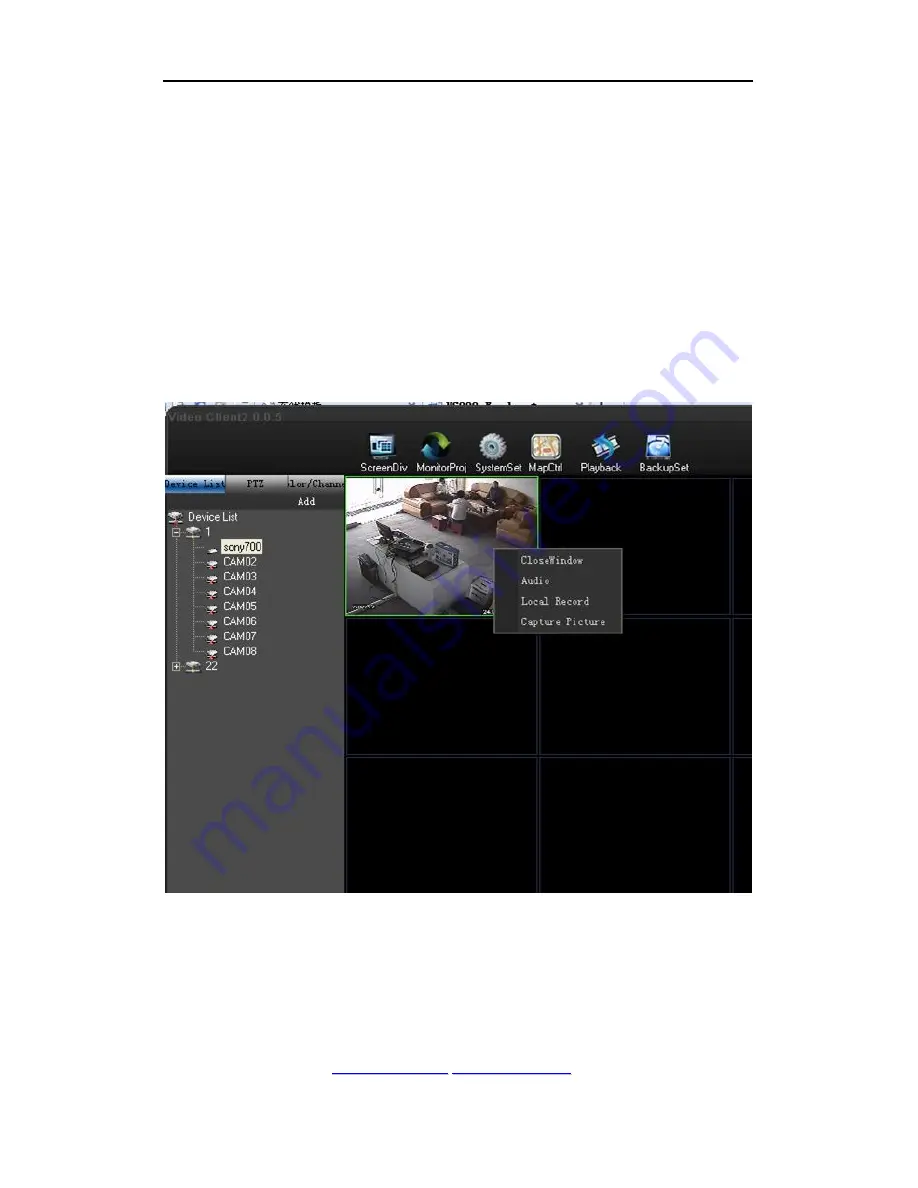
Double-click  again  to  close  the  channel,  and  you  can  also  right-click  on 

the screen of the channel, then the shortcut management dialog box will pop 

up,  as  shown  below.  In  the  dialog  box,  click  "Close  window"  to  close  the 

current channel real-time preview window; click the "Local Video", the video of 

the  channel  will  be  automatically  stored  in  the  storage  directory  of  system 

settings.  The  default  path  is  “C:\Program  Files\VS200\Record”,  and  the 

generated video  file  is in  H.264  format. Click  "Grab"  to  automatically  capture 

the current screen and store it in the directory of system settings. The default 

path  is  “C:\Program  Files\VS200\Picture”  and  the  generated  video  file  is  in 

bmp format.   


3.4


Introduction of The Software Main Interface 

The main interface features buttons at the top left were: " Video Split ", " 

Monitoring  Plan  ",  "Playback",  "Log",  "System  Settings"  and  "Real-time 
backup".   

Summary of Contents for vs200

Page 1: ...rr ra aq q c co om m w ww ww w f fa ac ce eb bo oo ok k c co om m a al lb bu ur rr ra aq q VS200 User Manual Version 2 0 Call 971 50 18 70 526 971 555 11 72 73 To know more about our company visit ww...

Page 2: ...search and development in the latest products and services enabling us to advise our clients with innovative solutions to nurture and grow their own businesses 7TECH Alburraq In 2012 7TECH has entered...

Page 3: ...Working Environment Requirements 2 2 1 1 Hardware Requirements 2 2 1 2 Software Requirements 2 2 2 Client Software Installation 3 2 3 Client Software Uninstallation 4 3 Cms2 0 CLIENT OPERATION 5 3 1 L...

Page 4: ......

Page 5: ...time Preview Real time preview of video Video Playback Remotely playback recorded video Video Download Remotely download recorded video Devices Management Remote configuration and management of DVR P...

Page 6: ...Operation system fit Windows 2000 Windows XP Windows 2003 Windows Vista We do not recommend running under Windows 98 1 Recommend using Microsoft Windows XP Professional SP2 2 Install DirectX 9 0c or a...

Page 7: ...o o a al lb bu ur rr ra aq q c co om m w ww ww w f fa ac ce eb bo oo ok k c co om m a al lb bu ur rr ra aq q 2 2 Client Software Installation Step 1 double click Cms2 0 installation package installati...

Page 8: ...Uninstallation Mode 1 Click Start Control Panel Add Remove Software Cms2 0 Remove VS200 Because uninstalling the software will delete all the relevant documents it is recommended to back up the video...

Page 9: ...the CMS2 0 shortcuts generated on the screen the login interface will appear then enter the user name and password The factory default user name is admin and the password is 123456 Step 2 Click the S...

Page 10: ...fo o a al lb bu ur rr ra aq q c co om m w ww ww w f fa ac ce eb bo oo ok k c co om m a al lb bu ur rr ra aq q Step 2 Click add on the Add interface as shown below to increase the devices operating in...

Page 11: ...ain name is used for connection add domain name in the IP address bar then the device name can be automatically completed according to different requirements The port number is that of the added devic...

Page 12: ...rr ra aq q c co om m i in nf fo o a al lb bu ur rr ra aq q c co om m w ww ww w f fa ac ce eb bo oo ok k c co om m a al lb bu ur rr ra aq q 3 3 Real time Preview Double click a channel in the device t...

Page 13: ...9 9 C Ca al ll l 9 97 71 15 55 55 51 11 17 72 27 73 3 w ww ww w a al lb bu ur rr ra aq q c co om m i in nf fo o a al lb bu ur rr ra aq q c co om m w ww ww w f fa ac ce eb bo oo ok k c co om m a al lb...

Page 14: ...ndow to close the current channel real time preview window click the Local Video the video of the channel will be automatically stored in the storage directory of system settings The default path is C...

Page 15: ...aq q c co om m w ww ww w f fa ac ce eb bo oo ok k c co om m a al lb bu ur rr ra aq q Icons of buttons Names of buttons ScreenDiv MonitorProj LocalSet MapCtrl Playback Backup 3 4 1 Video Split Click th...

Page 16: ...aq q c co om m w ww ww w f fa ac ce eb bo oo ok k c co om m a al lb bu ur rr ra aq q 3 4 2 Monitoring Plan Click the button Monitoring Plan and make surveillance plans for every device every device w...

Page 17: ...i in nf fo o a al lb bu ur rr ra aq q c co om m w ww ww w f fa ac ce eb bo oo ok k c co om m a al lb bu ur rr ra aq q below New monitoring tasks Drag the channel which needs to implement monitoring ta...

Page 18: ...73 3 w ww ww w a al lb bu ur rr ra aq q c co om m i in nf fo o a al lb bu ur rr ra aq q c co om m w ww ww w f fa ac ce eb bo oo ok k c co om m a al lb bu ur rr ra aq q Click Confirm after finished an...

Page 19: ...sks Click the pause menu pause monitoring tasks as shown below 3 4 3 Playback Playback function button remote on line playback video in digital video recorder click Playback as shown playback interfac...

Page 20: ...51 11 17 72 27 73 3 w ww ww w a al lb bu ur rr ra aq q c co om m i in nf fo o a al lb bu ur rr ra aq q c co om m w ww ww w f fa ac ce eb bo oo ok k c co om m a al lb bu ur rr ra aq q 3 4 4 Log Log fun...

Page 21: ...3 3 w ww ww w a al lb bu ur rr ra aq q c co om m i in nf fo o a al lb bu ur rr ra aq q c co om m w ww ww w f fa ac ce eb bo oo ok k c co om m a al lb bu ur rr ra aq q If not want to pop up log informa...

Page 22: ...l lb bu ur rr ra aq q c co om m i in nf fo o a al lb bu ur rr ra aq q c co om m w ww ww w f fa ac ce eb bo oo ok k c co om m a al lb bu ur rr ra aq q 3 4 5 LocalSet LocalSet function button Configure...

Page 23: ...55 51 11 17 72 27 73 3 w ww ww w a al lb bu ur rr ra aq q c co om m i in nf fo o a al lb bu ur rr ra aq q c co om m w ww ww w f fa ac ce eb bo oo ok k c co om m a al lb bu ur rr ra aq q Double click t...

Page 24: ...co om m w ww ww w f fa ac ce eb bo oo ok k c co om m a al lb bu ur rr ra aq q Click the LocalSetting after the pop up dialog box click the dialog box on the Browse to set up a local video and drawings...

Page 25: ...rr ra aq q c co om m i in nf fo o a al lb bu ur rr ra aq q c co om m w ww ww w f fa ac ce eb bo oo ok k c co om m a al lb bu ur rr ra aq q 3 4 6 Real Time Backup Real Time Backup function button set t...

Page 26: ...bo oo ok k c co om m a al lb bu ur rr ra aq q 3 4 7 PTZ control Select PTZ tab enter the PTZ management and control interface as shown below Click Settings and enter the PTZ function setting interface...

Page 27: ...r rr ra aq q LoopPoint Select the tour route number In the Tour option box and then select the preset point in the Preset option box click the increase the selected preset point is set to the tour Rep...

Page 28: ...w f fa ac ce eb bo oo ok k c co om m a al lb bu ur rr ra aq q 3 4 8 Color settings Click the Color tab enter the color adjustment interface as shown below the interface shows brightness adjustment con...

Page 29: ...ww ww w a al lb bu ur rr ra aq q c co om m i in nf fo o a al lb bu ur rr ra aq q c co om m w ww ww w f fa ac ce eb bo oo ok k c co om m a al lb bu ur rr ra aq q 3 5 1 System information view Check re...

Page 30: ...co om m i in nf fo o a al lb bu ur rr ra aq q c co om m w ww ww w f fa ac ce eb bo oo ok k c co om m a al lb bu ur rr ra aq q 3 5 2 System settings Common setting to set the system video format date...

Page 31: ...27 7 C Ca al ll l 9 97 71 15 55 55 51 11 17 72 27 73 3 w ww ww w a al lb bu ur rr ra aq q c co om m i in nf fo o a al lb bu ur rr ra aq q c co om m w ww ww w f fa ac ce eb bo oo ok k c co om m a al l...

Page 32: ...ser Manual 2 28 8 C Ca al ll l 9 97 71 15 55 55 51 11 17 72 27 73 3 w ww ww w a al lb bu ur rr ra aq q c co om m i in nf fo o a al lb bu ur rr ra aq q c co om m w ww ww w f fa ac ce eb bo oo ok k c co...

Reviews: