Albatron DM-5952KF User Manual Download Page 17

30 


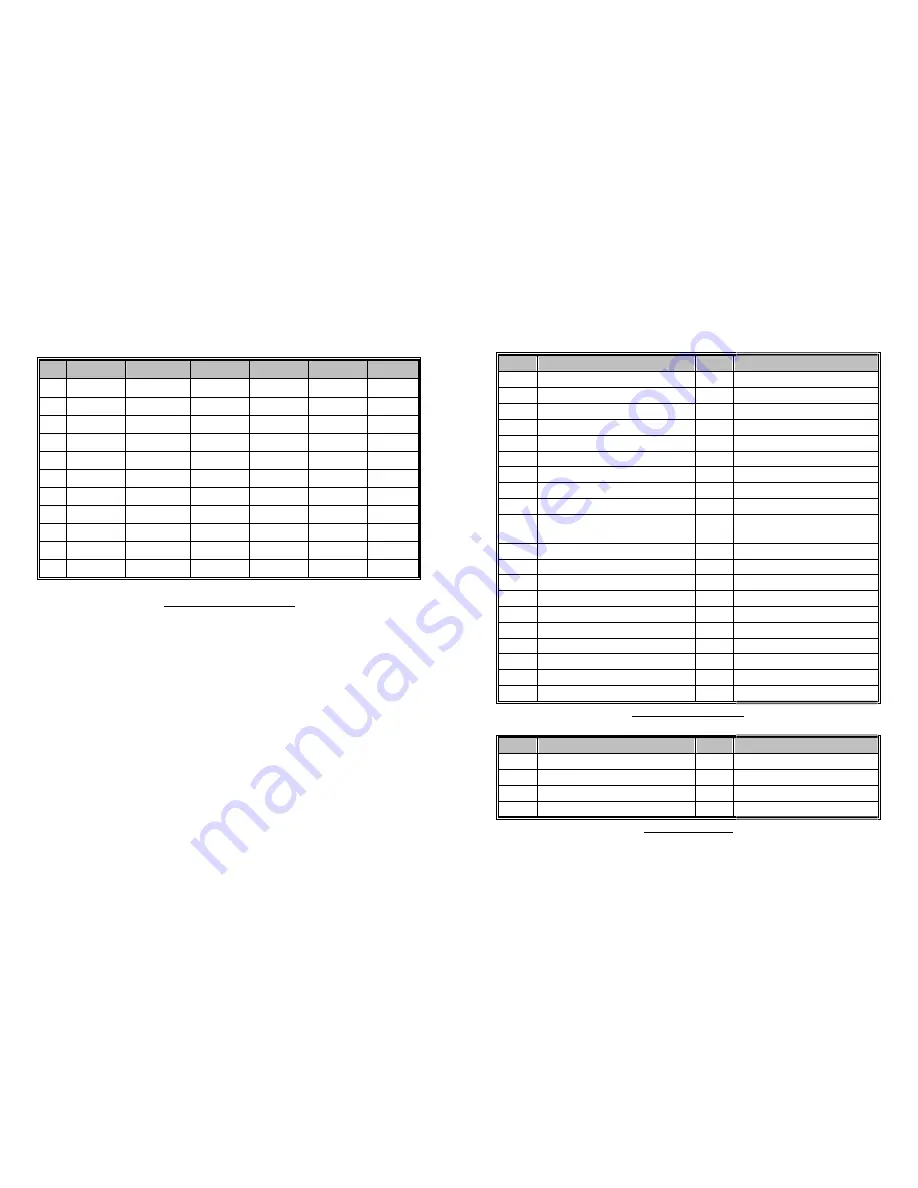
19. FACTORY PRESET AND COMPATIBLE MODE


Mode  Resolution  H freq (kHz) V freq (Hz)  H polarity

V polarity Remarks

1 640

×

480 31.469  59.941 


 VGA 

2 720

×

400 31.469  70.087 


 VGA 

3 640

×

350 31.469  70.087 


 VGA 

4 800

×

600 37.879  60.317 


 VESA 

5 800

×

600 48.077  72.188 


 VESA 

6 1024

×

768 48.363  60.004 


 VESA 

7 480P  31.469  60.000  N/A 

N/A  DTV 

8 1080I  33.750  60.000  N/A 

N/A  DTV 

9 720P  45.000  60.000  N/A 

N/A  DTV 

 10 

800

×

600 35.150  56.250 


 VESA 

 11 

640

×

480 37.860  72.810 


 VESA 


TABLE 3

FACTORY PRESENT


31 


20. IR REMOTE CONTROLLER CODE


CODE 

KEY 

CODE

KEY 

000H


Display


017H Number key 7


001H


CH-UP


018H Number key 8


002H


CH-DOWN


019H Number key 9


005H


AIR/CATV


035H PIC STD


006H


SYSTEM


036H Fine Tuning UP


007H


SLEEP


037H Fine Tuning DOWN


008H


Quick View


058H PIC SEL  (& Parental control)


00AH


AUTO search


059H PIC UP    (& Parental control)


00CH


ADD/ERASER


05AH PIC DOWN (& Parental control)


00DH


PC/TV/AV SW (& Y,Pb,Pr direct 
key)


05BH Parental control menu


00EH


POWER on/off


09CH CCD


00FH


MTS


09DH CCD CAP/TXT


010H


Number key 0


09EH CCD LANG


011H


Number key 1


09FH CCD FIELD


012H


Number key 2


0A0H Power ON


013H


Number key 3


0A1H Power OFF


014H


Number key 4


034H TV direct key


015H


Number key 5


00BH VIDEO direct key


016H


Number key 6


01AH SVHS direct key


02CH


ID


02FH Y, Pb, Pr direct key


VIDEO CONVERTER CODE


CODE 

KEY 

CODE

KEY 

01BH


VGA1 direct key


01FH SEL


01CH


VGA2 direct key


003H VOL


01DH


MENU


004H VOL


01EH


SEL


009H MUTE


MONITOR KEY CODE


Summary of Contents for DM-5952KF

Page 1: ...USER MANUAL High Definition Multimedia Pure Flat Monitor DM 5952KF DM 6952KF A73110002790 ...

Page 2: ...mful interference in a residential installation This equipment can generate use and radiate radio frequency energy and if not installed and or used in accordance with the instructions provided may cause harmful interference to radio communications However there is no guarantee that interference will not occur in a particular installation If this equipment does cause harmful interference to radio o...

Page 3: ...et Do not defeat the purpose of the grounding plug 10 Do not allow anything to rest on the power cord Do not locate this product where persons will walk on the cord 11 If an extension cord is used with this product make sure that the total of the ampere ratings on the products plugged into the extension cord does not exceed the extension cord ampere rating Make sure that the total of all products ...

Page 4: ...button located next to the front VGA connector and on the Remote Control until the computer image is displayed SIMULTANEOUS VIEWING OF THE MONITOR AND STANDARD PC MONITORS Connect the VGA cable from the PC s VGA output to the VGA input Then plug the desktop monitor s VGA cable to the monitor VGA output 5 USING WITH A LAPTOP If you are using Notebook Press Fn F5 or Fn F3 to output the display to CR...

Page 5: ...6 4 WITHOUT VISION CONVERTER FIGURE 1 DM XX52KF W O VISION CONVERTER CONNECTION 7 5 WITH CT 1871 VISION CONVERTER Note Only for Rev K 1 or higher FIGURE 2 DM XX52KF CONNECT WITH CT 1871 VISION CONVERTER ...

Page 6: ...on the Remote controller the Red indicator should turn into green 4 Press TV PC AV button or press TV button on Remote Controller until the monitor displays MAIN NTSC TV 5 To switch to TV CATV mode select TV if you are using an antenna or select CATV if you have a cable service 6 Press AUTO button with your remote control and Monitor will now preset all active channels into memory 7 Selecting a ch...

Page 7: ... VGA2 that located on the front panel 2 Connect the Audio to the appropriate audio connector next to the VGA connector 3 Press the TV PC AV button or press VGA1 VGA2 button until VGA1 VGA2 appears on the screen 4 If monitor has no display check your video card on the appendix B 5 If there is no display on the screen verify if the proper input VGA1 VGA2 has been manually selected 11 High Definition...

Page 8: ... connect with a vision converter b Press this key to execute degaussing while in normal status Each degauss is lasting for 4 seconds and waiting for 5 minutes to re do degauss MENU Toggle Enables Disables the on screen display menu or return to the upper level menu in the menu mode SEL CH SEL CH This is a dual function key a Press SEL to serve as menu item selection b Press CH to adjust the channe...

Page 9: ...control DISP Display the current mode on the present status SLEEP To set the sleep timer each press will increase the sleep timer in 10 minute intervals up to 120 minutes then back to 00 When the sleep count reaches the last 5 minutes the screen will show up every minute for 3 seconds During the last minute and it will display every 10 seconds MTS Multi Sound selection MUTE Cuts audio and turns au...

Page 10: ...on component inputs CT 1890 Y Cb Cr For Conventional component inputs CT 1890 CT 1892 VGA 1 Select VGA 1 source VGA 2 Select VGA 2 source TV PC AV Select TV PC VIDEO S Video COMPONENT switch source TV CATV Select TV CATV source CH CH Steps through the channels PIC STD Factory preset PIC PAGE Control and select items PIC SEL button PIC SEL User video adjustment screens 17 SYSTEM Changes the video s...

Page 11: ...utton while in the top level menu MAIN MENU Picture Menu Fine tunes the Picture image quality manually CONTRAST BRIGHTNESS H V SIZE H V POSITION PINCUSHION TRAPEZOID TOP CORNER BOTTOM CORNER PIN BALANCE PARALLELORGAM ROTATION and RECALL Note a Recall will replace current settings by the factory preset values You can only recall factory settings when the PC mode is in one of the 14 predefined modes...

Page 12: ...LED is lit on The monitor will stay in the saving mode till the power be turn on again while the INSTANT ON is switch off and the red LED is lit on c Auto Saving The power will shut down automatically and be in the power saving status while the Auto Saving switch on e Degauss Enable Disable the AUTO DEGAUSS The AUTO DEGAUSS will be executed automatically by every 24 hours since switch on the funct...

Page 13: ...Video signal connector Output the signal to another monitor 3 Video out Composite Video output to another device 4 Audio out Left Left speaker signal to another device 5 Audio out Right Right speaker signal to another device 6 Video in Composite from a VCR or DVD player 7 Audio in Left Composite from a VCR or DVD player 8 Audio in Right Composite from a VCR or DVD player 9 Audio in Left For S Vide...

Page 14: ...ay on monitor A PC MAC Check the resolution settings of the control panel display settings in windows to make sure they are set within the perimeters of our monitors If you are using a notebook computer with our monitor you need to change the configuration of your notebook The output needs to be set to CRT B Video Check all of the video connections RCA S Video for proper connection C Television Ma...

Page 15: ...78 Kg Operating Environment T 5 to 40 C H 30 to 80 RH Storage environment T 20 to 60 C H 10 to 90 RH 27 16 Model DM 5952KF SPECIFICATIONS CRT Size Type 27V Pure flat square screens with 108 degree magnetic deflection dynamic focus forming and 53 5 transmission Dot Pitch mm 0 68mm Maximum Resolution XGA 1024 768ȞNon Interlacedȟ Horizontal frequency 30 kHz to 52 kHz Auto Synchronous Vertical frequen...

Page 16: ...SDA 13 H sync 14 V sync 15 SCL 29 18 RS 232 CONNECTOR ASSIGNMENT Input Connector Assignment 1 No Connection 2 TXD 3 RXD 4 No Connection 5 No Connection 6 No Connection 7 Ground 8 No Connection 9 No Connection OUT CONNECTOR ASSIGNMENT 1 No Connection 2 RXD 3 TXD 4 No Connection 5 No Connection 6 No Connection 7 Ground 8 No Connection 9 No Connection 1 6 5 9 5 9 1 6 ...

Page 17: ... Number key 9 005H AIR CATV 035H PIC STD 006H SYSTEM 036H Fine Tuning UP 007H SLEEP 037H Fine Tuning DOWN 008H Quick View 058H PIC SEL Parental control 00AH AUTO search 059H PIC UP Parental control 00CH ADD ERASER 05AH PIC DOWN Parental control 00DH PC TV AV SW Y Pb Pr direct key 05BH Parental control menu 00EH POWER on off 09CH CCD 00FH MTS 09DH CCD CAP TXT 010H Number key 0 09EH CCD LANG 011H Nu...

Page 18: ...M RS232 V0 9 Select Serial Port Under DM RS232 V0 9 Control Page Select COM1 on the Select Serial Port Note The select serial will be set on COM1 automatically and you will be warning while the COM1 port has been selected by other interface each time you enter Setting an ID number Through DM RS232 V0 9 Serial Transmission Communication interface to remote control the device To identify the monitor...

Page 19: ...e power saving status while the Auto Saving switch on Auto Degauss Enable Disable the AUTO DEGAUSS 1 Select Yes and the AUTO DEGAUSS will be executed automatically by every 24 hours while switch on the function Auto Shift Active AUTO SHIFT to protect the screen from result in the image remain 1 Select Yes to active Auto Shift and the picture will be auto shift once for every 6 hours 2 Select No to...

Page 20: ... color contrasts by drag the Scroll Bar on the Control page 3 Press Recall 9300K 6500K 5500K TV to restore the pre set the RGB value of 9300K 6500K 5500K TV 37 Picture Control 1 Select any label on the picture frame to adjust the picture quality 2 To adjust the color contrasts by drag the Scroll Bar or input an applicable value in each textbox on the control page 3 Press Recall to restore the pre ...

Reviews: