background image

11. DVD Setup Menu’s

TV Shape.

Some DVD discs have been authored in 4:3 aspect ratio format. To


see the material in its original mode, 

you may need to change the Aspect ratio.

Normal/PS (Pan& Scan). 

Black edges left and right will be seen.

Normal/LB (Letterbox).

Top and bottom of the screen may be black.

Wide 16:9 (Widescreen).

Full width picture but may have black areas top and bottom. 

OSD Language

.

Select the OSD Language (English is default.

Last Memory

. ON/OFF.

You may wish the player to remember where it finished playing a disc and then remove the disc. When you 
stop the disc, the player will automatically remember the point it finished playing. When the disc is re 
inserted the player will continue from the same point.

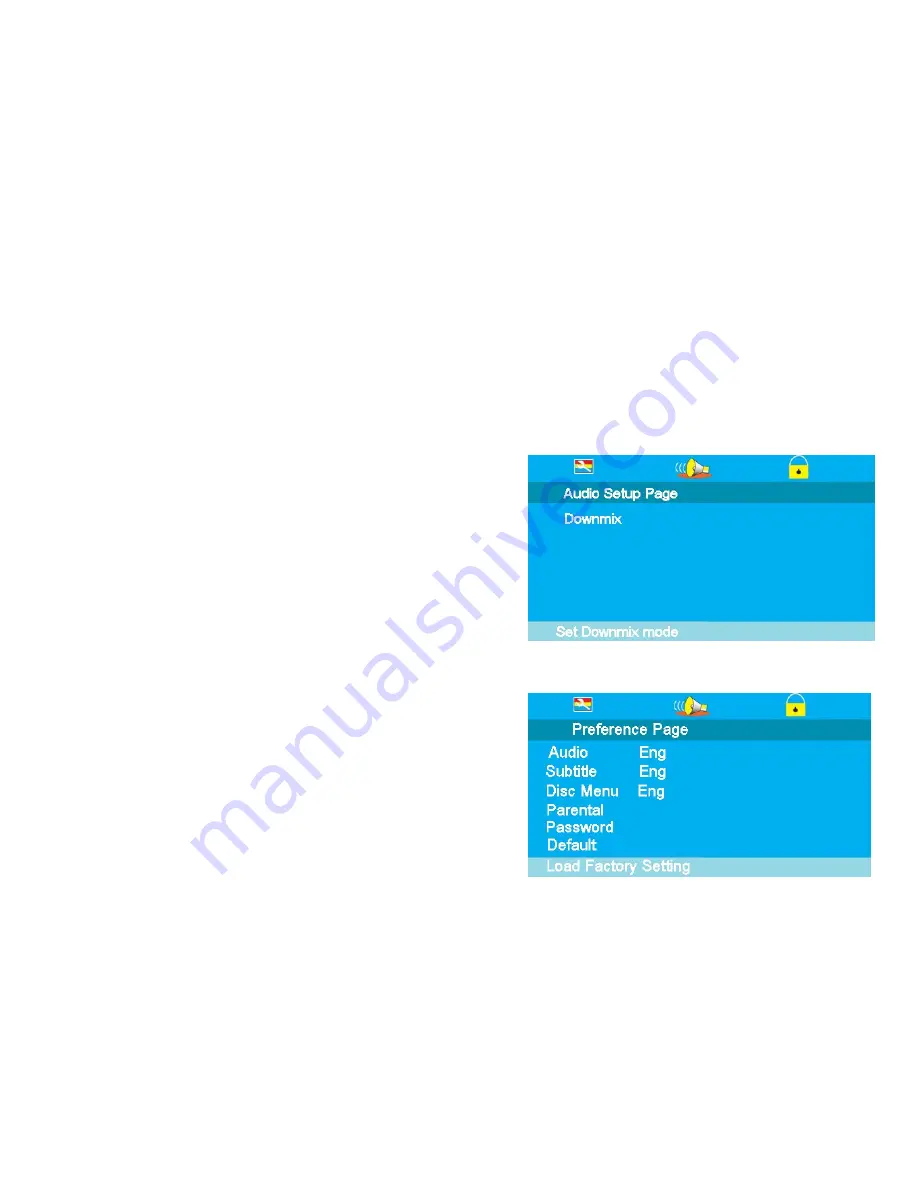
Audio Setup Page. (Fig 24)

Down mix is defaulted to Stereo

Preference page. (Fig 25).
AUDIO

. Select Audio using the 

/

buttons. The languages 

available will be shown in the right column. Select the required


language using the 

and /

buttons. Default is English. If the 

disc has that language it will play the soundtrack in that 
language.

SUBTITLES

. Select Subtitle using the 

/

buttons. The 

languages available will be shown in the right column. Select 
the required language using the 

and /

buttons. Default is 

English. If the disc has that language it will display the Subtitles 
in that language

DISC MENU

. Select Disc menu using the 

/

buttons. The 

languages available will be shown in the right column. Select 
the required language using the 

and /

buttons. Default is 

English. If the disc has that language it will display the menu in 
that language

PARENTAL

. Select Parental using the 

/

buttons. Enter the 

list using the 

button.

Set the level using the 

/

buttons and press OK. You will be 

asked for the password (136900).


Default is ADULT.

PASSWORD

. Select Password using the 

/

buttons. Select 

Change using the 

button and OK. Put in the old password. 

You must then put in the new password twice and press OK.
Make a note of the new password and keep safe.

DEFAULT. 

Selecting Default will reset to the factory settings all 

your personal settings in the DVD setup menu. 

Fig 24

Fig 25

18

Summary of Contents for APLDVD2323W-HDID

Page 1: ...Model APLDVD2323W HDID 23 58 4cm Digital LCD TV with DVD DVBt Freeview HDMI...

Page 2: ...h precision technology and 99 9 or more of the pixels are effective dots may appear These can be black or bright dots red green or blue and may appear constantly on the LCD screen This is a structural...

Page 3: ...3 Accessories 4 4 User Controls 5 5 Remote Control 6 6 Connections 8 7 Menu Operation 10 8 Teletext 16 9 EPG Electronic Programme Guide 17 10 DVD Operation 17 11 DVD Setup menu s 17 12 Trouble Shooti...

Page 4: ...rolled waste disposal please keep separate from other household waste and recycle it responsibly to promote the sustainable reuse of material resources Household users should contact either the retail...

Page 5: ...her damp places Do not allow water or other fluids to enter the TV Do not touch the Mains plug or adaptor with wet hands Should moisture enter the TV disconnect from the supply and call the customer h...

Page 6: ...3 Accessories Please check the contents of the TV before you continue If any item is missing please contact your point of purchase User Manual Remote Control Mains lead 4...

Page 7: ...to previous level of menu 6 Input Selects the different input sources each press will select another input source 7 Power Switches TV On from standby Also returns TV to standby 8 LED Displays Tv stat...

Page 8: ...e points of repeat in DVD mode Subpage selects subpage numbers in text mode 38 NEXT BLUE Next selects next chapter or track in DVD mode Blue fast text mode 1 STANDBY Switches TV to Standby and Operati...

Page 9: ...use re chargeable batteries Remove batteries if not using the remote control for long periods to prevent leakage If the batteries do leak clean the compartment with soapy water and scrape any residue...

Page 10: ...nput from TV aerial or cable source 1 m V 75 typical CI SLOT Place a CAM Conditional Access Module into this point to allow a Pay per View card to be used HDMI Input CVBS Input IMPORTANT When making c...

Page 11: ...ortable listening Note Do NOT use headphones at high volume levels for prolonged periods SCART Disconnect TV from mains supply Connect scart lead to TV and appliance Connect adaptor to TV and power to...

Page 12: ...ed in the lower right corner Press either the Standby button on the remote control or the Power button on the TV The led will now turn Green and the screen will light up after approx 5 seconds At this...

Page 13: ...icture brightness Colour Adjusts the colour saturation colour depth Sharpness Adjusts the clarity of the picture If the signal is noisy analog then this setting should be reduced to mask the noise Tin...

Page 14: ...Fig 9 Language English only available Country UK This is set in the Tuning Menu Auto Tuning Hearing Impaired Digital TV only Sets Subtitles when transmitted Restore Factory Default Restores all factor...

Page 15: ...ing see next DTV Manual Tuning Fig 13 It may be necessary to add more digital channels as they are provided by the programme providers or manually tune stations for reasons above Select DTV Manual Tun...

Page 16: ...ain When a channel has been selected to Skip you still may select that channel with the numeric buttons Fav To add channels to your Favourite library use the cursor buttons to select the channel you w...

Page 17: ...odule away from the TV Reconnect the TV and switch on Select DTV Insert your Pay per view card Do NOT touch the gold contacts Press the LCD Menu button and select TV Setting menu Select CI Information...

Page 18: ...size REVEAL Press to reveal hidden answers in quizzes or puzzles SUBPAGE Some text pages may contain several sub pages To access these press this button and then enter the page number using the numeri...

Page 19: ...ctly may cause damage to the Laser Optic Do NOT place any damaged dirty or disc not 12 cm in diameter into the loader The mechanism will draw the disc in automatically In most cases the DVD Title will...

Page 20: ...he and buttons Default is English If the disc has that language it will play the soundtrack in that language SUBTITLES Select Subtitle using the buttons The languages available will be shown in the ri...

Page 21: ...re noisy and ghosting Analog Poor aerial signal Have aerial signal checked If indoor aerial it may need an outdoor aerial TV Picture freezing and breaking up Digital Poor aerial signal Have aerial sig...

Page 22: ...se a soft dry cloth For stubborn dirt use a soft cloth with dilute detergent Ensure the disc is completely dry before placing into the player DO NOT USE CHEMICAL CLEANERS OR VYNYL DISC FLUID 14 Wall M...

Page 23: ...ystems BG I DK L Audio Output 2 W per channel Tuning Analog Band 1 Band 3 UHF Digital UHF Inputs Scart HDMI VGA CVBS S Video L R audio PC Audio Outputs Scart Headphones OSD Language English Audio Nica...

Page 24: ...accordance with the diagram as in Fig 27 The Brown wire Live should be connected to the terminal L The Blue wire Neutral should be connected to the terminal N The Green Yellow wire Earth should be co...

Reviews: