GETTING STARTED
1.
Please read the safety section (page 2) in the main instructions
before proceeding further. This section
contains vital information to ensure safe positioning and use of
the TV
2.
Unpack the TV and place on a flat level surface suitable to support the weight of the TV (4.5 kg approx.).
3.
Remove the plastic protective film on the front of the screen.
4.
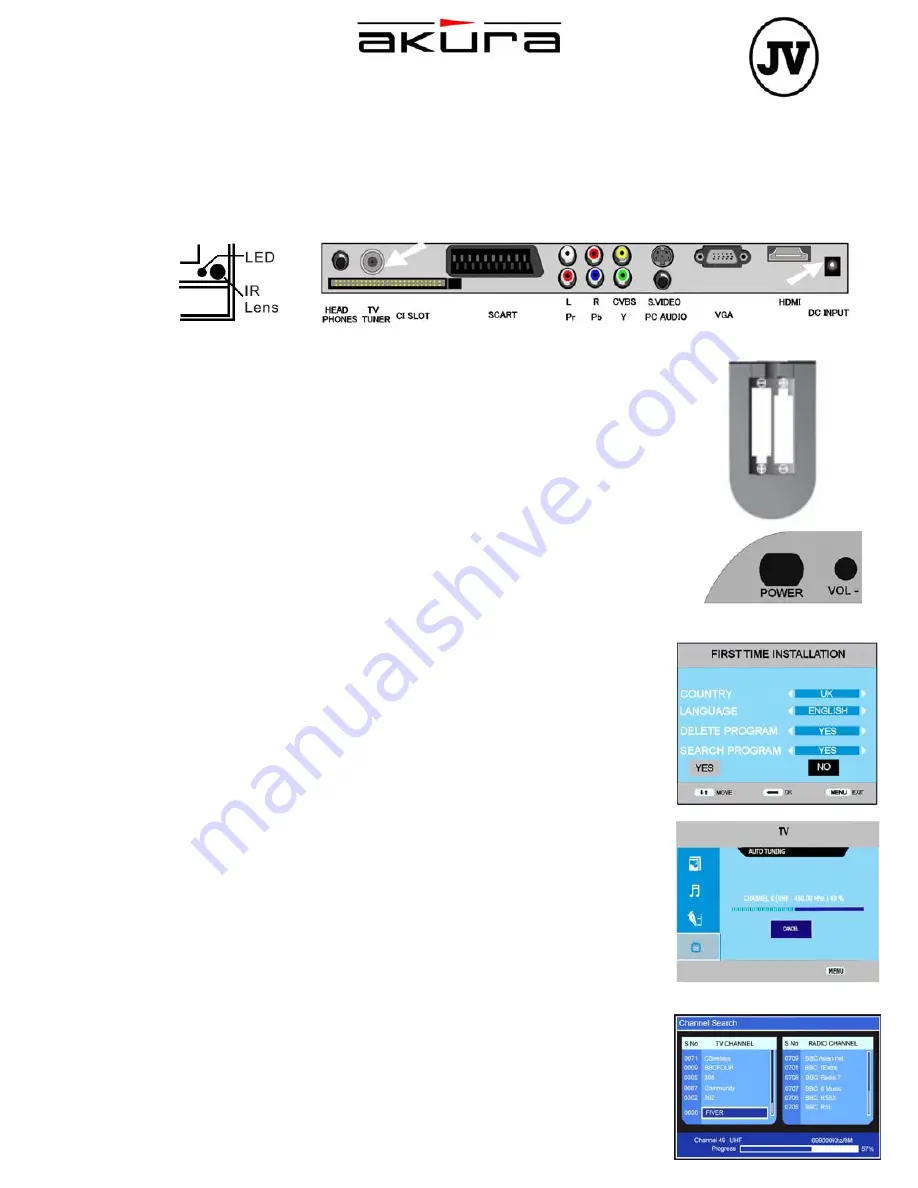
Connect the aerial into the TV Tuner connector at the left side of the TV (Fig 2).
Fig.2
Fig.3
5.
Connect the mains power lead to the mains adaptor and insert the
DC jack into
the DC-INPUT socket at the left side of the TV (Fig 2). Plug in and switch on at
the mains. The LED indicator on the TV will illuminate and show
red (Fig 1).
6. Open the battery compartment cover (Fig 3) on the reverse of the remote control.
Insert 2 x AAA 1.5V alkaline batteries in accordance with the diagram in the
battery compartment. Take care to observe the correct polarity (+/-). Refit the
battery compartment cover
7. Press the POWER button (Fig 4) to turn the TV set on. The LED indicator will
turn green and after a few seconds, the screen will activate and
the first time
installation menu (Fig 5) will appear.
8.
Use the cursor
▼
/
▲
buttons on the remote control to move up and down the
display to highlight desired options.
9. The default language is “English”
if you want another language select that
language using the
►
/
◄
buttons and press Ok.
10. Select YES to start tuning and press Ok. Fig 6 and 7 will be displayed. The TV
will now search the entire UHF range for both Digital and Analog
TV stations.
When search is complete the TV will display the first channel (BBC1) in DVBt
mode. The Analog stations may not be in the correct order, see page18 in the
Main Instruction book for more information
Fig.4
Fig 1
APL21668FD
SP 7050
Quick Start Guide
Fig.6
Fig.7
WATCHING TV (basic operation)
11. To select a channel either enter the number of the channel using the number
buttons on the remote control or scroll through the channels using the channel
CH+/-
buttons.
12. To view analogue TV channels press the SOURCE button to display the source
menu. Using the cursor
▲
/
▼
buttons highlight TV on the menu and press OK to
select. To view digital TV channels select DTV on this same menu.
13. To check the list of channels stored, press the “OK”
button to display the channel
list and use the cursor
▲
/
▼
buttons to move up and down the display. To select
a channel, highlight the channel on the list and press “OK”
to confirm.
14. Adjust the volume to the desired level using the volume
or cursor
◄
/
►
buttons.
The sound can be silenced by pressing the MUTE button on the remote control
and a mute symbol will appear on the screen. Press the MUTE button a second
time to restore the sound.
15. To switch off the TV for short periods, press the POWER
button. The TV will go
into standby mode and the LED indicator will change to red. If not using the TV
for extended periods turn off at the mains switch to conserve electricity, all
settings will be retained.
Fig.5
LCD Screen
Although the LCD screen is made with high precision technology and 99.9% or more of
the pixels are effective, dots may appear. These can be black or
bright dots (red, green
or blue) and may appear constantly on the LCD screen. This is a structural property of
the LCD panel and is not a malfunction.
For advanced operation of this TV please consult the Instruction
Manual.
Should you have difficulty in operating this unit, please consult the Trouble Shooting Guide in
the Instruction Manual. If you suspect a fault, please contact
the Customer Help Line, details
of which can be found in the Instruction Manual.


