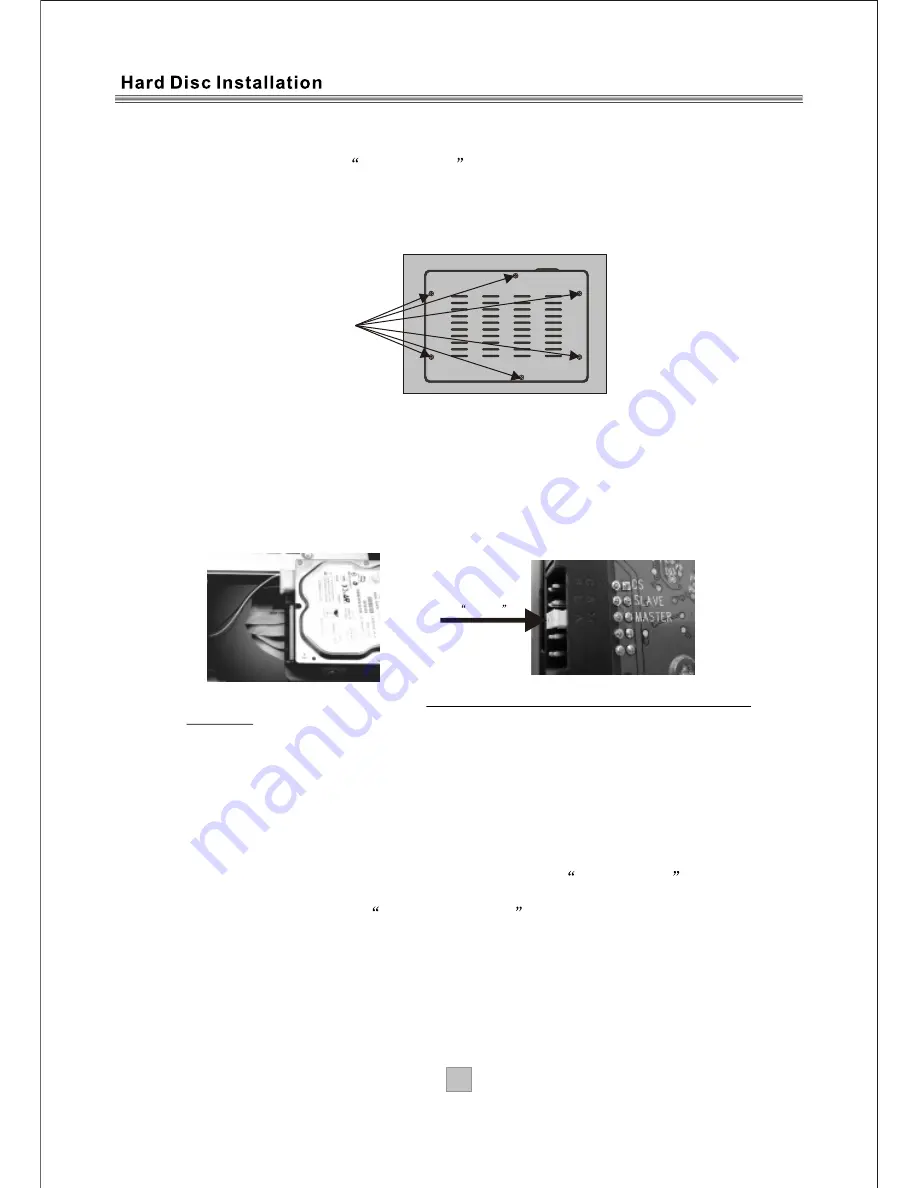
background image

23

23

Remove 6 screws

Hard Disk Installation/ replacement

Please note when replacing hard disk (HDD), the hard disk must format before start 
using (this can be done in the 

DTR Setting

 menu).

Note: make sure that the main AC power is turn off and all cable is disconnect from this 
unit while installing/replacing the Hard Disk (HDD).
Tool required: a screw driver
A)     Remove old Hard Disk Drive (HDD)

          1. Turn this unit upside down and locate the HDD trap door, un-crew the 6 screws        

surrounding the edge of the HDD trap door.

          2. Once done open the HDD trap door and locate the two cables that connected to  

the HDD.

          3. First disconnect the power cable that connected to your hard disk.
          4. Then disconnect the IDE data cable from the HDD.

B)      Insert new Hard Disk Drive (HDD)

          1.  Check and make sure that your new HDD jumper setting is set to MASTER 

position.

          2.  Re-connect the power cable to your hard disk drive (HDD) then.
          3.  Re-connect the 40 pin flat data cable to the IDE socket on the HDD.
          4.  Place the HDD into its housing, close the HDD trap door and tighten all the 6 

screws.

          5.  Once complete, you can now re-connect the main AC power of this unit and 

reconnect to your TV, now turn on the main AC power.

          6.  1). Press the Menu button on the remote controller and enter the main menu, 

press the OK button again to enter the System Setting menu.     

               2). Press the UP or DOWN button to highlight the 

DTR Setting

, then press 

the OK button to enter its submenu.     

               3). High light and select 

Format Hard Disk  option and press OK button, you 

will see a warning message, press the OK button, then you have to enter the     
4 digits pin code (default is 6666) to proceed, after you pressed the OK button, 
the hard disk will be formatted and the unit will be reset in few seconds.     

               4). Now you can start recording or do time shift operations.

Jumper setting 
for master

Summary of Contents for AMTDT3505

Page 1: ...Customer Help Line 01422 263313 Opening Hours Mon Fri 8am 8pm Sat 9am 4pm Sun 11am 4pm Or visit our website at www ekey co uk AMTDT3505 HDD Personal Video Recorder...

Page 2: ...A V Setting 12 First Time Installation 13 System Info 13 Change Pin Code 13 Software Update 14 Auto Mode 14 Manual Mode 14 DTR Setting 15 Time Shift Durationg 15 Format Hard Disk 15 HDD Information 1...

Page 3: ...t indicates useful and important tips Trade Mark of the DVB Digital Video Broadcasting Project 1991 to 1996 Digital Video Broadcasting Accessories In the Box Remove your Digital set top box carefully...

Page 4: ...soft damp not wet cloth Ventilation The slots and openings on the set top box are for ventilation Do not cover or block them as it may cause overheating NEVER let children push anything into the holes...

Page 5: ...15 GOTO 16 SLOW Used to adjust the slow speed in HDD playback mode 17 STANDBY Used to switch the set top box to on and off 18 RECORD LIST Used to view the recorded program 19 STOP Used to stop the cur...

Page 6: ...es O PEN O PEN 1 Open the cover 2 Install batteries 3 Close the cover Using the Remote Control To use the remote control point it towards the front of the digital set top box The remote control has a...

Page 7: ...outputs composite video signal 6 S Video output This socket outputs separate Y C videosignal 7 AUDIO L R This socket outputs analog audio L R signal 8 RS 232 PORT This socket is only used for softwar...

Page 8: ...R R F F LOOP LOOP R R F F THROUGH THROUGH IN IN R R F F PVR TUNER PVR TUNER TV TUNER TV TUNER 100 240V 50 60Hz SERVICE S VIDEO S VIDEO R R COAXIAL COAXIAL AUDIO VIDEO OUT AUDIO VIDEO OUT DIGITAL AUDIO...

Page 9: ...Connecting to a Television 8 8 SERVICE VIDEO S VIDEO L R COAXIAL AUDIO VIDEO OUT DIGITAL AUDIO 100 240V 50 60Hz...

Page 10: ...COAXIAL AUDIO VIDEO OUT DIGITAL AUDIO BASS TREBLE ECHO DOWN UP VOLUME INPUT SELECTOR MUTE KARAOKE CHANNEL TEST MODE 3 STEREO PRO LOGIC BYPASS EXCITE POWER MIC 2 1 1 MIC VOL 2 MIC Digital Amplifier Co...

Page 11: ...16 9 or 4 3 Press the OK button to continue installation a confirmation message window displays as right Press the LEFT or RIGHT cursor button to highlight confirm Press the OK button to continue Sca...

Page 12: ...to select Channel Search 3 Press the OK Button to enter the sub menu 4 Highlight the Search Type and press the LEFT or RIGHT cursor to select Manual Scan 5 Press the DOWN cursor to select Channel No...

Page 13: ...r the sub menu 4 Press the UP or DOWN button to select A V Setting and Press the OK button to enter its sub menu TV Shape options 4 3 16 9 Video Output options RGB CVBS OSD Transparency range 0 100 5...

Page 14: ...the software version and hardware version of the STB 1 Enter the System Setting menu press the UP or DOWN cursor to highlight the System Info menu 2 Press the OK button to open up the information box...

Page 15: ...b menu Auto Mode 1 Enter the software update menu press the UP or DOWN cursor to highlight Auto Mode 2 Press the OK button to enter Auto Mode menu 3 Press the LEFT or RIGHT cursor to set the status to...

Page 16: ...anner here The options can be 5 seconds 10 seconds 15 seconds 20 seconds the OSD menu will turn off if timeout Timers Follow below steps to activate the Timer window 1 Enter the main menu press the UP...

Page 17: ...Unlock a channel 1 Enter the channel list menu press the UP or DOWN cursor to select your desired channel 2 Press the Blue button you are asked to enter the pin code 3 Enter the correct pin code usin...

Page 18: ...u of the STB 2 Press the UP or DOWN cursor to select Favourite List 3 Press the OK button to enter the Favourite List menu 4 Press the Red button to switch the desired favourite list 5 Press the UP or...

Page 19: ...the Channel Schedule or using the on screen channel list 1 Stepping through the channel list Press the P button to browse up and the P button to browse down the available channels 2 Selection by numb...

Page 20: ...tton to quit the channel list and view the channel on full screen Recall You can switch to the previously viewed channel by pressing the RECALL button Volume Control The volume level of the STB can be...

Page 21: ...creen stops the racier from displaying the digital teletext pages and they are temporarily replaced by a blank picture while the banner or menu is displayed Digital teletext cannot be accessed when th...

Page 22: ...The RECORD button Pressing the RECORD button the record will start using the PVR tuner you can press the CH keys to change your viewing channel while the first recording in background A second record...

Page 23: ...name or Delete one exist recording or Lock Unlock a selected recording On the right up corner you will find the detailed information of the selected recording On the bottom of the screen you will fin...

Page 24: ...ting is set to MASTER position 2 Re connect the power cable to your hard disk drive HDD then 3 Re connect the 40 pin flat data cable to the IDE socket on the HDD 4 Place the HDD into its housing close...

Page 25: ...insertedincorrectly Remote control batteries exhausted Aerial may not becompatable Aerial is damaged misaligned What to do Check mains lead Check fuse Check aerial lead Check aerial Check with dealer...

Page 26: ...enna Input 2 Therefore Output 1 for VCR 1 for TV 1 for software upgrade 1 CVBS output 1 R L output 1 COAXIAL SPDIF digital audio output 1 S Video output This symbol on the product or in the instructio...

Page 27: ......

Reviews: