


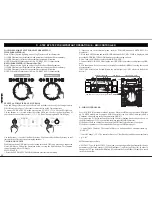


A- GENERAL FUNCTIONS AND CONTROLS
NOTE: a loaded CD player goes into Auto-Cue mode after being switched on. In this way,
mode, this is to prevent accidentally ejecting the disc when in play mode.
the Cue Point is automatically set on the first signal of a track.
16- CUE BUTTON:
A Cue Point is a self-defined starting point, usually at the beginning of a beat. When
activating the Cue Button (16) the Player interrupts playing the track and returns to the last
set Cue Point. To set a Cue Point, follow either of the following two options:
a) Search the desired Cue Point using the Jog Wheel (8) while in Pause mode. You will
access the Frame Search mode (fragmented repeats =1/75 minute) and can precisely set
your Cue Points. Then press the Play/Pause Button (15) to save the Cue Point. The player
returns to Play mode.
b) While in Play mode, press the Loop In Button (26) at the desired point to save the Cue
Point. The player remains in Play mode. With a little practice, this is a faster way to set the
desired Cue Point. Press the Cue Button (16) for the player to return to the Cue Point and go
into Pause mode. By pressing and holding the Cue Button you will return to Play mode until
you release the button again. The player will then return to the Cue Point and go into Pause
mode. Press the Play/Pause Button (15) to permanently return to Play mode.
24- RELOOP BUTTON:
NOTE: When pressing the Cue Button (16) while in Play mode when no Cue Point has been
If a SEAMLESS LOOP has been made, but the CD player is not actively in seamless loop
set, the player returns to the start of the track and goes into Pause mode (Auto-Cue). The
mode, pressing the reloop button will instantly reactivate the seamless loop mode. To exit
player saves the Cue Point which can be prompted with the Cue Button for a single track
loop, press the out button. RELOOP will appear in the VFD display when the RELOOP
only. When changing to another track, the previous Cue Point will no longer be saved.
function is available.
17- CUE PLAY BUTTON:
In the loop mode, hold RELOOP button, LED of IN/OUT/RELOOP will flash and “OUT
Press the button to return to the last CUE point and resume playback immediately. You can
EDIT” will be indicated on the VFD, now you can turn the J.W. to edit out point; then press
also tap the button to create a BOP effect.
the RELOOP button again to exit editing.
18- SEARCH BUTTONS:
Note: Please DO NOT touch the sensitive JOG Wheel under A. Cue Scratch mode.
This search button allows you to quickly scan backwards through a track.
25- OUT BUTTON:
This search button allows you to quickly scan forwards through a track.
This button is used to set the ending point of a loop. A loop is started by pressing the IN
19- NEXT TRACK BUTTON:
button, pressing the OUT button set the loop ending point. The loop will continue to play
While either playing a track or in pause mode, press this button to search for the next track
until the OUT button is pressed once again. (● EXIT).
you want to play. NEXT TRACK indicators will flash. Now you can turn the FOLDER or
26- IN BUTTON:
TRACK knob to search for the next track. Press the PRESET button you found your desired
This function allows you to set a CUE POINT without music interruption. This button also
track.
sets the starting point of a seamless loop.
20- TRACK KNOB:
27- EFFECTS AND HOLD BUTTON:
This knob has three functions.
HOLD BUTTON - This button allows you to set and lock any new parameters you set to the
a- The knob is used to select a track. Turning track knob will forward/backward skip to
effects. This button will glow when the hold function is activated. If the hold function is not
next track.
selected any changes to the effect parameters will be momentary.
b- Holding down and turning track knob will rapidly forward/backward skip through the
PARAMETER TIME BUTTON - This button is used to adjust the parameter time value.
tracks by 10 tracks per click.
You can also push the TIME knob, LED on, and turn the JOG WHEEL to adjust the
c- Press track knob to switch file name/title (ID3)/artist (ID3)/Album(ID3)/Genre(ID3) on
parameter time value.
the VFD.
1. If the hold function is not selected any changes to the effect parameters will be
21- REVERSE KNOB:
momentary.
Activate Reverse function to play the track or sampler in reverse. Press the button again to
2. During hold function is selected the auto beat sync will be turned off.
deactivate this effect.
ECHO EFFECT - This button is used to activate and deactivate the echo effect. The echo
22- FOLDER KNOB:
effect adds an echo to your output signal.
Turn FOLDER knob to search the desired folder.
FLANGER EFFECT - This button is used to activate and deactivate the flanger effect. The
23- EJECT BUTTON:
flanger effect distorts the output signal and creates an effect similar to the frequency
Press this will eject the CD. The eject function will only when the unit is in cue or pause
phasing in and out of each other.
28
27
26
25
24
29 30
31 32
ENGLISH
21