Installation Manual Trux 700 (English)
93 5164-100 A0
Åkerströms Trux AB
Björbovägen 143
SE-780 45 Björbo, Sweden
Phone +46 241 250 00
Fax +46 241 232 99
E-mail [email protected]
www.akerstroms.com
Under no circumstances can Åkerströms Trux AB be held liable for damages arising
from use of this document or from the hardware and software that is described herein.
Check the contents of the box against the label on the packaging.
Read through these installation Manual before commencing assembly.
!
Connect the supply cable only when everything
else has been assembled.
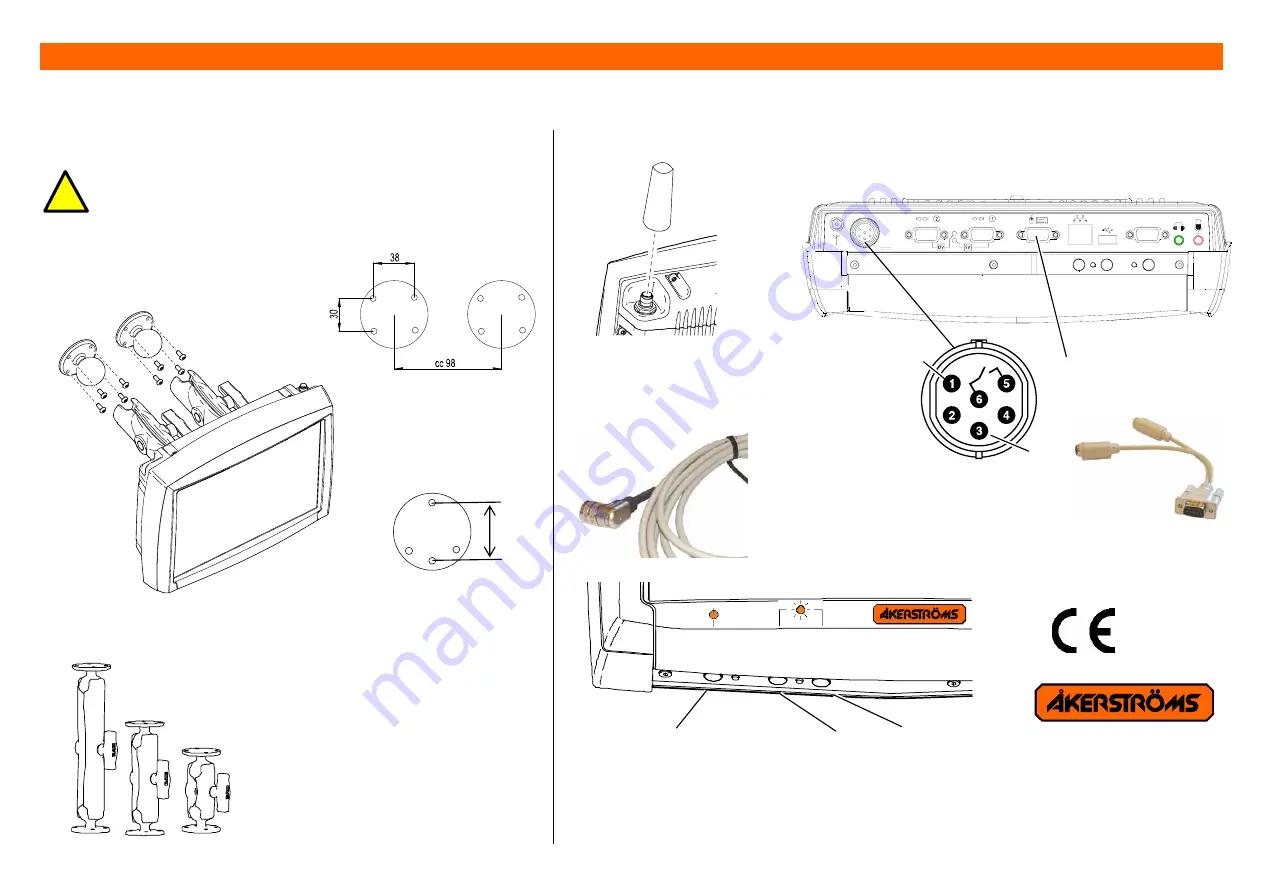
Tools are only required for assembling the ball attachments and for
attaching the nine-pin connectors.
1. Fit the ball attachments for the brackets.
The diameter of the holes is 5.5 mm.
[mm]
1a Fit the ball attachments
for
the
2¼”
bracket
Ø8
mm
2. Assemble the Trux computer with the brackets at the desired angle.
Three sizes of brackets are available as options.
1½” Brackets
2¼” Brackets
Length: 275 mm (10
⅞
") 438 mm (17¼”)
Length: 190 mm (7½")
285 mm (11¼”)
Length: 134 mm (5¼")
210 mm (8¼”)
3. Mount the antenna.
4. Connect the cable for external connections.
Only the connections for voltage feed, mouse and
keyboard are described here.
12VDC
MULTI PURPOSE
5. Connect 12 V direct current voltage supply.
12V
Ensure that pin
1
is connected to
Connection for mouse
+ pole (brown conductor) and pin
3
to
and keyboard.
– pole (white conductor).
0V
Connection for power
supply. Pins 5 and 6 used
for shutting down.
See the product manual for
further information.
Adapter for connecting
mouse and keyboard with
The length of the power cable is 4 meters (5 1/2 yards)
PS2 connectors.
6. Press the start button
Use the Increase and Decrease
to start the computer.
buttons to set the intensity of the
screen.
The computer is now ready for use. See the user manual for more
information.
For installation of GPRS-aerial see installation manual GPRS.
Ø 70


