background image

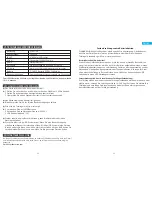
Resolution
Field of Angle View
IR LED
Wi-Fi
Audio
Recording
SD Card
Battery
Notifications

166 Degree
6 * 850mm led lights
Support IEEE 802.11b/g/n
Clarity Intercom
Loop recording with Micro SD Card

2 * 18650 Battery (TOTAL 5200mAh)
Instant Notifications within 2S

Max. Up to 32G (packed with 8G internal micro SD card)

1280 * 720

Two 18650 Batteries (5200mAh), working 15 minutes every day can be used for 6-8 months.

Q: 

Device can’t connect Wi-Fi?

A: 

1.Make sure the connect Wi-Fi is 2.4GHz.

    2. Make sure the indicator red light flash slowly.
    3. Check the password whether it is correct or have space.

Q: 

Device can’t receive any notifications?

A: 

Please check it again whether your phone notification permission enabled.

Q: 

How to supply power to the doorbell?

A: 

1. Use the 18650 battery standalone

    2. Use AC(14-24V) input

    3. USB cable charge (5V)

Q: 

Why there has a notification, but I can’t find the file on message sometimes?

A: 

 This problem will be shown on iOS system, if you get the notification and didn’t 

     open it in time, then the iOS system will kill some files, so you can’t find it on

     message. Please go back to playback interface, then you can find some files you

     need.

                                  Hardwired VS Battery Powered


The 

AKASO

 Doorbell has dual power, which means you can choose to run it off of the

internal Lithium battery, or connect it to your existing doorbell wires.

Battery Operated (i.e. wireless)

If you choose to operate it wirelessly, the standby time could last for up to a year
before needing another charge. Battery life, however, depends on a variety of factors -
the most important being usage. Frequent motion alerts or dings will play in role in
how long your device will function before needing another charge. You can plug the
included micro USB charging cord into a USB power wall adapter.

Hardwired (i.e. connected to your existing door chime)

The Ring Doorbell can be connected to your existing door chime–mechanical or 
electronic–so long as it's between 14~24V AC. Simply remove your door chime and 
connect the existing wires to the designated terminals on the Ring Doorbell mounting
bracket.

English

VII. FAQ

7

8

VI. TECHNICAL SPECIFICATION

CONTACT US

For any inquiries, issues or comments concerining our products, please send E-mail to the 
address below or call us. We will respond as soon as possible.

E-mail: 

[email protected]

US customer service line: 

(301)670-7335

Summary of Contents for Smart Video Doorbell

Page 1: ...Please read this manual before operating your Smart Video Doorbell and keep it for further reference 36 Smart Video Doorbell User Manual...

Page 2: ...G VIDEOS SCAN THE FOLLOWING QR CODE TO VIEW THE VIDEOS AKASO Video Doorbell Overview How To Connect The Doorbell How to Share to Other Devices How To Replace The SD Card How To Connect the Doorbell Ch...

Page 3: ...ply of the equipment can be supplied by connecting the hole and the AC power supply on the wall 15 Stuck Hole Mounting the equipment onto the bracket 16 Security Screw Hole Mounting the security screw...

Page 4: ...h screws Fixed the AC 14 24V power line with screws Remove the battery cover and install two 18650 batteries Reset button long press more than 5 seconds to reset the product Put the battery cover and...

Page 5: ...ring a User 1 Enter to monitor interface click the share key and input administrator password 2 Click the and assign a nickname to the shared user then the QR code will be shown 3 Other device can be...

Page 6: ...ssage Please go back to playback interface then you can find some files you need Hardwired VS Battery Powered The AKASO Doorbell has dual power which means you can choose to run it off of the internal...

Page 7: ...sloch Das Ger t kann mit Strom versorgt werden indem das Loch mit der Netzstromversorgung an der Wand verbunden wird 15 Steckloch Zur Montage des Ger ts an der Halterung 16 Sicherheitsschrauben Loch M...

Page 8: ...rauben Entfernen Sie die Batterieabdeckung und setzen Sie zwei 18650 Batterien ein Reset Knopf l nger als 5 Sekunden gedr ckt halten um das Ger t zur ckzusetzen Setzen Sie die Batterieabdeckung und R...

Page 9: ...Bitte benennen Sie das Ger t um sobald die Verbindung mit dem WLAN erfolgreich war Wenn Sie Ihr WLAN Netzwerk neu konfigurieren m chten dr cken Sie bitte den Reset Knopf 5 Sekunden lang und befolgen...

Page 10: ...werden Bitte kehren Sie zur Abspieloberfl che zur ck dort werden Sie die gesuchten Dateien finden Festverdrahtung contra Batteriebetrieb Die AKASO T rklingel verf gt ber eine doppelte Stromversorgung...

Page 11: ...a AC la fuente de alimentaci n del equipo puede ser sustituida conectando el orificio a una toma de corriente de pared 15 Orificio obstruido montaje del equipo en la abrazadera 16 Orificio del tornill...

Page 12: ...C 14 24V con tornillos Retire la cubierta de la bater a e instale dos bater as 18650 Bot n de reinicio mantenga apretado el bot n durante m s de 5 segundos para restaurar los ajustes de f brica Ponga...

Page 13: ...a del administrador 6 Por favor cambie el nombre del dispositivo despu s de haberse conectado al WiFi con xito Si desea reconfigurar su red WiFi por favor presione el bot n de reinicio durante 5 segu...

Page 14: ...en bucle con tarjeta Micro SD Bater as 2 18650 TOTAL 5200mAh Notificaciones instant neas en 2s M ximo hasta 32G incluye micro tarjeta SD interna de 8G 1280 720 Dos bater as 18650 5200mAh funcionando...

Page 15: ...ontage 14 Trou D Entr e AC L alimentation de l appareil peut tre r alis e en connectant ce trou et l alimentation AC sur le mur 15 Trou De Fixation Montez l appareil sur le loquet 16 Trou De Vissage D...

Page 16: ...ec des vis Retirez le couvercle du boitier et installez deux piles 18650 Bouton de remise z ro appuyez longuement plus de 5 secondes pour remettre l appareil en r glages d usine Replacez le couvercle...

Page 17: ...cliquez sur la touche de partage et entrez le mot de passe administrateur 2 Cliquez sur le signe et assignez un nouveau surnom l utilisateur partag le code QR sera ensuite montr 3 D autres appareils p...

Page 18: ...areil n cessite une nouvelle charge La vie des piles cependant d pend de facteurs nombreux le principal tant l utilisation Des alertes de d tection de mouvements fr quente ou des sonneries fr quentes...

Page 19: ...montaggio 14 Foro di input AC la corrente elettrica per il dispositivo pu essere fornita connettendo il foro di corrente alla fonte di corrente sul muro 15 Foro di blocco per montare il dispositivo su...

Page 20: ...i Rimuovere il coperchio della batteria e installare due batterie Tasto di reset Tenere premuto per pi di 5 secondi per resettare le impostazioni del prodotto Inserire il coperchio dello scompartiment...

Page 21: ...or cliccare l icone di condivisione e inserire la password dell amministratore 2 Cliccare sul e assegnare un nickname all utente condiviso verr poi mostrato codice QR 3 Altri dispositivi possono esser...

Page 22: ...l interfaccia di riproduzione dove si trovano alcuni file di cui potresti avere bisogno Carica via cavo VS Batteria Il campanello AKASO ha doppia possibilit di carica quindi si potr scegliere se usarl...

Reviews: