background image

Audacity Software Overview 


Audacity is free software, licensed under the GNU General Public License(GPL). More information as well 
as open source code can be found on the web at 

http://audacity.sourceforge.net

Note: Please ensure you have installed the software before starting. 

 
Setting up your PC to work with Audacity. 
  1. Connection an input source to the unit. 
  2. Connection the USB lead to your computer. 
  3. Install the Audacity recording software. 
  4. Open the Audacity program. 
  5. Select 

Preferences

 from the Edit tab in the Audacity menu

.


  6. Select 

Audio I/O

 tab at the top left. 

  Under Playback, Device, select your internal sound card. 
  Under Recording, Device, select 

USB Audio CODEC


  Under Recording, Channels, select 

2 (Stereo)


  Check the box marked 

Play other tracks while recording new one


  Check the box marked 

Software Playthrough


19

Summary of Contents for TTA01USB

Page 1: ...AKAI MANUAL DE UTILIZARE Pick up profesional cu USB TTA01USB Romanian 02 11 English 12 20 ...

Page 2: ...tricat poate cauza incendiu sau socuri electrice Verificati cablu de alimentare din cand in cand Cand il gasiti deteriorat intrebati la cel mai apropiat service autorizat sa vi l schimbe Precautii de folosire Instalati aparatul pe o suprafata solida dar nu pe o boxa Instalati aparatul departe de caldura umezeala de razele soarelui Evitati murdaria praful fumul sau aburul Instalati aparatul departe...

Page 3: ...sa de curent din casa dumneavoastra consultati dealer ul local sau compania care furnizeaza curent Pentru produsele destinate sa opereze pe baza de baterii sau alte surse referiti va la instructiunile de operare 11 Impamantarea si polarizarea trebuie luate precautii astfel incat polarizarea si impamantarea aparatului sa nu fie stricate 12 Protectia cablului de alimentare Cablurile de alimentare tr...

Page 4: ...folositi aparatul dupa ce il lasati sa stea in jur de o ora dupa ce cresteti temperatura gradat Denumirea partilor componente 1 Cablu de alimentare 8 Selector de marime 30 17 2 Platan 9 Elevator brat sus jos 3 Protectie de praf 10 Buton STOP 4 Iesire jack RCA 11 Buton START 5 Suport de disc 12 Buton de viteza 33 45 6 Brat de sunet 13 USB cablu USB maxim 3m 7 Cartus 14 Comutator Phono Line 3 2 4 5 ...

Page 5: ...panglici ale curelei cu grija puneti cureaua peste scripetele motorului Fig 2 Aveti grija sa nu se rasuceasca 4 Indepartati panglica 5 Odata ce panglica este asezata ca in figura 2 banda trebuie rupta 6 Indepartati inca o banda Fig 3 7 Asezati discul peste platan Fig 4 8 Indepartati siguranta bratului de sunet Fig 5a 9 Indepartati siguranta penitei Fig 5b Fig 4 Fig 1 Fig 2 Fig 3 Fig 5 Fig 5a Fig 5...

Page 6: ...chipamentul este oprit inainte de a face schimbari la diferite conexiuni 1 Conectati cablul de alimentare la priza 2 Conectati cablul RCA la intrarea PHONO a amplificatorului Terminalele iesirii Amplificator Receptor L ALB Canalul Stanga R ROSU Canalul Dreapta Nota Puteti sa folositi si o intrare setand comutatorul phono line din spatele aparatului 3 Conectati cablul USB la calculator 6 ...

Page 7: ...deti protectia de praf 6 Introduceti selectorul de iesire in amplificator 7 Apasati butonul START 8 Ajustati controlul volumui la amplificator Bratul de sunet se va retrage automat in pozitia de stand by cand discul se termina Pentru a opri discul in timpul redarii apasati butonul STOP Precautii cand redati discuri Nu rotiti sau opriti platanul manual Nu opriti bratul de sunet manual cand se retra...

Page 8: ...a inlatura muradaria Cand suprafetele sunt foarte murdare stergeti cu o carpa inmuiata intr o solutie diluata neutra de cinci sau sase ori cu apa si apoi stergeti din nou cu carpa uscata Nu folositi ceara de mobila sau alti produsi Nu folositi diluanti benzen spray insecticid sau alte compozitii chimice pe sau in apropierea aparatului intrucat acestea vor duce la coroziunea suprafetei Specificatii...

Page 9: ...amul Audacity 1 Conectati o sursa de intrare in unitate 2 Conectati cablul USB in calculator 3 Instalati softul de inregistrare Audacity 4 Deschideti programul Audacity 5 Selectati Preferences din tabul Edit 6 Selectati tabul Audio I O din stanga sus Sub meniul Playback Device selectati placa dumneavoastra de sunet Sub meniul Recording Device selectati USB Audio CODEC Sub meniul Recording Channels...

Page 10: ...As 2 Cum inregistrati Porniti aparatul sa cante melodia sau albumul care doriti sa il inregistrati Apasati pe butonul rosu pentru a incepe inregistrarea Puneti bratul de sunet pe albumul sau melodia care doriti sa o inregistrati Apasati butonul albastru Pause pentru a pune pauza Apasati din nou pentru a continua Apasati butonul galben Stop Puteti acum sa redati inregistrarile dumneavoastra si sa e...

Page 11: ...ţionare ci duceţi l la un centru de colectare autorizat pentru reciclare În acest fel veţi ajuta la protejarea mediului înconjurător şi veţi putea împiedica eventualele consecinţe negative pe care le ar avea asupra mediului şi sănătăţii umane Pentru a afla adresa celui mai apropiat centru de colectare Contactaţi autorităţile locale Accesaţi pagina de internet www mmediu ro Solicitaţi informaţii su...

Page 12: ...ther cords The power cords should be routed such that they are not likely are not likely to be stepped on A damaged power cord can cause a fire or give you an electrical shock Check the power cord once in a while When you find it damaged ask your nearest authorized service center or your dealer for a replacement Handling Precautions Install on a solid flat surface but not on top of a speaker Insta...

Page 13: ...ibed in the operating instructions or as marked on the appliance Grounding or Polarization Precautio ns should be taken so that the groun ding or polarization means of an appliance is not defeated Power Cord Protection Power supply cords should be routed so that they are n ot likely to be wal ked on or pinched by items placed upon or agai nst them paying particular attention to cords at plugs conv...

Page 14: ...ce In cases like this use the turntable after allowing it to stand for about an hour or after raising the room temperature gradually Names of Parts 1 AC power cord 8 Size Select 30 17 2 Platater 9 Arm elevation UP DOWN 3 Dust cover 10 STOP Button 4 RCA output jack 11 START Button 5 Platter mat 12 SPEED Button 33 45 6 Tonearm 13 USB socket USB cable limit within 3M 7 Cartridge 14 Phono Line switch ...

Page 15: ... on the turntable belt carefully pull the belt over the motor pulley Fig 2 Be sure it does not twist 4 Remove the ribbon 5 Once the belt is seated in the pulley s groove as Fig 2 the fiber tape can be torn off 6 Remove another one ribbon Fig 3 7 Place the mat on top of the platter Fig 4 8 Remove the tie securing the tonearm Fig 5a 9 Remove the stylus guard Fig 5b Fig 1 Fig 2 Fig 3 Fig 5 Fig 5a Fig...

Page 16: ...rent connections 1 Connect the power cord to an AC outlet 2 Connect the RCA cable to the PHONO input of your AMPLIFIER Output terminals Amplifier Receiver L White L Channel R Red R Channel Note You can also use a line input by setting the phono line switch at the rear of the turntable to line 3 Connect PC via USB cord Set the PHONO LINE switch to LINE Set the PHONO LINE switch to PHONO PC 16 ...

Page 17: ...plifier 7 Press the START button 8 Adjust the volume control on the amplifier The tonearm will automatically return to the rest position when the record finishes To Stop During Play B Press the STOP button Precautions when playing records Do not rotate or stop the platter manually Do not stop the tonearm manually when it is returning automatically Moving or jarring the unit without securing the to...

Page 18: ...oth to wipe off dust and dirt When the surfaces are very dirty wipe with a soft cloth dipped in some neutral cleanser diluted five or six times with water and wrung out well and then wipe again with a dry cloth Do not use furniture wax or cleaners Never use thinners benzene insecticide sprays and other chemicals on or near this unit since these will corrode the surfaces Specification GENERAL Power...

Page 19: ...dacity 1 Connection an input source to the unit 2 Connection the USB lead to your computer 3 Install the Audacity recording software 4 Open the Audacity program 5 Select Preferences from the Edit tab in the Audacity menu 6 Select Audio I O tab at the top left Under Playback Device select your internal sound card Under Recording Device select USB Audio CODEC Under Recording Channels select 2 Stereo...

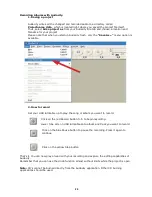
Page 20: ...Set your USB turntable up to play the song or album you want to record Click on the red Record button to b to begin recording Lower tone arm on USB turntable onto album and track you want to record Click on the blue Pause button to pause the recording Press it again to continue Click on the yellow Stop button That s it You can now play around with your recording and explore the editing capabilitie...

Reviews: