background image


4.


Press “

/

” button to select “TREBLE” and press the “

/

” button to enter treble 

adjustment menu to adjust treble. 

5.


Press “

/

” button to select “BALANCE” and press the “

/

” button to enter balance 

adjustment menu to adjust balance. 

6.


Press “

/

” button to select “AVL” and 

press the “

/

”button to select the avl 

function on or off. 

7.  

Press “

/

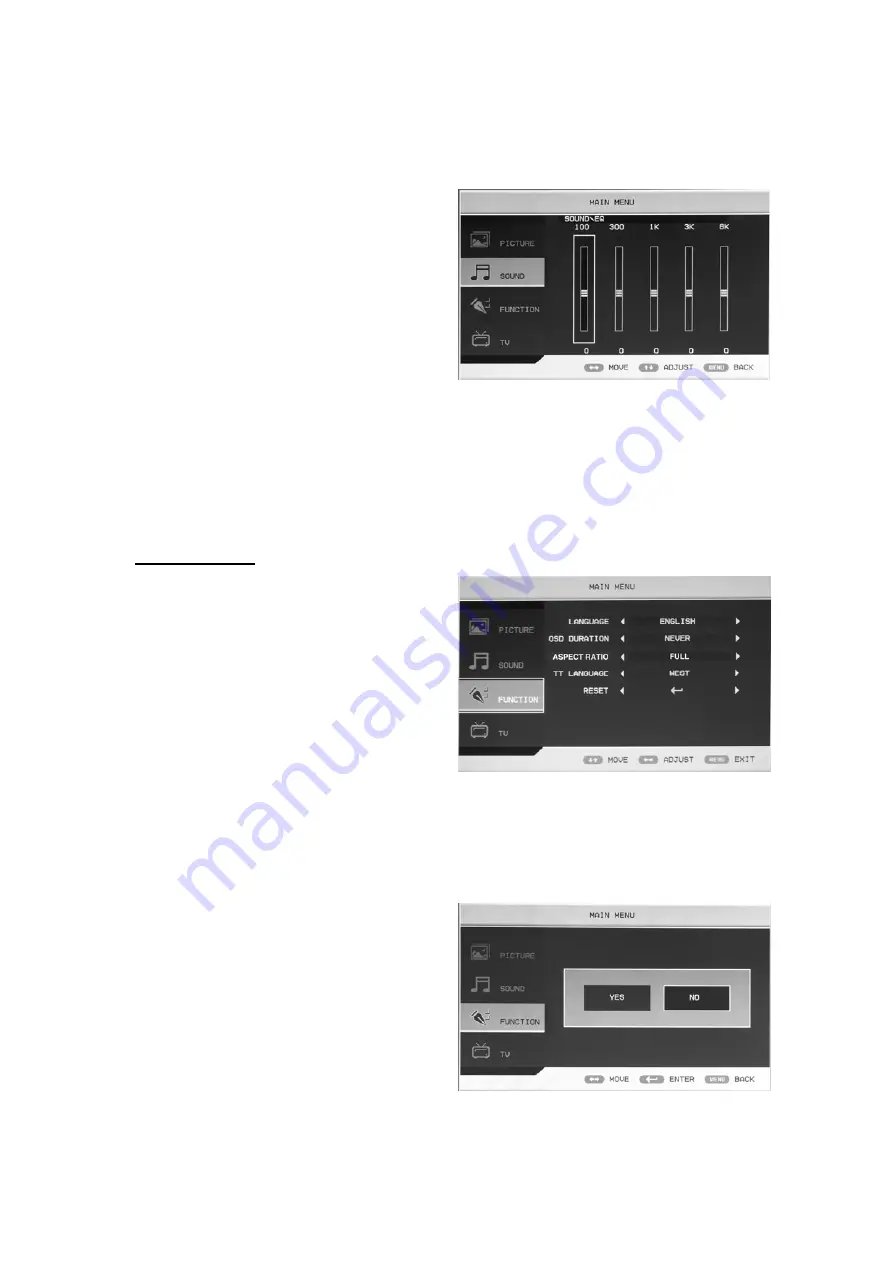
” button to select “EQ” and 

press the “ENTER” button to enter. Press 

/

” button to select the frequency of 

wave band and press the “

/

” button to 

adjust .


FUNCTION 

1.


Press the “MENU” button to enter the 
OSD menu. Then press “

/

” button to 

select the “FUNCTION” menu. Enter the 
“FUNCTION” menu by pressing “

” 

button . 

2.


Press “

/

” button to select 

“LANGUAGE” menu and press the 

/

” button to select the OSD language 

which you desire. 

3.


Press “

/

” button to select “OSD DURATION” and press the “

/

” button to select the 

OSD duration which you desire. 

4.


Press “

/

” button to select “ASPECT RATIO” and press the “

/

” button to select the 

aspect ratio which you desire. 

5.


Press “

/

” button to select “TT LANGUAGE” menu and press the “

/

” button to select 

local teletext language. 

6.


Press “

/

” button to select “RESET”                                 

and press the “ENTER” button to enter. 
Press the “

/

” button to select “YES” or 

“NO” and press “ENTER” button to 
confirm. Select “YES” to reset the 
function and select “NO” to return the 
previous menu. 


9

Summary of Contents for LT-1906AB

Page 1: ...MANUALUL UTILIZATORULUI...

Page 2: ...Con inut Introducere Avertizare Aten ie Descrierea unit ii principale Telecomanda OSD ajustare de baz Specifica ii Trouble Shooting 2...

Page 3: ...cient ntre receptor i perete pentru a permite ventilarea 3 Evita i loca iile excesiv de calde pentru a preveni posibila deteriorare a receptorului sau defec iunea prematur a unei componente 4 Acest re...

Page 4: ...R ADRESA I V PERSONALULUI DE SERVICE CALIFICAT Acest simbol are rolul de a alerta utilizatorul pentru a evita riscul de electrocutare demontarea acestui echipament nu poate fi realizat de c tre oricin...

Page 5: ...urile sau deschiderile echipamentului Nu v rsa i nici un fel de lichid pe echipament Precau ie Evita i expunerea unit ii principale la lumina direct a soarelui i la alte surse de c ldur Nu plasa i tel...

Page 6: ...provoca v t marea grav a unei persoane i defectarea lui Precau ie Atunci c nd produsul nu este utilizat pentru o perioad ndelungat de timp v recomandam s deconecta i cablul de la priz Precau ie Panoul...

Page 7: ...i semnalul de intrare POWER Pornire c nd este modul a teptare sau intrare n modul de a teptare Conexiuni TV 1 HDMI terminal de intrare 2 VGA terminal de intrare a semnalului PC 3 SCART terminal de int...

Page 8: ...i de reglare EXIT Ie ire OSD Afi are pe ecran 0 9 Selecta i i trece i la un canal folosind 0 9 Comutati ntre canal cu o cifr i canal cu dou cifre Comuta i napoi i nainte ntre canalul curent i cel ante...

Page 9: ...tru a regla contrastul 5 Ap sa i butonul pentru a selecta SATURATION i ap sa i butonul pentru a intra n meniul de ajustare culoare pentru a ajusta satura ia 6 Ap sa i butonul pentru a selecta SHARPNES...

Page 10: ...tru a selecta EQ i ap sa i butonul ENTER Ap sa i butonul pentru a selecta banda de frecven de und i ap sa i butonul pentru reglare FUNC IE 1 Ap sa i butonul MENU pentru a accesa meniul OSD Apoi ap sa...

Page 11: ...la meniul anterior 3 Ap sa i butonul pentru a selecta MANU SEARCH ap sa i butonul butonul pentru selecta YES sau NO i ap sa i ENTER pentru confirmare Selecta i DA pentru a efectua c utarea manual i N...

Page 12: ...erge i i ap sa i butonul CYAN ALBASTRU Ap sa i butonul ENTER pentru confirmare e Ap sa i butonul pentru a selecta un canal din list i ap sa i butonul ENTER pentru a accesa meniul EDIT SUB f Ap sa i bu...

Page 13: ...tonul pentru a selecta V POSITION i ap sa i butonul pentru a selecta meniul de ajustare V POSITION pentru reglarea V POSITION 4 Ap sa i butonul pentru a selecta PHASE i ap sa i butonul pentru a select...

Page 14: ...Specifica ii 14...

Page 15: ...r de pe telecomand Ap sa i butonul SOURCE apoi ap sa i butonul n mod repetat pentru a selecta sursa TV Imagine slab sunet OK Verifica i cablul de interfa ntre TV i anten cablu TV ncerca i un alt canal...

Page 16: ...ui produs este f cut corect ve i ajuta la prevenirea unui poten ial mediu periculos pentru s n tatea uman lucru care ar putea fi provocat de manipularea necorespunz toare a de eurilor provenite din ac...

Page 17: ...USER S MANUAL 19 LCD TV SET MODEL LT 1906AB...

Page 18: ...Contents Introduction Warning Caution Main Unit Description Remote Control OSD basic adjustment Specifications Trouble Shooting 1...

Page 19: ...ing Allow enough space between the receiver and the wall to permit ventilation Avoid excessively warm locations to prevent possible damage to the cabinet or premature component failure This TV receive...

Page 20: ...CAUTION RISK OF ELECTRIC SHOCK DO NOT OPEN This symbol is intended to alert the user to avoid the risk of electric shock do not disassemble this equipment by anyone except a qualified service personn...

Page 21: ...s into the television cabinet slots or openings Never spill any kind of liquid on the television receiver Caution Avoid exposing the main unit to direct sunlight and other source of the heat Do not st...

Page 22: ...individual and damage to the television may result if it should fall Caution When the product is not used for an extended period of time it is advisable to disconnect the AC power cord from the AC out...

Page 23: ...l POWER Switch on when at standby mode or enter the standby mode TV Terminal Connections 1 HDMI input terminal 2 VGA input terminal of simulation signal of PC 3 SCART input terminal 4 S video input te...

Page 24: ...al adjustable setting EXIT Exit the OSD On screen display 0 9 Select and switch to a channel using 0 9 Switch the program digit Switch back and front between the current and previous channels PMODE Se...

Page 25: ...press the button to enter color adjustment menu to adjust saturation 6 Press button to select SHARPNESS and press the button to enter sharpness adjustment menu to adjust sharpness 7 Press button to se...

Page 26: ...ss button to select the FUNCTION menu Enter the FUNCTION menu by pressing button 2 Press button to select LANGUAGE menu and press the button to select the OSD language which you desire 3 Press button...

Page 27: ...h you want to fine tune 5 Press button to select COLOR SYSTEM and press the button to select the local color system 6 Press button to select SOUND SYSTEM and press the button to select the local sound...

Page 28: ...to select SKIP and press the button to select skip the channel on or off PC 1 Press the MENU button to enter the OSD menu Then press button to select the PC menu Enter the PC menu by pressing button...

Page 29: ...60 XGA 1024x768 48 4 60 WXGA 1360 x 768 47 7 60 HDMI INPUT Model Resolution Horizontal Frequency KHz Vertical Frequency HZ VGA 640 x 480 31 47 59 94 480i 720 x480i 15 73 59 94 60 576i 720 x 576i 15 6...

Page 30: ...button on the remote Press the SOURCE button the remote then press the button repeatedly to select the TV source Poor picture sound OK Check the interface cable between TV and antenna cable TV Try ano...

Page 31: ...ectronic product By ensuring the correct disposal of this product you will help prevent potentially hazardous to the environment and to human health which could otherwise be caused by unsuitable waste...

Reviews: