Akai APC20 Quick Start Manual Download Page 3


 INTRODUCTION 

 
This Quickstart Guide is intended to give you a brief overview of the functionality and features of the Akai APC20 Ableton 
Controller. 
 
APC20 is designed for performance with Ableton Live. In this manual, you will find instructions on how to connect the APC20 
and use its basic features with Ableton Live – Akai Professional APC Edition.  APC20 can also be used in "generic mode" as a 
controller with other virtual DJ applications that use MIDI protocol.   
 
If you already own Ableton Live, make sure to download the latest Ableton Live update for full APC20 support at 

www.ableton.com/latest_versions

. We recommend referring to the Ableton manual on the CD as well as the lessons 

available in the software itself.


 SOFTWARE INSTALLATION 

 
To install the Akai Profesisonal APC Edition of Ableton Live, simply insert the included CD into your computer, then follow the 
on-screen instructions.  
 
To access the software after installing it, you can find it here: 

PC: 

Start Menu   All Programs   Ableton   Live [Version Number]


Mac:

 Applications   Ableton   Live [Version Number]

 
In order for Ableton Live to properly recognize the APC20, however, you must connect the controller before opening the 
software, and you must set your Preferences accordingly.  See the CONNECTION DIAGRAM and SOFTWARE SETUP 
sections for instructions on how to do this. 
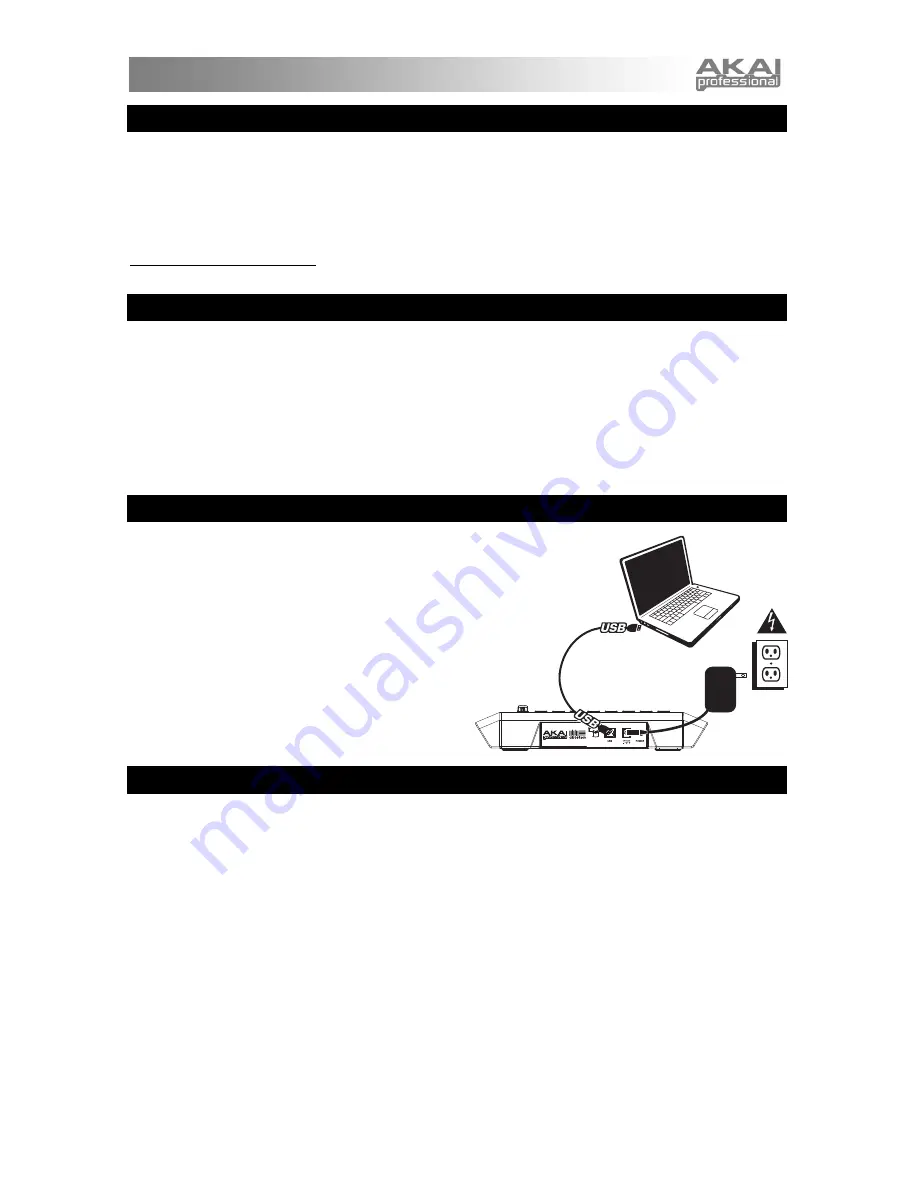
 

 CONNECTION DIAGRAM 

 
1.


Connect APC20 to a power source using the included 
12V–2A DC power adapter.


2.


Connect APC20 to your computer with a standard USB 
cable (included). 

3.


Turn on APC20. 

4.


Open Ableton Live – Akai Professional APC Edition. 


Note:

 We recommend keeping the APC20 away from devices 

that can cause electrical interference.  If its performance is 
noticeably affected, move or reposition the APC20 away from 
the source of interference. 


 SOFTWARE SETUP 

 
After connecting the APC20 (as shown in the CONNECTION DIAGRAM), you will need to configure Ableton Live to recognize it: 


1.


Open Ableton Live – Akai Professional APC Edition (

after

 connecting and powering on the APC20). 

2.


Go to 

Options   Preferences 

(PC) or 

Live   Preferences 

(Mac). 

3.


Click the 

MIDI Sync

 tab. 

4.


Select "APC20" as the device for the "Control Surface," "Input" and "Output." 

5.


Under "MIDI Ports," turn all available "Track" and "Remote" settings "On." 

6.


Close the Preferences window. 

 
When you open the software, a panel on the right should display Lessons to help you get started with the Akai Professional 
APC Edition of Ableton Live. We recommend starting with the “Tour of Live” Lesson. From the first page of this Lesson, there is 
also a link to a special Lesson called “Using the APC20,” which will walk you through all of the APC20’s controls in detail. 


We recommend referring to the Lessons to further acquaint yourself with the hardware's and software's features so you can 
take full advantage of them when performing! (If you decide to close this panel for now, you can always access them again 
from the 

Help

 menu.) 


Note on MIDI Mapping: 

We have already mapped APC20's controls to some of Ableton Live's most useful functions, but if you 

would like to change your MIDI mappings, you can do so by clicking the "MIDI" button in the upper right-hand corner of the 
software window.  From here you can create new mappings as you could with any other controller.  Refer to Ableton Live's 
manual or lessons for more information on how to do this. 


Summary of Contents for APC20

Page 1: ...WWW AKAIPRO COM WWW ABLETON COM QUICKSTART GUIDE ENGLISH 3 5 GUÍA DE INICIO RÁPIDO ESPAÑOL 6 8 GUIDE D UTILISATION RAPIDE FRANÇAIS 9 11 KURZANLEITUNG DEUTSCH 12 14 GUIDA RAPIDA ITALIANO 15 17 ...

Page 2: ......

Page 3: ... APC Edition Note We recommend keeping the APC20 away from devices that can cause electrical interference If its performance is noticeably affected move or reposition the APC20 away from the source of interference SOFTWARE SETUP After connecting the APC20 as shown in the CONNECTION DIAGRAM you will need to configure Ableton Live to recognize it 1 Open Ableton Live Akai Professional APC Edition aft...

Page 4: ...ks 1 8 If you hold SHIFT and press the second button in the first row after releasing SHIFT the Clip Launch View will represent Clips 1 5 of Tracks 9 16 If you hold SHIFT and press the first button in the second row after releasing SHIFT the Clip Launch View will represent Clips 6 10 of Tracks 1 8 2 SHIFT Holding this button down lets you access extra controller features printed in amber on the co...

Page 5: ...ive by one track left or right or by one scene up or down Holding SHIFT while pressing this pad will move the selection by 8 tracks left or right or by 5 scenes up or down effectively changing the Clip Launch View see 1 13 NOTE MODE Press this button to put the CLIP LAUNCH SESSION OVERVIEW buttons into Note Mode In Note Mode the 8x5 grid will be divided into two equal halves with each button repre...

Page 6: ...te el APC20 al suministro eléctrico con el adaptador de potencia de 12 V 2 A CC incluido 2 Conecte el APC20 a su computadora con un cable USB estándar incluido 3 Encienda el APC20 4 Abra Ableton Live Akai Professional APC Edition CONFIGURACIÓN DEL SOFTWARE Después de conectar el APC20 como se muestra en el DIAGRAMA DE CONEXIÓN es necesario que configure Ableton Live para reconocerlo 1 Abra Ableton...

Page 7: ...mente ninguna ranura de clip Ejemplos Si tiene 16 pistas con 20 clips en cada una la primera vista Clip Launch representa los Clips 1 5 de las pistas 1 8 Si mantiene pulsado SHIFT y pulsa el segundo botón de la primera fila después de soltar SHIFT la vista Clip Launch representa los Clips 1 5 de las pistas 9 16 Si mantiene pulsado SHIFT y pulsa el primer botón de la segunda fila después de soltar ...

Page 8: ...regrabación MIDI Activa y desactiva la sobregrabación MIDI 12 SELECCIÓN DE BANCO Estos pads mueven el cursor selección en Ableton Live una pista a la izquierda o derecha o una escena arriba o abajo Reteniendo SHIFT mientras se pulsa este pad la selección se mueve 8 pistas a la izquierda o la derecha o 5 escenas arriba o abajo cambiando efectivamente la vista Clip Launch consulte el Nº 1 13 NOTE MO...

Page 9: ...r les instructions SCHÉMA DE CONNEXION 1 Branchez le APC20 à une prise d alimentation à l aide du bloc d alimentation 12 V 2 A CC inclus 2 Branchez le APC20 à un ordinateur à l aide du câble USB standard inclus 3 Mettez le APC20 sous tension 4 Lancez la version professionnelle d Ableton Live pour APC de Akai CONFIGURATION LOGICIELLE Après avoir raccordé le APC20 comme indiqué dans la section SCHÉM...

Page 10: ...s qui sont présentement en mode de lecture ROUGE des clips sont présents dans cette grille de 8 x 5 qui contient des emplacements pour clips qui ne sont pas en mode de lecture Exemples Si vous avez 16 pistes contenant 20 clips chacune le premier affichage Clip Launch représente les clips 1 à 5 des pistes 1 à 8 Si vous maintenez la touche SHIFT enfoncée tout en appuyant sur la deuxième touche de la...

Page 11: ...ne piste 1 à 8 ou MASTER 10 TOUCHES DE DÉFILEMENT Ces touches de défilement PLAY STOP et REC correspondent aux mêmes fonctions que celles dans le logiciel 11 MIDI OVERDUB Cette touche permet d activer ou de désactiver la fonction MIDI Overdub enregistrement MIDI fractionné 12 BANK SELECT Ces touches permettent de déplacer le curseur sélection dans le Ableton Live une piste à la fois gauche ou droi...

Page 12: ...2V 2A Gleichspannungsnetzteils an eine Steckdose an 2 Verwenden Sie zum Anschluss des APC20 an Ihren Computer das beiliegende Standard USB Kabel 3 Schalten Sie den APC20 ein 4 Öffnen Sie Ableton Live Akai Professional APC Edition SOFTWARE EINSTELLUNGEN Nach dem Anschluss des APC20 wie in der ANSCHLUSSÜBERSICHT gezeigt muss Ableton Live so konfiguriert werden dass der Controller erkannt wird 1 Öffn...

Page 13: ...s pro Track haben repräsentiert der erste Clip Launch View die Clips 1 5 der Tracks 1 8 Wenn Sie SHIFT gedrückt halten und dann den zweiten Button in der ersten Reihe drücken werden nach dem Loslassen des SHIFT Buttons die Clips 1 5 der Tracks 9 16 im Clip Launch View dargestellt Falls Sie SHIFT gedrückt halten und den ersten Button in der zweiten Reihe drücken werden nach dem Loslassen des SHIFT ...

Page 14: ...ASTEN Diese Transporttasten PLAY STOP und REC führen dieselben Funktionen wie die Transportsteuerungen der Software aus 11 MIDI OVERDUB Schaltet MIDI Overdub an oder aus 12 BANK SELECT Diese Pads bewegen den Cursor oder die Auswahl in Ableton Live um einen Track links oder rechts bzw um eines Scene auf oder ab Falls Sie dabei die SHIFT Taste gedrückt halten bewegen Sie die Auswahl um 8 Tracks link...

Page 15: ...d una fonte di alimentazione servendosi dell adattatore di alimentazione 12V 2A CC in dotazione 2 Collegare l APC20 al computer servendosi di un cavo USB standard in dotazione 3 Accendere l APC20 4 Aprire l Ableton Live Akai Professional APC Edition CONFIGURAZIONE DEL SOFTWARE Dopo aver collegato l APC20 come illustrato nello SCHEMA DEI COLLEGAMENTI sarà necessario configurare l Ableton Live in mo...

Page 16: ...clips nella griglia 8x5 ma nessuna slot è attualmente riprodotta Esempi se si hanno 16 tracce con 20 clip per ciascuna traccia il primo Clip Launch View rappresenterà le clip 1 5 delle tracce 1 8 Se si tiene premuto SHIFT e si preme il secondo tasto della prima riga dopo aver rilasciato la pressione da SHIFT il Clip Launch View illustrerà le clip 1 5 delle tracce 9 16 Se si tiene premuto SHIFT e s...

Page 17: ...oftware 11 MIDI OVERDUB Accende e spegne la funzione MIDI Overdub 12 BANK SELECT Seleziona banco Questi pad muovono il cursore la scelta in Ableton Live di una traccia sinistra o destra per volta o di una scena in alto o in basso per volta Tenendo premuto SHIFT al momento di premere questo pad si sposterà quanto selezionato di 8 tracce a sinistra o a destra o di 5 scene in alto o in basso cambiand...

Page 18: ......

Page 19: ...7 51 0310 A ...

Page 20: ...WWW AKAIPRO COM WWW ABLETON COM ...

Reviews: