background image

English   

- 66 -

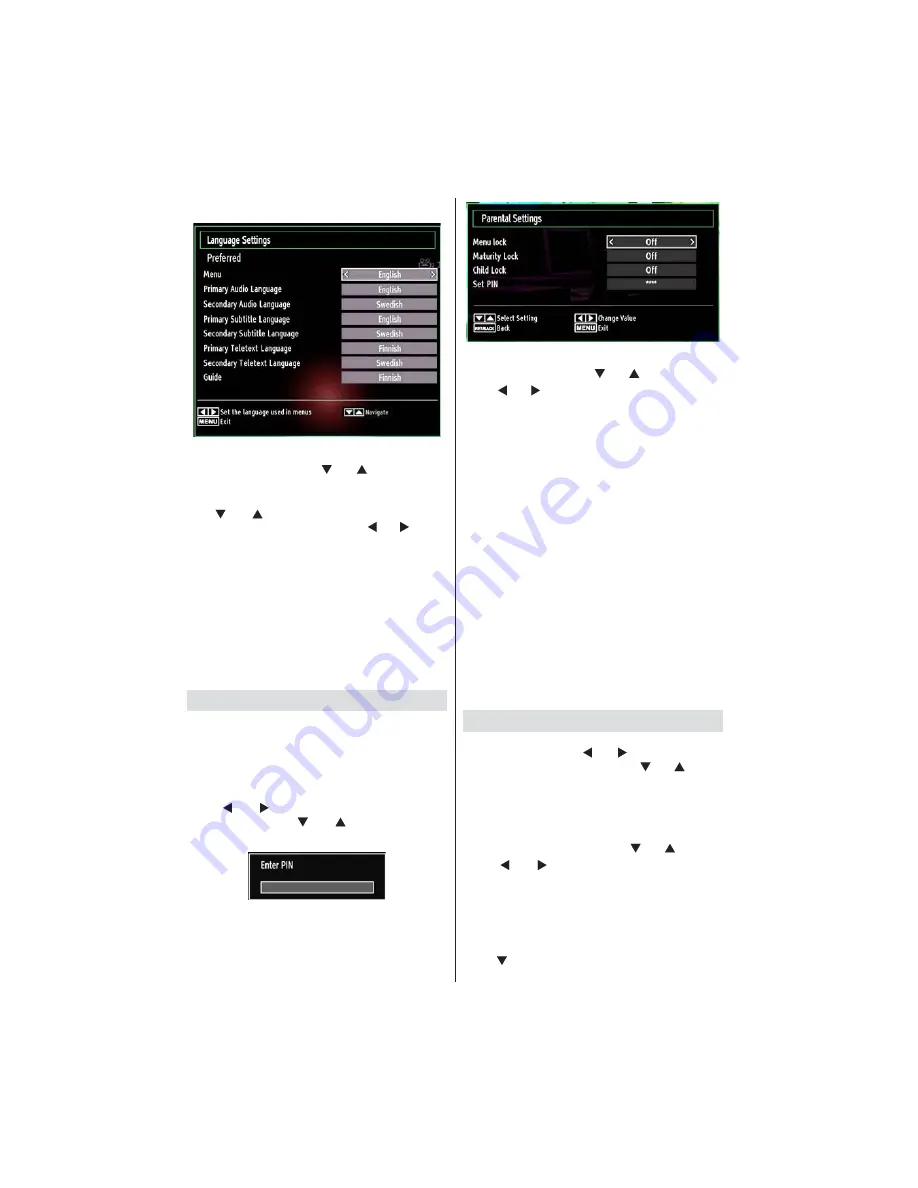
Language Settings

]    !  %   
Settings item by pressing “

” or “

” buttons. Press 

OK and Language Settings submenu will be displayed 
on the screen:

Use “

” or “

” buttons to highlight the menu item 

that will be adjusted and then press “ ” or “ ” button 
to set.

Notes:

System Language determines the on-screen menu 

language.

Audio Language is used for selecting the soundtrack 

of a channels.

 $   $?% %

choices are available on a broadcast. Secondary 
 % #? 
are not available.

Parental Control

To prohibit viewing of certain programmes, channels 
and menus can be locked by using the parental 
control system.

This function enables or disables the menu protection 
system and allows the PIN code to be changed.

Press 

MENU

 button and select the Settings icon by 

using “ ” or “ ” button. Press 

OK

 button to view 

Settings menu. Use “

” or “

” button to highlight 

Parental

 and press 

OK

 to continue:

To display parental lock menu options, the PIN number 
should be entered. The factory default PIN number 
is 

0000

After coding the correct PIN number, parental settings 
menu will be displayed:

Parental Settings Menu Operation

Select an item by using “

” or “

” button. 

Use “ ” or “ ” button to set an item. 

Press

 OK

 button to view more options.

Menu Lock (optional)

: Menu lock setting enables or 

 =%; =%
the installation menu or the whole menu system. 

Maturity Lock (optional)

: When set, this option 

gets the maturity information from the broadcast and 
if this maturity level is disabled, disables access to 
the broadcast.

Child Lock (optional)

: When Child Lock is set, the TV 

can only be controlled by the remote control. In this 
case the control panel buttons will not work. Hence, 
if one of those buttons is pressed, 

Child Lock Is On


will be displayed on the screen when the menu screen 
is not visible.

Set PIN

[   ? ]^ =; K  

=    ?   =;  ? %% 
$?  #  
purposes.

IMPORTANT

: The factory default pin number is 

0000

if you change the pin number make sure you write it 
down and keep it safe.

Timers

To view Timers menu, press 

MENU

 button and select 

Settings icon by using “ ” or “ ” button. Press 

OK


button to view Settings menu. Use 

” or “

 button 

to highlight Timers and press 

OK

 to continue:

Setting Sleep Timer

This setting is used for setting the TV to turn off after 
a certain time.

Highlight Sleep Timer by using “

” or “

” button.

Use “ ” or “ ” button to set. The timer can be 

programmed between 

Off

 and 

2.00

 hours (120 

minutes) in steps of 30 minutes.

Setting Programme Timers

You can set programme timers for a particular 
programme using this feature.

Press “ ” button to set timers on an event. Programme 
timer function buttons will be displayed on the screen.

Summary of Contents for ALED2606TBK

Page 1: ...43 1 83 ALED2606TBK LCD TV DVD COMBI WITH DVB T C TUNER...

Page 2: ...al Search 58 Analogue Fine Tune 58 Network Channel Scan 58 Clear Service List 58 Managing Stations Channel List 59 Operating the Channel List 59 Moving a Channel 59 Deleting a Channel 59 Renaming a Ch...

Page 3: ...DVD recorder VCR PC etc This device is only suitable for dry indoor use This appliance is intended solely for private domestic use and may not be used for industrial and commercial purposes We exclude...

Page 4: ...Do not try to recharge batteries there is a danger of explosion Replace batteries only with the same or equivalent type This symbol on the product or on its packaging means that your electrical devic...

Page 5: ...wallowed Store batteries out of the reach of small children In case of swallowing a battery medical aid has to be sought immediately Also keep the packaging away from children as there is danger of su...

Page 6: ...ower Save Mode When the TV is not in use please switch off or disconnect the TV from the mains plug This will also reduce energy consumption the TV from the mains plug instead of keeping stand by mode...

Page 7: ...ure mode selection 15 Source selection 16 Red button 17 Green button 18 19 Menu on off 20 Blue button 21 OK Edit Channel list Hold in TXT mode 22 Cursor right Subpage in TXT mode 23 Cursor down 24 Vol...

Page 8: ...Input connects to an aerial antenna system Note If you use a decoder or a media recorder you should connect the aerial cable through the device to the television with an appropriate antenna cable as...

Page 9: ...se the supplied AV connection input located on the plural side of the supplied AV connection cable The colours of the connected jacks should match To enable audio connection you must use RED and WHITE...

Page 10: ...e resolution that suits your viewing requirements Resolution information can be found in the appendix PC Input back Side AV Input PC VGA Cable not supplied PC Audio Cable not supplied Side Audio Video...

Page 11: ...HDMI socket you can connect via HDMI When you connect to a DVD player as illustrated below switch to the HDMI source See Input Selection section DVD players can also be connected through cable is not...

Page 12: ...he PC input with YPbPr to PC cable not supplied Basic Operations You can operate your TV using both the remote control and onset buttons Operation with the Buttons on the TV Volume Setting volume of t...

Page 13: ...s OK button to proceed SUBTTL Press SUBTITLE button to view Select Genre menu Using this feature you can search the programme guide database in accordance with the genre Info available in the programm...

Page 14: ...g TV only and full When set press to select Teletext Language Use or to select the desired Teletext Language Press OK button on the remote control to continue and the following message will be display...

Page 15: ...tune by using button and press OK button Automatic Channel Scan Retune options will be displayed You can select options by using and OK buttons Auto Channel Scan Menu Operation Digital Aerial Searches...

Page 16: ...Digital Cable you can set the desired options and press OK button to search Analogue Manual Search After selecting search type as analogue you can use button to highlight an item and then press or but...

Page 17: ...dit this channel list set favourites or set active stations to be listed by using the Channel List options Press MENU button to view main menu Select the Channel List item by using or button Press OK...

Page 18: ...the favourite channels are navigated Select a channel by using or button Press OK button to add selected channel to favourites list Press OK button again to remove Button Functions OK Add remove a sta...

Page 19: ...a video OK button to play a video If you select OK button you can select or Jump Numeric buttons The TV will jump to the buttons on your remote control Play This OK button Play GREEN button with the...

Page 20: ...er in Media Browser Settings Music folder will be displayed as pressing FAV button INFO Press once to disable with the change of the icons Media Browser Settings Q using the Settings dialog Press or b...

Page 21: ...Press OK button to view Picture Settings menu Operating Picture Settings Menu Items Press or button to highlight a menu item Use or button to set an item Press MENU button to exit Picture Settings Me...

Page 22: ...ettings will be added to the Picture Settings while in PC mode PC Picture Settings For adjusting PC picture items do the following Press or button to select Picture icon Picture menu appears on the sc...

Page 23: ...evel of advertisements tend to be louder than programmes Dynamic Bass Dynamic Bass is used to increase bass effect of the TV set Digital Out Sets digital out audio type Detailed settings can be config...

Page 24: ...settings may change depending on the service provider Press MENU button and select the icon by using or button Press OK button to view Settings menu Use or button to highlight Conditional Access and...

Page 25: ...more options Menu Lock optional Menu lock setting enables or the installation menu or the whole menu system Maturity Lock optional When set this option gets the maturity information from the broadcas...

Page 26: ...U button to cancel Deleting a Timer Select the timer you want to delete by pressing or button Press RED button Select YES by using or buttons to delete the timer Select NO to cancel 5 Select Date Time...

Page 27: ...enables any special signal concerning the audio you can set this setting as On to receive such signals Audio Description Audio description refers to an additional narration track for blind and visual...

Page 28: ...s for example in poor adverse weather conditions some text errors may occur or the teletext mode may be aborted Teletext function buttons are listed below Teletext Mix Activates teletext mode when pre...

Page 29: ...the aerial Is the picture or teletext unrecognisable Check if you have entered the correct frequency Please retune the channels The picture quality may degrade when two peripherals are connected to th...

Page 30: ...z 17 1400x900 65Hz 75Hz 18 1600x1200 60 Hz 19 1680x1050 60 Hz 20 1920x1080 60 HzA 21 1920x1080 60 HzB 22 1920x1200 60HzA 23 1920x1200 60Hz Appendix B AV and HDMI Signal Compatibility Input Signal Type...

Page 31: ...press OK button to open Upgrade Options menu Upgrade Options menu select Scan for upgrade and press OK button the upgrade A progress bar indicates the remaining download progress When the download com...

Page 32: ...ic mp3 MPEG 1 Layer 1 2 MP3 32Kbps 320Kbps Bit rate 32KHz 48KHz Sampling rate Photo jpg jpeg Baseline JPEG max WxH 15360x8640 4147200bytes Progressive JPEG max WxH 1024x768 6291456bytes bmp max WxH 96...

Page 33: ...412 Weight Kg 6 50 Digital Reception DVB T Y Y K for UK Y K Frequency range 474 850 MHz for UK models 170 862 MHz for EU models Transmission standard DVB T MPEG 2 MPEG 4 Demodulation COFDM with 2K 8K...

Page 34: ...3 JPEG MPEG playback NTSC PAL playback according to disc content LPCM audio via coaxial digital audio output optional Multi Audio up to 8 support According to disc content Multi Subtitle up to 32 supp...

Page 35: ...the disc to direct sunlight or heat sources such as hot air ducts or leave it in a car parked in direct sunlight as the temperature can rise quickly and damage the disc After playing store the disc i...

Page 36: ...ould press STOP button three times to eject Overview of the Remote Control 1 Standby 2 Numeric buttons 3 Return back 4 Language selection Set language 5 Display time DVD menu 6 Clear 7 Stop 8 No funct...

Page 37: ...glish 78 General Operation You can operate DVD movie CD music or picture CD s content by using the proper buttons on your remote control Below are main functions of commonly used remote control button...

Page 38: ...k to the initial settings 7 If a language is selected not supported by the disc the subtitle language will automatically be set to the disc s priority language 8 Usually a circulation will happen whil...

Page 39: ...TPUT You can set Spdif Output as PCM or RAW If you select PCM from SPDIF Output in DVD menu and play DVD with Dolby audio you can get audio output with two channels via the speakers and the SPDIF Out...

Page 40: ...und have been recorded by means of digital signals Incorporating a new video compression technology MPEG II and high density recording technology DVD enables aesthetically pleasing full motion video t...

Page 41: ...lby D igital and M P E G 2 S ystem Vario u s screen and au dio fu nctio n s ca n b e easily selected throu gh th e on scr een m enu A n LP is record ed as an an alo g sig n al w ith m ore d isto rtio...

Reviews: