Akai AL2605TBK User Manual Download Page 10

English 

- 41 -

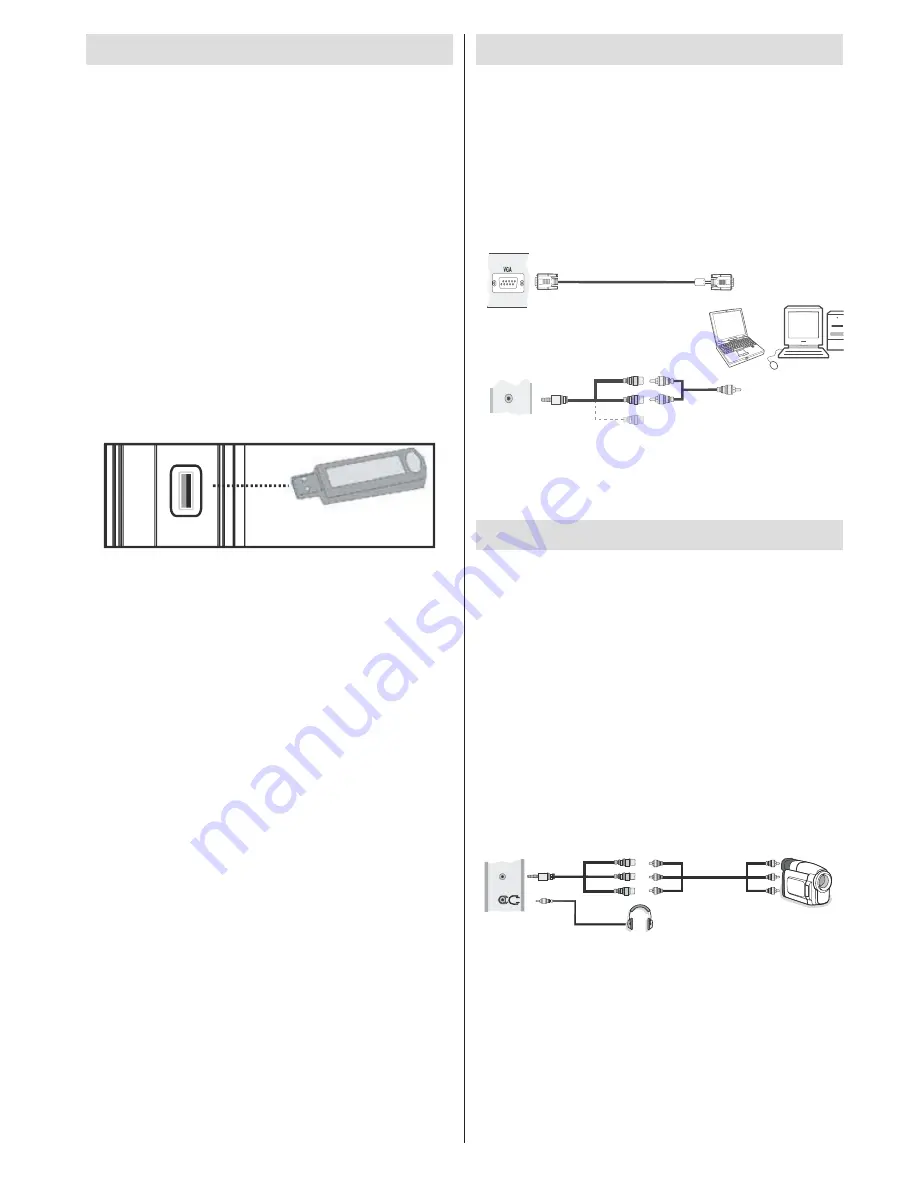
Using USB Media

You can connect USB devices to your TV by using 

• 

the USB input of the TV. This feature allows you to 

display/play JPG, MP3 and video files stored on a 

USB stick.
It is possible that certain types of USB devices (e.g. 

• 

MP3 Players) may not be compatible with this TV. 

You should back up your files before making any 

• 

connections  to  the TV  set  in  order  to  avoid  any 

possible  data  loss.  Note  that  the  manufacturer 

will not be responsible for any file damage or data 

loss.

 Do not pull out USB module while playing a file.

• 

CAUTION: Quickly plugging and unplugging USB 

devices, is a very hazardous operation. Do not 

repeatedly quickly plug and unplug the drive. This 

may cause physical damage to the USB player and 

especially the USB device itself.

SIDE VIEW        USB MEMORY

5Vdc

Max:500mA

USB

USB Memory Connection

IMPORTANT: The TV should be switched off while 

plugging or unplugging a  USB device.

 Plug your 

USB  devices  to  the  USB  input  of  the TV. You  can 

connect a USB device to your TV by using the USB 

input of the TV.

Note: It is possible certain types of hard disk drives 

are not supported.

Connecting the TV to a PC

For displaying your computer’s screen image on your 

TV, you can connect your computer to the TV set. 

Power off both computer and display before making 

any connections. Use a 15-pin D-sub display cable 

to connect a PC to the TV. When the connection is 

made, switch to PC source. See the 

Input selection 

section.  Set  the  resolution  that  suits  your  viewing 

requirements. Resolution information can be found 

in the appendix.

PC  Input

(back)

Side  AV  Input

PC  VGA  Cable

(not  supplied)

PC  Audio  Cable

(not  supplied)

Side  Audio/Video 

Connection  Cable

(supplied)

or

SI

D

AV

Note:  If  you  connect  a  PC  to  the  TV  using  HDMI 

connection, radio interference may occur. Therefore 

this  type  of  connection  is  not  recommended. You 

should use VGA connection instead.

Using Side AV Connectors

You can connect a range of optional equipment to your 

LED TV using side connectors of the TV.

For connecting a camcorder or camera , you should 

• 

use 

SIDE


AV

 socket (side). To do this, you must use 

the supplied 

video/audio connection cable

. First, 

plug single jack of the cable to the TV’s

 AV IN

 socket 

(side). Afterwards, insert your camera cable’s (

not 

supplied

) connectors into the plural part of the 

video/

audio connection cable

. Colours of the connected 

jacks should match. See illustration below. 
Afterwards, you should switch to 

• 

Side AV

 source. See 

the section 

Input selection

 in the following sections 

for more information.

Camera

Side  AV  Connection

Cable  (supplied)

AV  Cable

(not  supplied)

Headphone

SI

D

AV

To  listen  the  TV  sound  from  headphones,  you 

• 

should connect headphones to your TV by using the 

HEADPHONE 

jack as illustrated above.

Summary of Contents for AL2605TBK

Page 1: ...33 1 63 AL2605TBK LED TV WITH DVB T TUNER...

Page 2: ...ogue Fine Tune 46 Managing Stations Channel List 46 Operating the Channel List 47 Moving a Channel 47 Deleting a Channel 47 Renaming a Channel 47 Locking a Channel 47 Managing Stations Favourites 47 B...

Page 3: ...ecorder VCR PC etc This device is only suitable for dry indoor use This appliance is intended solely for private domestic use and may not be used for industrial and commercial purposes We exclude liab...

Page 4: ...rincipally be recycled Packaging materials such as a foil bag must be kept away from children Batteries including those which are heavy metal free should not be disposed of with household waste Please...

Page 5: ...e properly any possible danger Batteries accumulators can be life threatening when swallowed Store batteries out of the reach of small children In case of swallowing a battery medical aid has to be so...

Page 6: ...able when the TV is in Power Save Mode When the TV is not in use please switch off or disconnect the TV from the mains plug This will also reduce energy consumption Note that annually using the TV set...

Page 7: ...nels 17 Programme Up Page down in DVB channels 18 Sleep Timer 19 Picture mode selecion 20 Okay Confirm Hold in TXT mode Edit 21 Channel List Cursor Down 22 Exit Return Index page in TXT mode 23 Cursor...

Page 8: ...HDMI socket Your TV is capable of displaying High Definition pictures from devices such as a High Definition Satellite Receiver or DVD Player These devices must be connected via the HDMI sockets or C...

Page 9: ...cable s not supplied connector into the YELLOW input located on the plural side of the supplied AV connection cable Colours of the connected jacks should match To enable audio connection you must use...

Page 10: ...display before making any connections Use a 15 pin D sub display cable to connect a PC to the TV When the connection is made switch to PC source See the Input selection section Set the resolution tha...

Page 11: ...VD player s audio cable s connectors into the plural part of the VGA Component audio connection cable see illustration below Colours of the connected jacks should match RED WHITE DVD Player Side AV In...

Page 12: ...with the menu system of your TV Switching On Off To Switch the TV On Connect the power cord to the 220 240V AC 50 Hz Press STANDBY touch button Then the standby LED lights up To switch on the TV from...

Page 13: ...l be listed Yellow button Display EPG data in accordane with timeline schedule Blue button Filter Views filtering options Red button Prev Time Slice Displays the programmes of previous time slice Gree...

Page 14: ...earch Type option Use or to set the desired search type Available search types are Digital and analog digital only and analog only When set press to select Teletext Language Use or to select the desir...

Page 15: ...l channel scan the number of the multiplex or frequency are entered manually and only that multiplex or frequency are searched for the channels After selecting search type as Digital you can enter the...

Page 16: ...t character Pressing or button toggles the current character i e b character becomes a by and c by Pressing the numeric buttons 0 9 replaces the highlighted character with the characters printed above...

Page 17: ...edia Playback Using Media Browser If the USB stick is not recognized after power off on or First Time Installation unplug the USB device turn the TV off and on again and re insert the USB device To di...

Page 18: ...how Previous Next Left Right buttons Jumps to previous or next file on slideshow Rotate Up Down buttons Rotates the image using up down buttons Loop Shuffle Blue button Press once to disable Loop Pres...

Page 19: ...modes Press the SCREEN button repeatedly to change the image size Available zoom modes are listed below Auto WhenAUTO is selected the aspect ratio of the screen is adjusted by the information provide...

Page 20: ...e Noise Reduction setting to reduce the noise amount Noise Reduction can be set to one of these options Low Medium High or Off Advanced Settings Colour Temp Sets the desired colour tone Setting Cool o...

Page 21: ...by using or button Press OK button to view Sound Settings menu Operating Sound Settings Menu Items Press or button to highlight a menu item Use or button to set an item Press MENU button to exit Soun...

Page 22: ...ional access module CAM may be necessary This module must be inserted in the CI slot of your TV Obtain the Conditional Access Module CAM and the viewing card by subscribing to a pay channel company th...

Page 23: ...Note If the Country option is set to Denmark Sweden Norway or Finland the Language Settings menu will function as described below Language Settings In the configuration menu highlight the Language Se...

Page 24: ...write it down and keep it safe Timers To view Timers menu press MENU button and select Settings icon by using or button Press OK button to view Settings menu Use or button to highlight Timers and pres...

Page 25: ...UTO is selected Date Time and Time Zone options will not be available to be set If MANUAL option is selected as the Time Zone can be altered By pressing or buttons select Time Zone Use or buttons to c...

Page 26: ...ion describing what is happening on the screen during the natural pauses in the audio and sometimes during dialogue if deemed necessary You can use this feature only if the broadcaster supports that a...

Page 27: ...ersistence Please note that ghosting may occur while displaying a persistent image On LED TVs image persistence may disappear after a short time Try turning the TV off for a while To avoid this do not...

Page 28: ...HzB 16 1400x1050 75Hz 85Hz 17 1400x900 65Hz 75Hz 18 1600x1200 60 Hz 19 1680x1050 60 Hz 20 1920x1080 60 HzA 21 1920x1080 60 HzB 22 1920x1200 60HzA 23 1920x1200 60Hz Appendix B AV and HDMI Signal Compa...

Page 29: ...Options menu In Upgrade Options menu select Scan for upgrade and press OK button If a new upgrade is found it starts to download the upgrade A progress bar indicates the remaining download progress Wh...

Page 30: ...Hz Sampling rate Photo jpg jpeg Baseline JPEG max WxH 15360x8640 4147200bytes Progressive JPEG max WxH 1024x768 6291456bytes bmp max WxH 9600x6400 3840000bytes Subtitle sub srt Products Battery Inform...

Page 31: ...65 W max PANEL 16 9 display 26 Screen Size DIMENSIONS mm DxLxH With foot 188 x 649 x 453 Weight Kg 6 25 DxLxH Without foot 39 5 x 649 x 412 Weight Kg 5 85 Digital Reception DVB T MHEG 5 ENGINE complia...

Reviews: