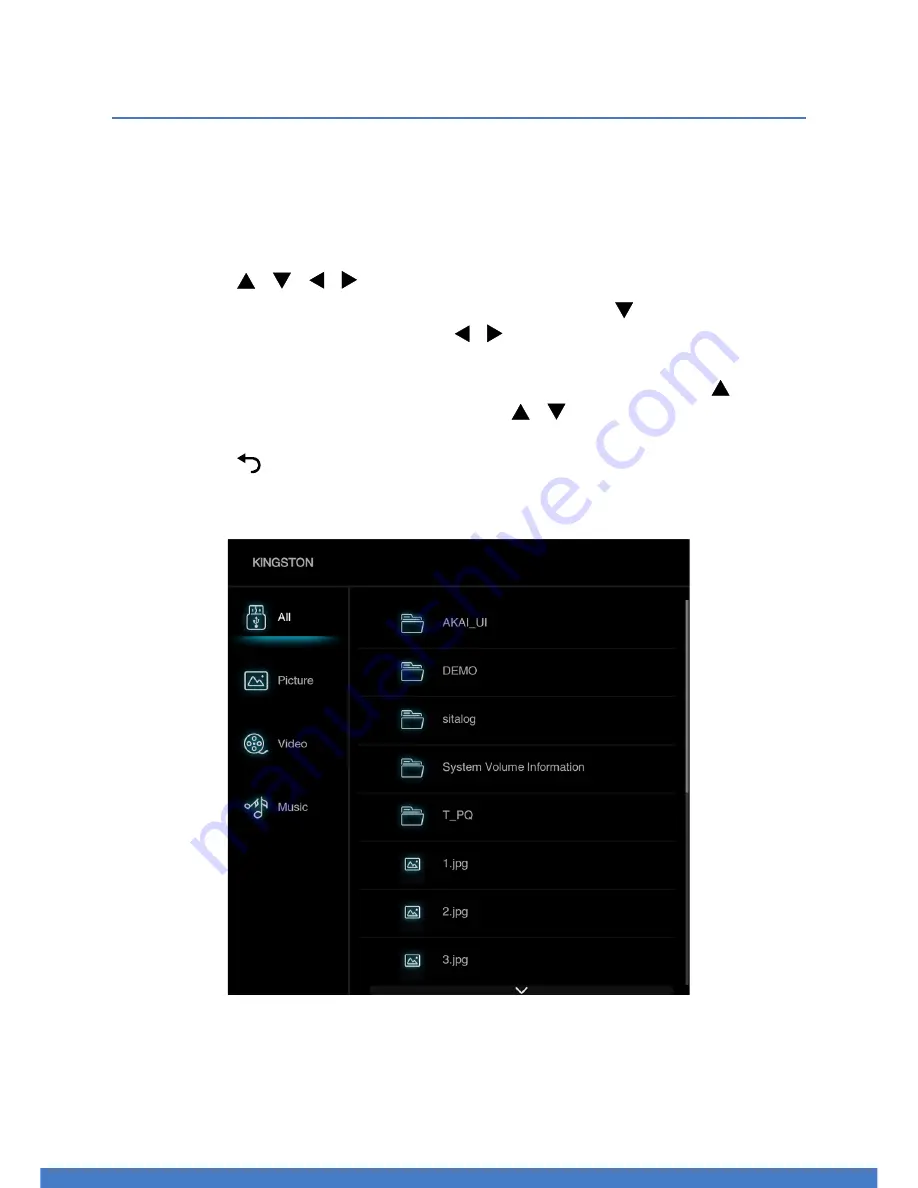
background image

39

Media Mode

Media Playback

•  First insert a USB memory device into the USB port.
•  Press the 

SMART HOME button on the remote control and select MEDIA 

to switch the unit to Media mode.

•  Press the   / 

 /   /   buttons to move the cursor.

•  If your USB device has multiple partitions, press the 

 button repeatedly 

to highlight 

USB and then use the   /   buttons to select the desired 

partition.

•  To switch between Photo, Music and Video sections, press the   button 

repeatedly to highlight 

Files and use the   /   buttons to select the 

desired section. Only supported files will be shown under each category.

•  Press the 

 button to go back to the previous screen.

•  Press the 

EXIT button to exit Media mode.

Summary of Contents for AK3219NF

Page 1: ...32 High Definition TV with Netflix INSTRUCTION MANUAL Model Number AK3219NF...

Page 2: ...to you by AKAI are manufactured to the highest standards of performance and safety and as part of our philosophy of customer service and satisfaction are backed by our comprehensive 1 Year Warranty W...

Page 3: ...4 Remote Control 9 Installation 13 Controls and Connections 17 Getting Started 25 Basic Operations 31 TV Guide EPG 33 Recording 35 Media Mode 39 Smart Hub 43 Menus 47 Troubleshooting 59 Specification...

Page 4: ...or back This unit contains no user serviceable parts inside Refer all servicing to qualified service personnel only IMPORTANT INFORMATION If the TV is not positioned in a sufficiently stable location...

Page 5: ...s or incense sticks on top of the TV Antenna Install the antenna away from high voltage power lines and communication cables and make sure it is installed securely Contact between the antenna and a po...

Page 6: ...on Do not cover the ventilation openings with items such as newspapers tablecloths curtains etc as this could impede ventilation Cabinet slots Do not insert objects of any kind into this unit through...

Page 7: ...structions concerning use of the product by a person responsible for their safety Children Supervise young children to ensure they do not play with the TV Cleaning and Maintenance Unplug To reduce the...

Page 8: ...8...

Page 9: ...9 9 Remote Control...

Page 10: ...9 EXIT Quit the current interface 10 EPG TV Guide DTV mode 11 SLEEP Set the TV to go into standby mode after a set time 12 PRE CH Return to the previous channel DTV mode 13 Functions are according to...

Page 11: ...level 29 Go to the Smart TV homepage 30 CH Press to select channels in ascending or descending order 31 MUTE Press to mute or restore sound 32 Go to the YouTube homepage 33 NUMBER BUTTONS Use to dire...

Page 12: ...bjects between the remote control and the remote control sensor Do not use this remote control while simultaneously operating a remote control of other devices Remote Control Preparation Install the b...

Page 13: ...13 Installation...

Page 14: ...plug first when installing or removing the TV stands To avoid damaging the TV we recommend asking someone to help with installation and or removal of the stand IMPORTANT Make sure the TV set is unplug...

Page 15: ...t is unplugged from the power supply before removing the stand and mounting it to a wall We recommend you contact a professional for assistance when wall mounting the TV We assume no liability for any...

Page 16: ...16...

Page 17: ...17 Controls and Connections...

Page 18: ...TV to On When the TV is on press to access the input source list When the TV is on press and hold to access the on screen keypad where you can access Input Sources Smart TV and Menu Settings and turn...

Page 19: ...ity connections 4 L R AUDIO INPUTS Left and right audio inputs 5 HDMI INPUTS 1 2 Provides a digital video audio connection between the TV and any HDMI devices such as a DVD player or A V receiver 6 US...

Page 20: ...he TV to other equipment Connecting an External Antenna For the best picture quality we recommend connecting the TV set to an external antenna 75 antenna plug goes into the antenna port in the back of...

Page 21: ...ow cable to connect the unit with other devices AV Cable not included HDMI Connection HDMI Cable not included Controls and Connections Cont Use a HDMI cable to connect the unit with other devices to r...

Page 22: ...vice Not included Use a coaxial cable to connect the unit with an amplifier or other audio decoding device for coaxial audio signal output Coaxial cable is not included ANTENNA IN COAX T LINK 1 LINE O...

Page 23: ...router and to the Ethernet port on the back of your TV 3 Use the Network Settings to configure your TV See page 54 for more information Modem Internet Router TV Set Ethernet back panel Port on the or...

Page 24: ...24 Blank page...

Page 25: ...25 Getting Started Basic Operations...

Page 26: ...ndicator light will glow red Installation Guide When you switch on the TV for the first time the First Time Setup menu will be displayed on the screen as illustrated below Setup navigation Press the b...

Page 27: ...ss the button to go to the previous step Step Three Location 1 Use the buttons to select the TV location Select Home for normal home viewing Shop and Shop with Demo modes are for store display purpose...

Page 28: ...ou can manually assign network addresses Use the number keypad on the remote to enter network addresses When done select OK and press the OK button on the remote to connect When you receive a Connecte...

Page 29: ...the next step Manual Manually enter the name of your Wi Fi network SSID select the Wi Fi security mode and enter your Wi Fi password Select OK and then press OK to connect When connected press the bu...

Page 30: ...to install channels and then press the OK button to skip tuning channels and finalise setting up the TV Select the Antenna Type to Digital and press OK to start tuning the TV channels When channel tun...

Page 31: ...to select a channel directly Quick Select While viewing a channel press the LIST button to enter the Channel List directly Press the buttons to select the channel and press OK to watch it Press the GR...

Page 32: ...et You can select an audio type to suit your personal preferences Available options Standard Music Movie Voice Stadium Personal Picture Freeze Select On to temporarily freeze the live TV picture Selec...

Page 33: ...33 TV Guide EPG Recording Media Mode...

Page 34: ...w program information by switching to the channel Press the buttons to switch between the channels list on the left column and the programs list on the right column Press the buttons to select a diffe...

Page 35: ...ess OK If you wish to turn off the TV and continue recording press the POWER button on the remote control A dialog box will appear select STANDBY RECORDING and press OK Select STANDBY to stop recordin...

Page 36: ...ngs to desired options select Add Schedule and press OK to confirm and save the scheduled recording NOTE You can set up several schedule programmes to record Different schedules should not overlap and...

Page 37: ...trol to initiate time shift mode and pause the program Press the button again to resume playback Use the buttons on the remote to control playback To stop time shift press the STOP button on the remot...

Page 38: ...ithout removing the USB recording device You will need to remove the USB device as it is required to reset after each recording to protect the device from damage If you see the message DISK NOT READY...

Page 39: ...B device has multiple partitions press the button repeatedly to highlight USB and then use the buttons to select the desired partition To switch between Photo Music and Video sections press the button...

Page 40: ...utton on the remote control to hide display the on screen toolbar Press the button to exit and return to the file list Music Music files can only be played in this menu category Use the buttons to sel...

Page 41: ...lect the preferred function then press OK to confirm Remote Operations when Playing Multimedia Files Press the button to pause playing Press the button to resume playback Press the button twice to sto...

Page 42: ...42...

Page 43: ...43 Smart Hub...

Page 44: ...evices such as computers gaming consoles and network hard drives are transferring large amounts of data across your network such as a file transfer online gaming or other instances of streaming video...

Page 45: ...ard winning TV shows movies and documentaries A paid subscription is required This TV can play Netflix content in HD resolution however the playback resolution may be lower depending on your subscript...

Page 46: ...46...

Page 47: ...47 Menus...

Page 48: ...he OK or button to enter the sub menu page Press the buttons to select the preferred option then press the OK or button to enter Press the MENU button to return to the previous menu Press the EXIT but...

Page 49: ...picture Tint Adjust the hue of the picture Valid only for NTSC signals Sharpness Object edges are enhanced for picture detail Colour Temperature Select the colour temperature of the picture Auto Form...

Page 50: ...conditions volume adjustment may be needed every time when the channel is changed This feature allows users to enjoy stable volume levels by making automatic adjustments for each program S PDIF Type...

Page 51: ...TV programmes You can navigate select view and programmes Channel Organiser This option allows you to skip sort edit and delete channels Channel Diagnostics on digital TV channels Displays some signal...

Page 52: ...t files saved on your PC Smart TV Policy Reads the Smart TV Policy Networked Standby Select On to turn on the networked standby Netflix Settings In the Netflix Setting menu Netflix Deactivation can de...

Page 53: ...house If you have a Dynamic Network you should use an ADSL modem or router that supports Dynamic Host Configuration Protocol DHCP Modems and routers that support DHCP automatically provide the IP add...

Page 54: ...rk Setup when connecting your TV to a network that requires a Static IP address 1 Follow steps 1 4 in the How to set up automatically procedure 2 Set Address type to Manual 3 Press the button to highl...

Page 55: ...press the OK button to proceed to the next menu 4 Select Scan then press the OK button The Network function searches for available wireless networks When done it displays a list of the available netw...

Page 56: ...umber or PBC Push Button Configuration methods to connect to the Wi Fi network Follow on screen instructions to connect Information Displays the information on current connection Connection test Tests...

Page 57: ...tandby Mode at the same time Lock This menu can control the special function for TV channels The factory default code 0000 The master password 4711 If you forget your code enter the master password to...

Page 58: ...tware Update You can update software by By USB or By Network By USB Enables you to install the latest version of the software from your USB ports By Network Enables you to download and install the lat...

Page 59: ...59 Troubleshooting Specifications Other Useful Information...

Page 60: ...a suitable level by pressing the VOL VOL button No operations can be performed with the remote control unit Check the batteries are correctly installed The batteries may be exhausted replace them Mak...

Page 61: ...ng how to use USB devices with this unit If the problem still occurs your device may not be compatible This machine has been tested with the majority of Flash memory based devices and hard disks Music...

Page 62: ...Ratio 16 9 HDMI version 1 4 HDCP version 1 0 USB Multimedia Playback Format Video AVI MPEG MKV FLV MOV Music MP3 AAC M4A Photo JPEG PNG BMP Power Input 110 240V 50 60Hz Power Consumption 50W Dimension...

Page 63: ...han throwing these materials away Responsible disposal of the TV At the end of its working life do not throw this TV out with your household rubbish An environmentally friendly method of disposal will...

Page 64: ...Customer Helpline 1300 886 649 Distributed by Tempo Aust Pty Ltd PO Box 6056 Frenchs Forest DC 2086...

Reviews: