background image

www.aja.com

24


RovoCam UltaHD HDBaseT Camers System v1.0r2

ON Button

With an UltraHD output selected, clicking the 

On

 button at the upper right activates and 

deactivates the ePTZ feature. When On, a HD resolution portion (Region of Interest) of 
the UltraHD signal is selected for display. A UltraHD monitor is not required to view this 
signal. 

Region of Interest Screen

The blue box represents the region of the UltraHD screen currently being displayed. You 
can click and drag the box to virtually pan and tilt the image.

Pan Tilt Controls

The diamond shaped controls on the right allow you to click an arrow to move the region 
a few pixels in that direction. Clicking on the center circle moves the region to the exact 
center of the UltraHD image.

X Y Controls

You can also move the region by entering X and Y values in their numeric fields, and by 
clicking their up and down arrow buttons.

ePTZ Zoom Slider

The Zoom slider on this screen works the same as those on the Camera Control screen 
(see 

“Zoom Control Group” on page 23

), except there is no speed control. The speed 

control setting on the Camera Control screen is also used by the ePTZ Zoom slider.

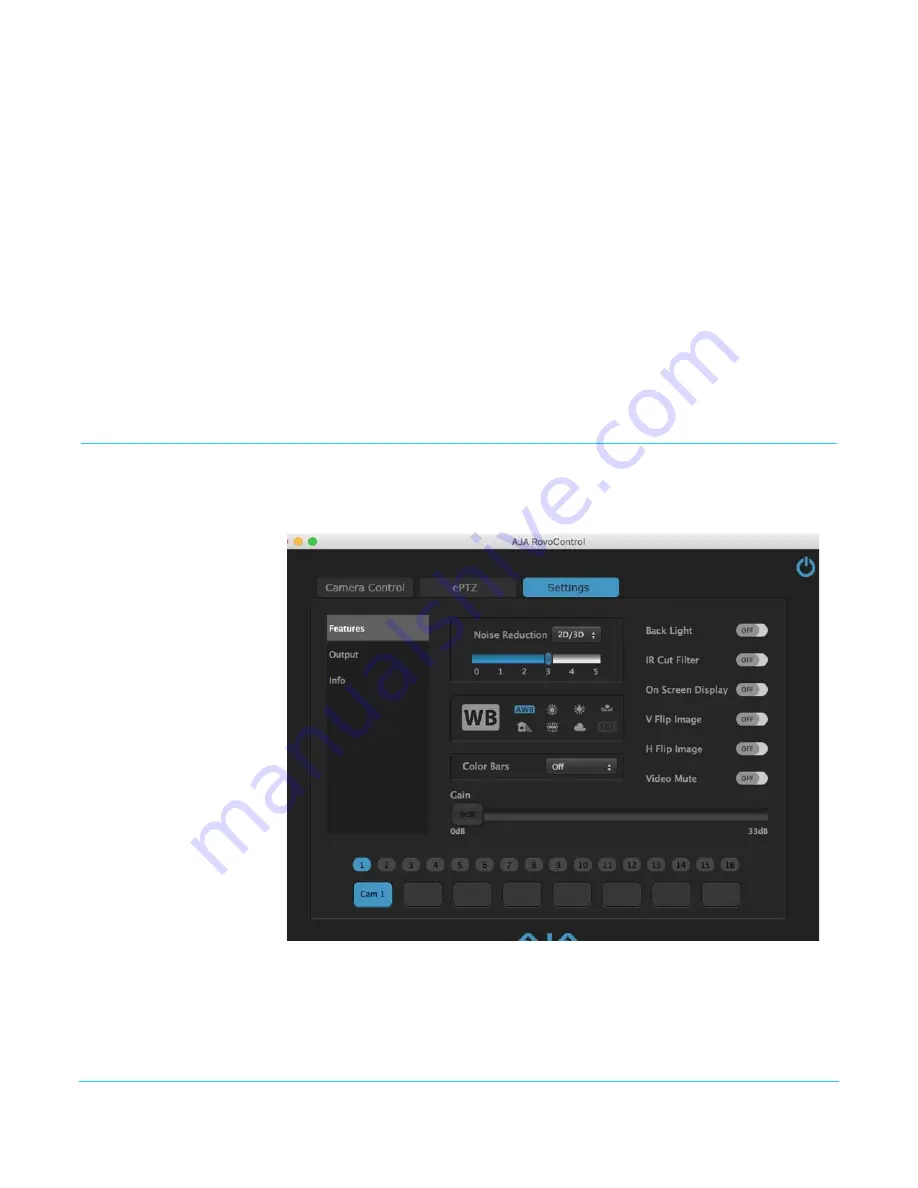
Settings Control Screens

Three different control screens are available under Settings.

Features Screen

Noise Reduction

The Noise Reduction (NR) function removes noise (both random and non-random) to 
provide clearer images. This function has six steps: levels 1 to 5, plus 0 (off ), controlled 
with a slider. The NR effect is applied in levels based on the gain, and this slider value 
determines the limit of the effect. In bright conditions, changing the NR level will not 
have an effect.

Summary of Contents for rovocam

Page 1: ...Installation Operation Guide Version 1 0r2 Published June 20 2016 RovoCam UltaHD HDBaseT Camers System ...

Page 2: ... Shoe 12 Enclosure 12 Eclipse 13 System Installation 13 General Precautions 13 Operation 13 Operation and Storage Locations 13 Care of the Unit 13 Other 14 Phenomena Specific to CMOS Image Sensors 14 Rolling Shutter 14 White Flecks 14 Aliasing 14 Phenomena Specific to Lenses 14 Ghosting 14 Chapter 3 RovoRx HDMI 15 Overview 15 Features 15 Block Diagram 16 I O Connections 16 System Installation 16 I...

Page 3: ...3 ON Button 24 Settings Control Screens 24 Features Screen 24 Noise Reduction 24 White Balance 25 Color Bars 25 Gain 25 Other Features 25 Output Screen 26 Apply Button 26 Video Format 26 Color Space 26 Info Screen 27 Camera ID 27 Chapter 5 Third Party Control Solutions 28 Overview 28 RocoSoft 28 Serial Port Tool 28 Appendix A Specifications 29 RovoCam Specifications 29 Camera Module 29 Video Forma...

Page 4: ...ance Notices 34 Class B Interference Statement 34 FCC Caution 34 Canadian ICES Statement 34 European Union and European Free Trade Association EFTA Regulatory Compliance 35 Declaration of Conformity 35 Recycling Notice 36 Korean KCC Compliance Statement 36 Taiwan Compliance Statement 36 Japanese Compliance Statement 36 Translated Warning and Caution Messages 37 Before Operation Please Read These I...

Page 5: ...ademark of Adobe Systems Incorporated in the United States and or other countries HDMI the HDMI logo and High Definition Multimedia Interface are trademarks or registered trademarks of HDMI Licensing LLC DVI is a registered trademark of DDWG TASCAM is a registered trademark of TEAC Corporation Dolby and the double D Dolby logo are registered trademarks of Dolby Laboratories Licensing Corporation S...

Page 6: ...terface Delivering this much functionality and power with single cable connectivity dramatically simplifies the installation camera setup and footprint requirements RovoRx HDMI the companion receiver unit offers the simplest reception option for RovoCam with an HDMI output to drive displays and all video audio signals power and control offered over HDBaseT RovoRx HDMI is an UltraHD HD HDBaseT Rece...

Page 7: ... see RovoCam Specifications on page 29 Sensor Progressive scan CMOS 1 2 3 type Exmor R 3840x2160 8 93 Mega Pixels Zoom Lens Computer with VISCA Control App HDMI HDBaseT Video Audio Power RS 232 Control RovoCam Stereo Microphone 3V PiP Audio Out Left Right Analog RovoRx HDMI UHD or HD HDMI Monitor RS 232 VISCA Hardware Controller HDMI HDBaseT Video RS 232 Control Local Power RovoCam RovoRx HDMI UHD...

Page 8: ...ontrollers are also available See Chapter 5 Third Party Control Solutions on page 28 for more information Warranty Three year AJA warranty on RovoCam Five year AJA warranty on RovoRX HDMI What s In The Boxes When you unpack your product you ll find the following components RovoCam Box AJA RovoCam camera Phoenix Euroblock style plug in power adapter optional use with local power RovoRX HDMI Box AJA...

Page 9: ...es the RovoRx HDMI hardware connections and system installation Chapter 4 Describes the AJA s RovoControl camera control software Chapter 5 Describes RovoCam system third party control software Appendix A Provides specifications for various aspects of the system Appendix B Contains important caution warning and compliance statements ...

Page 10: ...ble connections to a variety of equipment based on how the system is being used Block Diagram Figure 3 RovoCam Simplified Block Diagrams RJ 45 HDBaseT Out RS 232 In Power In USB Firmware Interface RS 232 Receiver Local RS 232 Control Stereo Mic Input 12 VDC Image Processor Power Distribution HDBaseT Transmitter Image Sensor 20dB ...

Page 11: ...ount removable RS 232 3 5mm jack used if control is not on HDBaseT input Link LED Tripod Plate on top or bottom Stereo mic input 3 5mm TRS jack with 3V PIP Top View Side View Front View Rear View Bottom View 2X 87 95 2X 58 95 74 95 96 92 130 1 139 8 2X 2 56 UNC 3 5 Cold Shoe Mount 9 7 10 32 2 50 Clearance Hole Top and Bottom 7 14 3 50 Clearance Hole Top and Bottom 4X 4 40 UNC 3 5 User Holes Top an...

Page 12: ...64 hex heads Figure 6 Tripod Plate Dimensions Cold Shoe The removable cold shoe plate can be mounted on the top of the camera and can hold a microphone or light It is held in place with two 2 Phillips head screws Enclosure The small block camera outside dimensions are suitable for installation into a variety of environmental enclosures Examples of compatible enclosures include SONY SNCUNI indoor u...

Page 13: ...layed Operation and Storage Locations Do not shoot images that are extremely bright e g light sources the sun etc for long periods of time Do not use or store the camera in the following extreme conditions Extremely hot or cold places operating temperature 0 C to 55 C 32 F to 131 F Close to generators of powerful electromagnetic radiation such as radio or TV transmitters Where it is subject to flu...

Page 14: ...ions Rolling Shutter As CMOS image sensors use shutters that capture images line by line there is a slight time difference between the top and bottom of an image As a result images may appear skewed if the camera is moved White Flecks Although the CMOS image sensors are produced with high precision technologies fine white flecks may be generated on the screen in rare cases caused by cosmic rays et...

Page 15: ...ple and economical RovoRx HDMI is designed to pair with the AJA RovoCam camera to provide video audio control and power transmission using a single CAT cable RovoRx HDMI can also be used with any compatible HDBaseT transmitter including AJA s HB T HDMI and HB T SDI Mini Converters Features HDBaseT Certified 4K UHD Signal Extender Extend uncompressed 4K UltraHD or HD HDMI signal up to 100m over Eth...

Page 16: ... does not encrypt video System Installation Installation with RovoCam Typically installation consists of the following steps 1 Ensure the RovoRx HDMI converter is disconnected from power USB Config Port RJ 45 HDBaseT In RS 232 Out Power Out 48 VDC HDMI Output RS 232 In Left Audio Out Unbalanced RCA Right Audio Out Unbalanced RCA RS 232 Receiver Power Distribution USB Config Control HDBaseT Receive...

Page 17: ...ain The RovoRx has a fixed audio gain of 10dB giving a system gain of 30dB which will bring a typical microphone output up to line level System Ground and Audio When the RovoCam is used with RovoRx the power provided by RovoRx has 1500V isolation from ground meaning that the RovoCam is electrically isolated from ground When RovoCam is used with an external microphone the microphone is also isolate...

Page 18: ...ss platform support RovoControl Installation 1 Download from the AJA website the free RovoControl version of software for your computer operating system msi for Windows dmg for Mac 2 Install the RovoControl software onto your computer using the standard procedure for your operating system 3 Connect the RovoRX HDMI converter to RovoCam with an RJ 45 cable 4 Connect the RovoCam HDMI Out port to an H...

Page 19: ...een subscreens can be selected from the list on the left On the upper right is a Camera power button which toggles power to the selected RovoCam on and off At the bottom of all the control screens are labeled Camera Select buttons and numbered Preset buttons Figure 10 RovoControl Example User Interface Screen Screen Control Summary Click on one of the upper tabs to go to that control screen Click ...

Page 20: ...reen display Lens Initialize Initializes the zoom and focus of the lens Default controls see below Camera Select Buttons When more than one RovoCam is connected clicking on a different lit Camera Select button chooses that camera for RovoControl operation Presets The 16 smaller buttons near the bottom of all the RovoControl screens can be used to set and recall Presets see below About RovoCam Defa...

Page 21: ...ick on one of the numbered Preset buttons and choose the Set option Those settings are saved to that preset Recall Preset Left clicking on a Preset button that has been set recalls those settings Left clicking on a preset and selecting Recall also recalls that preset Restore Default To A Preset To restore Default to a Preset left click on the screen background select Recall Default then right clic...

Page 22: ...or closed Shutter speed is set automatically S Shutter Priority Selecting S allows you to select the shutter speed from the drop down list Aperture is set automatically M Full Manual Selecting M gives you full control of both aperture and shutter speed Focus Control Group The center set of controls adjust focus AUTO Focus Button When On right and colored blue focus is controlled automatically When...

Page 23: ...e on the slider to quickly go to that zoom setting Range is 1x to 144x depending on type of zoom Zoom Speed A list of zoom speeds from slowest 0 to fastest7 is available by clicking on this control Type of Zoom Right clicking on a Zoom control brings up a list of types to zoom Zoom Optical 12x Only optical zoom is used ZoomSuper 20x Uses Sony Super Resolution Zoom Zoom Optical Digital 144x Permits...

Page 24: ...exact center of the UltraHD image X Y Controls You can also move the region by entering X and Y values in their numeric fields and by clicking their up and down arrow buttons ePTZ Zoom Slider The Zoom slider on this screen works the same as those on the Camera Control screen see Zoom Control Group on page 23 except there is no speed control The speed control setting on the Camera Control screen is...

Page 25: ...s on the right activate and deactivate the following features Backlight Backlight Compensation On or Off When the background of the subject is too bright or when the subject is too dark due to shooting in AE mode back light compensation will make the subject appear clearer IR Cut Filter ICR IR Cut Removable Mode On or Off An infrared IR cut filter can be disengaged On from the image path for incre...

Page 26: ...n Apply Button Some settings selected on this screen are not applied until the Apply button is used and may require resetting RovoCam Video Format Select the desired RovoCam format Choosing a 3840 UltraHD format permits use of the ePTZ feature Color Space Select RGB or YUV ...

Page 27: ...s information about the connected RovoCam Only the Camera ID control is active Camera ID When multiple RovoCams are in use you can assign a different number to each camera for reference UI slot assignment This allows you to change which slot in the RovoControl User interface that camera uses ...

Page 28: ...sted below are some providers products and links NOTE Some controllers will require a serial null modem to operate with RovoCam RocoSoft RocoSoft PTZ tester software free utility download http www rocosoft com download software RocosoftPTZCameraTester EXE PTZJoy PTZ Camera Controller PTZJoy Pro PTZ Camera Controller PTZJoy STUDIO PTZ Camera Controller Contact http www rocosoft com ptz control prod...

Page 29: ...Progressive scan CMOS 1 2 3 3840 x 2160 8 93 Mega Pixels Image Processor Noise reduction 2D 3D Visibility Enhancer ICR Day and Night Slow AE High Sensitivity Gamma Character Generator Defog Color Enhancement Picture Effect Spherical Privacy Zone Masking E Flip Lens Focal length 3 9mm to 46 8mm Focus Auto Manual One push trigger mode Lens Control Zoom Focus Iris IRCS F value 1 8 to 2 0 Horizontal A...

Page 30: ... AJA Control Software 1 x USB to 3 5mm TRS cable for RS 232 control Size Width 2 8 71mm Length 5 9 149 9mm Height Camera only 3 1 79mm Including tripod mount and cold shoe 3 6 91 4mm Weight 2 2 lbs 1kg Power Over HDBaseT Conforming to IEEE802 3af 2003 mode A 6W typical 8W max OR 10 12Vdc 2 pin pluggable terminal block 0 6A max 6W typical 8W max Environment Safe Operating Temperature Range 0 C to 5...

Page 31: ...100 meters 100 meters 24 bits 1024x768 to 120 fps 4 4 4 100 meters 100 meters 24 bits 1152x768 to 120 fps 4 4 4 100 meters 100 meters 24 bits 1280x768 to 120 fps 4 4 4 100 meters 100 meters 24 bits 1280x800 to 120 fps 4 4 4 100 meters 100 meters 24 bits 1280x1024 to 120 fps 4 4 4 100 meters 100 meters 24 bits 1360x768 to 120 fps 4 4 4 100 meters 100 meters 24 bits 1366x768 to 120 fps 4 4 4 100 met...

Page 32: ...AJA cable option User Interface AJA Control Software USB 1 x USB for firmware and additional control Size Width 4 03 102 4mm Length 5 2 132mm Height 0 94 23 9mm Weight 0 5 lbs 0 2kg DTE Device Computer Pin DB9 RS 232 Signal Names Pin DB9 RS 232 Signal Names DCE Device Modem DTE to DCE Connections DB9 DB9 Signal Direction 1 Carrier Detector DCD CD 2 Receive Data Rx RD 3 Transmit Data Tx TD 4 Data T...

Page 33: ...ing Altitude 3 000 meters 10 000 feet Safe Storage Temperature Power OFF 40 C to 60 C 40 F to 140 F Cat Cable Recommendations The cable types in the table below are recommended for maximum performance reach and full capacity by the HDBaseT Alliance Table 5 Recommended Cables for Ultra HD video transmission Type Manufacturer URL CAT7 S FTP Teldor http www teldor com CAT6A H STP Teldor http www teld...

Page 34: ...ration between the equipment and receiver Connect the equipment into an outlet on a circuit different from that to which the receiver is connected Consult the dealer or an experienced radio TV technician for help FCC Caution This device complies with Part 15 of the FCC Rules Operation is subject to the following two conditions 1 This device may not cause harmful interference and 2 this device must...

Page 35: ... License IEC 60065 2001 A1 2005 A2 2010 CB Scheme Report Certificate Additional licenses issued for specific countries available on request Emissions EN 55032 2012 CISPR 22 2008 EN 61000 3 2 2006 A1 2009 A2 2009 EN 61000 3 3 2008 Immunity EN 55103 2 2009 EN 61000 4 2 2009 EN 61000 4 3 2006 A1 2008 A2 2010 EN 61000 4 4 2004 A1 2010 EN 61000 4 5 2005 EN 61000 4 6 2009 EN 61000 4 11 2004 Environments...

Page 36: ...ironment it may cause radio interference Install and use the equipment according to the instruction manual This symbol on the product or its packaging indicates that this product must not be disposed of with your other household waste Instead it is your responsibility to dispose of your waste equipment by handing it over to a designated collection point for the recycling of waste electrical and el...

Page 37: ...y siga todas las instrucciones y advertencias marcadas en el producto o incluidas en la documentación Aviso Leia e siga todos os avisos e instruções assinalados no produto ou incluídos na documentação Avviso Leggere e seguire tutti gli avvisi e le istruzioni presenti sul prodotto o inclusi nella documentazione Warning Do not use this device near water and clean only with a dry cloth Avertissement ...

Page 38: ... any heat sources such as radiators heat registers stoves or other apparatus including amplifiers that produce heat Avertissement N installez pas l appareil près d une source de chaleur telle que des radiateurs des bouches d air de chauffage des fourneaux ou d autres appareils amplificateurs compris qui produisent de la chaleur Warnung Nicht in der Nähe von Wärmequellen wie Heizkörpern Heizregiste...

Page 39: ...e ser comprimido particularmente nas fichas em tomadas de parede de conveniência e no ponto de onde sai do dispositivo Avviso Proteggere il cavo di alimentazione in modo che nessuno ci cammini sopra e che non venga schiacciato soprattutto in corrispondenza delle spine e del punto in cui esce dal dispositivo Warning Unplug this device during lightning storms or when unused for long periods of time ...

Page 40: ...ch das Öffnen des Gehäuses wird die Garantie hinfällig es sei denn solche Wartungsarbeiten werden in einem AJA Service Center oder einem lizenzierten Betrieb vorgenommen Advertencia No abra el chasis El interior no contiene piezas reparables por el usuario El abrir el chasis anulará la garantía a menos que se lo haga en un centro de servicio AJA o en un local autorizado Advertência Não abra o chas...

Page 41: ...o se han caído objetos dentro del dispositivo el dispositivo ha sido expuesto a la lluvia o humedad o no funciona de modo normal o se ha caído Aviso Remeta todos os serviços de manutenção para o pessoal de assistência qualificado A prestação de serviços de manutenção é exigida quando o dispositivo foi danificado mediante qualquer forma como um cabo de alimentação ou ficha que se encontra danificad...

Page 42: ...to repair damage resulting from improper use or connection to incompatible equipment c to repair any damage or malfunction caused by the use of non AJA Video parts or supplies or d to service a product that has been modified or integrated with other products when the effect of such a modification or integration increases the time or difficulty of servicing the product THIS WARRANTY IS GIVEN BY AJA...

Page 43: ...tances exposure to strong magnetic fields use with improperly regulated power supplies exposure to electric shock use in temperatures outside the specified operating range or otherwise failing to treat the product in accordance with the standard of care appropriate to sensitive and delicate electronic equipment EXCEPT AS STATED ABOVE AJA VIDEO AND ITS VENDORS DISCLAIM IN THEIR ENTIRETY ALL OTHER W...

Page 44: ...ontrol Screen 23 F Factory Defaults RovoControl 21 Features RovoRX HDMI 15 Focus Control Group 22 G Gain 25 H H Flip Image 25 Hardware 7 Hardware features 7 I Info Screen 27 Installation RovoControl 18 IR Cut Filter 25 M Manual 8 N Noise Reduction 24 O ON Button RovoControl 24 On Screen Display 25 Output Screen 26 Overview RovoRX HDMI 15 P Packaging 8 Precautions RovoCam 13 Presets RovoCam 20 21 R...

Page 45: ...ter 18 S Safety Statements 34 Settings Control Screens 24 Software 8 Specifications 29 System Installation with AJA HB T Transmitter 17 with RovoCam 16 T Third Party Control Solutions 18 28 Tripod Plate 12 U Unpacking 8 V V Flip Image 25 Video Format 26 Video Mute 25 W Warnings Safety 34 White Balance 25 Z Zoom Control Group 23 ...

Reviews: