


ROI Series Mini-Converter v1.5r1 15 www.aja.com
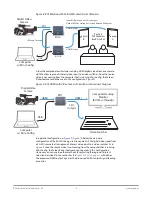
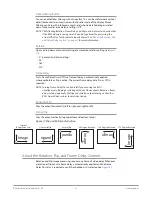
Figure 10. ROI-SDI with 3G-SDI Source to Switcher Interconnect Diagram
ROI-SDI
HDMI
USB
SDI
Output
Computer
w/ Mini-Config
Video Switcher
HDMI Monitor
3G-SDI Source
Installation
Typically, ROI installation consists of the following steps:
1. Ensure the ROI is disconnected from power.
2. Connect your computer or video console monitor output to the ROI’s HDMI/
DVI/DP input connector. For ROI-SDI, connect your SDI source signal to the
ROI’s SDI input connector.
3. Connect the ROI’s HDMI/DVI/DP output connector to a second monitor
(optional). For ROI-SDI, this would be the SDI Loop output connector.
4. Connect a video monitor to the converter SDI output BNC. The ROI-SDI
offers both an HDMI output and an SDI output for the processed signal.
5. If using ROI-HDMI/DVI/DP, connect two-channel analog audio input to
analog audio connector (optional).
6. If using ROI-SDI, connect two analog RCA jacks (optional).
7. Apply power to the converter (AJA power supply included).
8. The converter will now run using the default factory settings. If you wish to
alter the factory settings, you’ll need to:
• Install the AJA Mini-Config software onto your computer.
• Attach the converter via USB cable (included).
• Make your changes using Mini-Config setup screens.


