background image

38

ENGLISH

PLAYING AN MP3 DISC (CONTINUED)

TIME

a
g
c
s

r

f

t

The following functions do not work when playing an
MP3 disc.
• Sound reproduction during fast forward or fast reverse
• Time search
• Audio channel selection

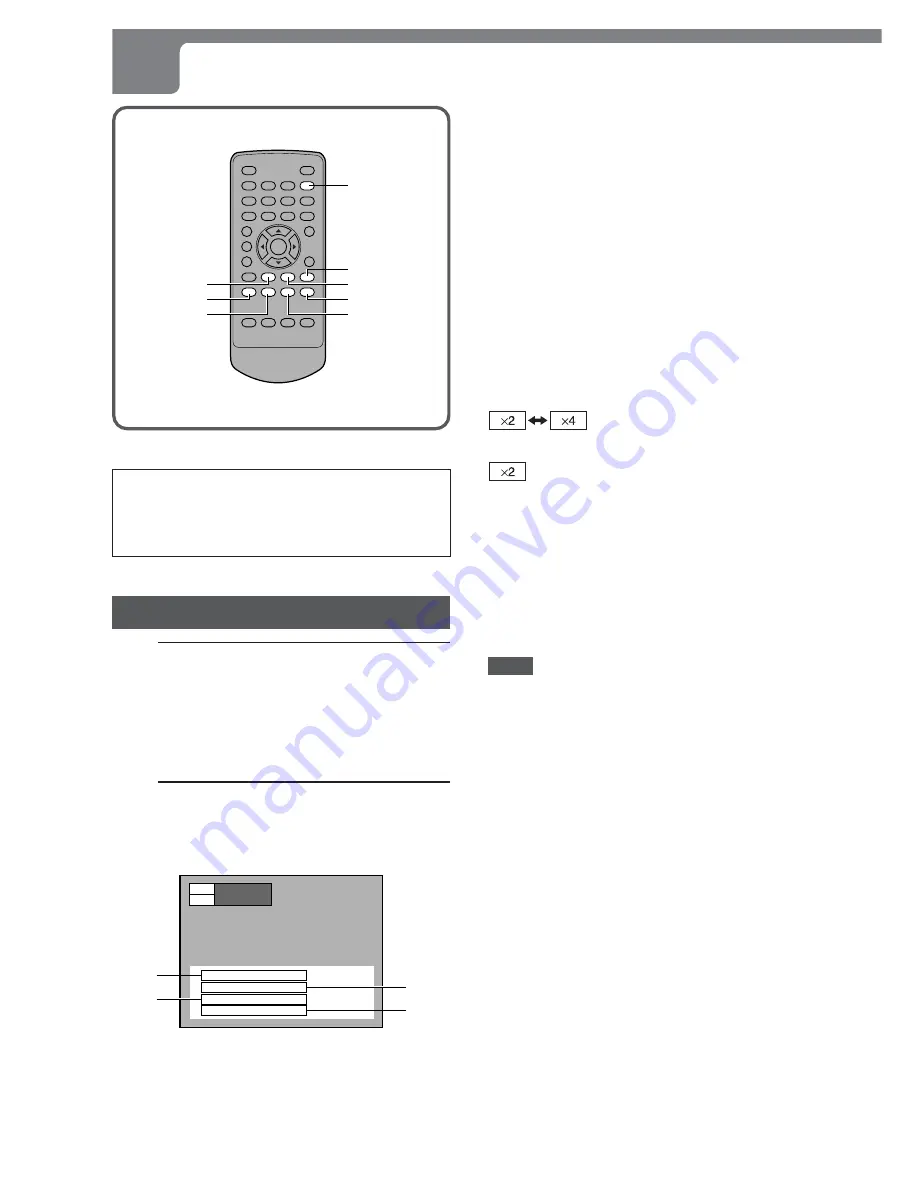
Playing an MP3 disc

1

Load an MP3 disc.

"MP3"  lights up and the total number of tracks is displayed
on the display window.

It may take over 30 seconds to read the MP3 tracks
depending on the complexity of the album tree.

2

Press 

c

.

Playback starts.
Disc information is displayed on the TV screen.

ALBUM  ABCD_EFG
TRACK  001_ABC
Sampling  Rate  44.1 kHz
Bit Rate  128 kbps

TRACK

001 / 160

TIME

TRACK 0 : 00 : 10

q

e

w

r

q

 Album (directory) name

e

 Sampling frequency

w

 Track (file) name

r

 Bit rate

To stop playback

Press 

s

.

To pause playback

Press 

a

 during playback.

To resume playback, press 

c

 or 

a

.

Removing the disc

The procedure is the same as that for audio CDs. Refer to
"Removing the disc" on page 17.

To fast forward or fast reverse

Press 

f

/

g

 during playback.

Each time you press 

f

/

g

, the play speed changes as

shown below.

g

: fast forward

f

: fast reverse


 (fixed)

If you press 

f

  during fast forward or 

g

  during fast

reverse, the fast playback direction changes to the opposite
with the speed 

×

2.

The play speed returns to normal at the beginning or end
of the track.
There is no audio during fast forward or fast reverse.

To return to normal playback, press 

c

.

NOTE

The time displayed during fast forward or fast reverse may
differ from the actual time on the disc.

To skip to another track during playback

To skip to the next track, press 

t

.

To return to the beginning of the current or previous track,
press 

r

.

To  skip to the desired track directly using
the number buttons

The procedure is the same as that for audio CDs. Refer to
"Skipping" on page 20.

To check the play time during playback

Press TIME.
The play time is displayed on the TV screen for 10 seconds.
Each time the button is pressed, the elapsed time and
remaining time of the track being played are displayed
alternately on the TV screen and the display window of the
DVD player.

Summary of Contents for HT-DV1

Page 1: ...l For assistance and information call toll free 1 800 BUY AIWA United States and Puerto Rico Model No Serial No Lot No HT DV1 Owner s record For your convenience record the model number and serial number you will find them on the bottom of your set in the space provided below Please refer to them when you contact your Aiwa dealer in case of difficulty ...

Page 2: ...on the rear panel 5 Foreign objects and liquid Be careful that foreign objects or liquid do not enter the system through the ventilation openings 6 Carts and stands The system should be moved with care when placed or mounted on a stand or cart Sudden stops excessive force or an uneven surface may cause the system or cart to fall over 7 Condensation Moisture may form on the pickup lens when This sy...

Page 3: ...Basic operation of the On Screen Display OSD menu 23 Description of each OSD menu item 24 More Features Search 26 Title search track search 26 Chapter search 27 Time search 27 Mark search 28 Random playback 29 Programmed playback 30 Programming tracks 30 Modifying the program 31 Clearing the entire program 31 Repeat playback 32 Repeat playback 32 Repeating a section between two specified points A ...

Page 4: ...stem can play CD R or CD RW discs that contain audio titles or MP3 files NOTES Depending on the condition of the recording equipment or the CD R RW disc itself some CD R RW discs cannot be played on the system The system cannot play CD R RW discs that contain no data or contain kinds of formatted data other than MP3 For more information about MP3 see page 37 Do not attach any seal or label to eith...

Page 5: ...u to locate the track you want Scene Moving pictures and still pictures are divided into sections called scenes Each scene is displayed in the menu screen and assigned a scene number enabling you to locate the scene you want A scene is composed of one or more tracks Types of video CDs There are two types of video CDs Video CDs equipped with PBC version 2 0 The PBC Playback Control function allows ...

Page 6: ...al shipping carton and packing materials come in handy For maximum protection repack the system as it was originally packed at the factory When installing the system The picture and sound of a nearby TV VCR or radio may be distorted during playback In this case position the system away from the TV VCR or radio or turn off the system after removing the disc To keep the surface clean Do not use vola...

Page 7: ...rol point the top of the remote control toward the DVD player If the system is not going to be used for an extended period of time remove the battery to prevent possible electrolyte leakage The remote control may not operate correctly when There is an intense light such as sunlight in the line of sight between the remote control and the DVD player There is fluorescent lighting near the remote sens...

Page 8: ...ter track Hold down to fast reverse a disc it button Press to skip to the next chapter track Hold down to fast forward a disc oc button Press to start playing a disc 0s button Press to stop playing a disc 1POWER 6STANDBY indicator Lights up red in power off standby mode Lights up green when the system power is on 2PHONES jack Plug in an optical headphones set with a stereo mini plug 3 5 mm diamete...

Page 9: ...ain to restore the audio to the previous volume level 2SURROUND button Press to select the audio surround mode 3TIME button Press to display the elapsed time or remaining time of the title chapter disc track currently being played 4C Clear button Press to clear a marked point Press to clear a track when programming tracks Press to cancel an input number in the On Screen Display OSD menu Press to c...

Page 10: ...Control is on uC chapter indicator Lights up while the current chapter number is displayed iVolume chapter number indication The volume level is displayed during volume adjustment The current chapter number is displayed during playback In stop mode The current chapter number is displayed when the resume function is on No indication when the resume function is off oTime counter The elapsed time or ...

Page 11: ...o the speaker terminals Loose connection may cause the system s safety device to be activated so that the power is turned off automatically to prevent short circuit If the power is turned off by activation of the safety device unplug the AC power cord and reinsert the speaker cords firmly Then plug the AC power cord again SURROUND R right surround speaker SURROUND L left surround speaker The TV se...

Page 12: ...plifier side by side 2 Connect the flat cable of the amplifier to the FROM AMP connector on the DVD player holding the plug with the cable side facing down The plug clicks into position 3 Connect the DC cord to the DC IN 6 3V jack on the DVD player and to the DVD jack on the amplifier To the DC IN 6 3V jack Rear of the DVD player To the DVD jack DC 6 3V 1 5A DC cord supplied Rear of the amplifier ...

Page 13: ...D player to a TV equipped with an S video input connector Set the setup menu correctly after connecting a TV Set the TV Aspect of the setup menu according to the TV connected to the system as follows see CHANGING SETUP VALUES on page 41 for details TV Aspect When the TV has a conventional 4 3 aspect ratio screen 4 3 LETTER BOX or 4 3 PAN SCAN When the TV has a wide screen 16 9 WIDE NOTE If picture...

Page 14: ...g each speaker FRONT R right front speaker red label FRONT L left front speaker white label CENTER center speaker green label SURROUND R right surround speaker grey label SURROUND L left surround speaker blue label Red FRONT R 4 m White FRONT L 4 m Grey SURROUND R 10 m Blue SURROUND L 10 m Green CENTER 3 m Purple SUB WOOFER 5 m CENTER FRONT L SURROUND L SUB WOOFER FRONT R SURROUND R Connecting the...

Page 15: ...te stripes go to the 0 terminals NOTES Use the supplied speakers only As far as possible install the speakers at the same distance from the listening position Install the center speaker as close as possible to midway between the left and right front speakers Install the left and right surround speakers no farther than the left and right front speakers from the listening position 4 Connecting the A...

Page 16: ... the TV screen if you press a button which cannot be used or enter an incorrect number Some DVDs may have places where they do not allow pressing certain buttons The symbol will be displayed on the TV screen if you press a button that is not allowed in such a place Getting ready to play Turn on the television and set its video source Video 1 Video 2 Video 3 etc to the one connected to the system T...

Page 17: ...PBC has been played press s once again 2 Press zOPEN to open the disc cover 3 Wait until the rotating disc is completely stopped 4 Pull out the disc while pressing the center pivot Do not touch the surface of the disc 5 Close the disc cover NOTE Do not open the disc cover during playback CONTINUE Adjusting the volume Turn the VOLUME control on the amplifier or press VOLUME on the remote control du...

Page 18: ...er NOTES The disc is rotating even in stop mode while the resume function is on To resume playback from the point where you stopped turn off PBC first See Playing a video CD without using Playback Control PBC on page 20 Still pause Press a during playback The time counter on the display window flashes when playing a DVD audio CD or video CD without PBC To return to normal playback Press c You can ...

Page 19: ... fixed speed There is no audio during fast forward or fast reverse except for audio CDs To return to normal playback Press c NOTES Slow playback fast forward or fast reverse may be canceled when the title has been changed playback has reached the end of a branch menu or the system returned to the main menu Performing fast forward or fast reverse with PBC on may cause the system to return to the me...

Page 20: ...n is pressed the play time displayed on the TV screen and on the display window changes as follows Elapsed time of the title being played Remaining time of the title being played Elapsed time of the chapter being played Remaining time of the chapter being played Elapsed time of the track being played Remaining time of the track being played Elapsed time of the track being played Remaining time of ...

Page 21: ...in 4 seconds press VOLUME Each time the button is pressed the bass or treble level increases or decreases by one step The level can be adjusted between 1 no emphasis and 7 maximum emphasis Alternatively press BASS or TREBLE repeatedly on the amplifier To cancel bass treble emphasis temporarily Press SOUND repeatedly to select TONE DEFEAT then press VOLUME to select ON Alternatively press TONE DEFE...

Page 22: ... STADIUM the reverberation time is much delayed to produce an echo effect as if you were in a large stadium LIVE the reverberation time is relatively short so that you can feel as though you were in a small music hall OFF no indication turns off the audio surround effect NOTES The audio surround effect only functions when the SURROUND L R speakers are connected to the system With some discs the au...

Page 23: ... vRETURN DISPLAY Number buttons Basic operation of the On Screen Display OSD menu CONTINUE You can check the general playback status change the play mode or locate a desired point on the disc etc by displaying and operating the OSD menu When playing an audio CD the OSD menu is displayed without pressing DISPLAY allowing you to skip step 1 below 1 Press DISPLAY The 1st partial display or 2nd full d...

Page 24: ...n the cursor blue area is at the top item TITLE Press k when the cursor is at the bottom item TIME Menu item TITLE CHAPTER TIME Status setting Title number total number of titles Total number of titles in stop mode resume off Chapter number total number of chapters Elapsed time or remaining time of title chapter Function Skip to the desired title Title search on page 26 Skip to the desired chapter...

Page 25: ...Start random or programmed playback pages 29 30 Turn on off the zoom function page 34 Store search marked points page 28 No indication for the status setting field and the function for the menu item is always disabled with video CDs version 2 0 with PBC on Second full display Press i when the cursor blue area is at the top item TRACK Press k when the cursor is at the bottom item TIME Menu item TRA...

Page 26: ...y OSD menu on page 23 2 Press i k repeatedly to select TITLE or TRACK then press ENTER or the l right cursor button When you pressed PLAY MODE and if you do not press i k within 10 seconds the OSD menu disappears and the operation is canceled The cursor yellow area is now at the title track number input field TITLE CHAPTER TIME 1 8 TITLE 0 03 39 0 2 TRACK TIME TRACK 0 50 18 00 10 3 Press i k repea...

Page 27: ...ch 1 Press DISPLAY or PLAY MODE The OSD menu appears on the TV screen For details on how to operate the OSD menu see Basic operation of the On Screen Display OSD menu on page 23 2 Press i k repeatedly to select TIME then press ENTER or the l right cursor button When you pressed PLAY MODE and if you do not press i k within 10 seconds the OSD menu disappears and the operation is canceled The cursor ...

Page 28: ...ER at a desired point Each time a point is marked changes to a mark number 1 to 5 4 Press the l right cursor button The cursor yellow area moves to the next 5 Repeat steps 3 and 4 to mark other points MARK 1 2 3 TITLE1 TIME 0 02 35 To start playback from a desired marked point In the mark entry field press j l repeatedly or use the number buttons 1 5 to select a desired marked point then press ENT...

Page 29: ...ressed PLAY MODE and if you do not press i k within 10 seconds the OSD menu disappears and the operation is canceled 3 Press i k repeatedly to select RANDOM then press c or ENTER The system starts playing the tracks in random order To cancel random playback In step 3 press i k repeatedly to select OFF then press ENTER NOTE This function does not work unless you turn off PBC first See Playing a vid...

Page 30: ...ress 0 and then 2 To enter track number 12 press 1 and then 2 5 Press ENTER The selected track number is entered in the program list You can select up to 99 tracks from a disc and play them in the programmed order The program is retained until the disc is removed or the system is turned off NOTE This function does not work unless you turn off PBC first See Playing a video CD without using Playback...

Page 31: ...on page 30 2 Press i k repeatedly to select EDIT then press ENTER The program list menu appears on the TV screen 3 Edit the program as required To add a track to the program list 1 Press i k repeatedly or use the number buttons to select a desired track For how to enter a track number using the number buttons see step 4 in the previous page 2 On the program list press j l to position the cursor wh...

Page 32: ...menu appears on the TV screen For details on how to operate the OSD menu see Basic operation of the On Screen Display OSD menu on page 23 2 Press i k repeatedly to select REPEAT then press ENTER or the l right cursor button When you pressed PLAY MODE and if you do not press i k within 10 seconds the OSD menu disappears and the operation is canceled A B Repeats a section between two specified point...

Page 33: ...ay function works only when A and B points fall within the same track REPEAT TRACK REPEAT A B REPEAT OFF REPEAT DISC A B Repeats a section between two specified points on the disc DISC Repeats all tracks on the disc TRACK Repeats the track currently being played NOTES REPEATA B is only displayed during normal playback PROGRAM is displayed instead of DISC during programmed playback Program repeat m...

Page 34: ... or l in step 2 during playback of a disc with no multi angle scenes or at a scene where the angle cannot be changed While the zoom function is active the angle cannot be changed The mark search chapter repeat and A B repeat functions do not work on multi angle scenes Zooming the picture This function allows you to zoom in and enlarge the picture to 4 times 1 Press DISPLAY during playback The OSD ...

Page 35: ...appears on its case within the following symbol 3 1 Press DISPLAY during playback The OSD menu appears on the TV screen For details on how to operate the OSD menu see Basic operation of the On Screen Display OSD menu on page 23 2 Press i k repeatedly to select AUDIO then press ENTER or the l right cursor button 3 Press i k repeatedly to select the desired audio track number or audio channel You ca...

Page 36: ... 2 1 Press DISPLAY during playback The OSD menu appears on the TV screen For details on how to operate the OSD menu see Basic operation of the On Screen Display OSD menu on page 23 2 Press i k repeatedly to select SUBTITLE then press ENTER or the l right cursor button SUBTITLE 1 2 JA OFF 3 Press i k repeatedly to select the desired subtitle number Alternatively use the number buttons 4 Press the l...

Page 37: ...e displayed as different characters The system does not support ID3TAG The elapsed play time may not be displayed correctly for MP3 tracks CONTINUE PLAYING AN MP3 DISC Notes on creating MP3 discs When converting audio data to MP3 Creating MP3 files with a sampling frequency of 44 1 kHz and a fixed bit rate of 128 kbps is recommended When creating MP3 discs Do not store more than 255 albums and or ...

Page 38: ... or fast reverse Press f g during playback Each time you press f g the play speed changes as shown below g fast forward f fast reverse fixed If you press f during fast forward or g during fast reverse the fast playback direction changes to the opposite with the speed 2 The play speed returns to normal at the beginning or end of the track There is no audio during fast forward or fast reverse To ret...

Page 39: ...he play mode or locate a desired track by displaying and operating the OSD menu For details on how to operate the OSD menu see Basic operation of the On Screen Display OSD menu on page 23 Description of each OSD menu item for the MP3 disc Random playback The procedure is the same as that for audio CDs Refer to RANDOM PLAYBACK on page 29 Repeat playback The procedure is the same as that for audio C...

Page 40: ...rd DO NOT set Digital Stream to DOLBY DIGITAL and dts Output to ON in the Audio Output Setting procedure of the setup menu Otherwise merely attempting to play a disc may cause a screeching noise that could be harmful to your ears and damage the speakers When connecting to an AV receiver equipped with a digital input connector using an optical cord Depending on the audio equipment connected to the ...

Page 41: ... the aspect ratio of the television set connected to the system Ratings page 46 When playing discs with preset restriction level encoding this setting allows the system to automatically cut scenes of excessive violence etc Audio Output Setting page 47 Set audio output of the DVD player when an external audio equipment is connected Set individual speakers 3 Press i k repeatedly to select the desire...

Page 42: ... off the guide message Each time the button is pressed the setting toggles between ON and OFF 4 Press vRETURN to return to the previous menu screen or press SETUP to exit the setup menu Menu Language Set the on screen menu language English Spanish or French 1 In the SETUP MENU press i k repeatedly to select On Screen Menu then press ENTER 2 Press i k repeatedly to select Menu Language then press E...

Page 43: ... select the language then press ENTER ENTER Choose item SETUP Completion RETURN Previous menu Choose The Item ik Original English Spanish French Others Audio Language Original The original language set for the disc is selected b Go to step 6 English Spanish French b Go to step 6 Others A message prompting you to input a language code appears b Go to step 4 4 When Others is selected in step 3 use t...

Page 44: ...eturn to the previous menu screen or press SETUP to exit the setup menu Subtitle Language The subtitle language on a DVD can be changed If the selected language is not available on the disc the original language for the disc is selected 1 In the SETUP MENU press i k repeatedly to select Disc Languages then press ENTER 2 Press i k repeatedly to select Subtitle Language then press ENTER Choose The I...

Page 45: ... Select this when a wide screen TV is connected Titles recorded in wide screen 16 9 format will be played at full size Setting the wide screen TV to full size mode is also necessary 16 9 Wide 4 3 LETTER BOX Select this when a conventional TV is connected Titles recorded in wide screen 16 9 format will be played in letterbox mode with black bands at the top and bottom of the screen 4 3 Letterbox 4 ...

Page 46: ...n is displayed Enter the Password ENTER Confirm SETUP Completion RETURN Previous menu PASSWORD 0 9 Code input PASSWORD 5 Enter a 4 digit password using the number buttons 6 Press ENTER The Player is Locked Remember the Password PASSWORD Press ENTER button 1 2 3 4 Confirmation of Password Do not forget the password you set 7 After confirming the password press ENTER again The password is saved 8 Pr...

Page 47: ...layer 1 In the SETUP MENU press i k repeatedly to select Audio Output Setting then press ENTER SETUP MENU Choose The Item ik On Screen Menu Disc Languages Audio Output Setting TV Aspect Ratings SETUP Completion ENTER Choose item 2 Press i k repeatedly to select Digital Stream Choose The Item ik Digital Stream dts Output Downmix Type Speaker Setting Test Sound DOLBY DIGITAL OFF Stereo OFF Audio Out...

Page 48: ...s menu screen or press SETUP to exit the setup menu CHANGING SETUP VALUES CONTINUED Speaker Setting Set the distance from the listening position to each speaker Based on the distance setting the system calculates the delay times of the respective speakers so that the sounds from them are centered at the listening position 1 In the SETUP MENU press i k repeatedly to select Audio Output Setting then...

Page 49: ...eam dts Output Downmix Type Speaker Setting Test Sound DOLBY DIGITAL ON Stereo OFF Audio Output Setting RETURN Previous menu ENTER Choose item SETUP Completion 3 Press ENTER to turn on or off the speaker test Each time the button is pressed the selection toggles between ON and OFF ON The test tone is generated from each speaker in the following order FRONT L CENTER FRONT R SURROUND L SURROUND R Ch...

Page 50: ...ian 4747 Kazakh 4748 Greenlandic 4749 Cambodian 4750 Kannada 4751 Korean 4755 Kashmiri 4757 Kurdish 4761 Kirghiz 4837 Latin 4850 Lingala 4851 Laothian 4856 Lithuanian 4858 Latvian Lettish 4943 Malagasy 4945 Maori 4947 Macedonian 4948 Malayalam 4950 Mongolian 4951 Moldavian 4954 Marathi 4955 Malay 4956 Maltese 4961 Burmese 5037 Nauru 5041 Nepali 5048 Dutch 5051 Norwegian 5154 Oriya 5237 Punjabi 523...

Page 51: ...t reverse This is not a malfunction Is the system connected correctly Are the speaker cords inserted firmly into the speaker terminals Has a short circuit occurred at the speaker terminals Is the connected audio equipment turned on Is the volume of the connected equipment set correctly Note that there is no audio during slow playback frame advance and fast forward reverse except with audio CDs Is ...

Page 52: ... DV1 Maximum effective output power FRONT L R 30 W 30 W 1 kHz 8 ohms 10 EIAJ SURROUND L R 30 W 30 W 1 kHz 8 ohms 10 EIAJ CENTER 30 W 1 kHz 8 ohms 10 EIAJ SUB WOOFER 30 W 100 Hz 8 ohms 10 EIAJ Output terminals FRONT SPEAKERS 8 ohms SURROUND SPEAKERS 8 ohms CENTER SPEAKER 8 ohms SUB WOOFER 8 ohms PHONES 32 ohms Power supply 120 V AC 60 Hz Power consumption 50 W operation mode 3 2 W standby mode Weig...

Page 53: ...interference by one or more of the following measures Reorient or relocate the receiving antenna Increase the separation between the equipment and receiver Connect the equipment into an outlet on circuit different from that to which the receiver is connected Consult the dealer or an experienced radio TV technician for help CAUTION Modifications or adjustments to this product which are not expressl...

Page 54: ...For Assistance and Information Call Toll Free 1 800 BUY AIWA United States and Puerto Rico Printed in Malaysia ...

Page 55: ...necting an external AV receiver not equipped with Dolby Digital decoder to the DIGITAL OUT OPTICAL jack of the DVD player you need not make any settings When playing DVDs with Dolby Digital sound on an external AV receiver equipped with Dolby Digital decoder set Digital Stream to DOLBY DIGITAL CAUTION U page 47 K page 49 The same correction as for page 40 U or page 42 K above dts Output U pages 47...

Page 56: ...io que realice ningún ajuste Ciando reproduzca discos DVD con sonido Dolby Digital en un receptor AV externo equipado con descodificador Dolby Digital ajuste Digital Stream en DOLBY DIGITAL PRECAUCIÓN página 47 La misma corrección que la de la página 40 anterior Salida dts páginas 47 y 48 Seleccione si las señales PCM digitales convertidas desde las señales de secuencia de bits DTS deben o no debe...

Page 57: ...lice Fixation des pastilles antidérapantes sous le caisson de grave Fixez les pastilles antidérapantes fournies sous le caisson de grave pour le stabiliser et l empêcher de glisser Bringen Sie die Gleitschutzpolster am Tieftöner an Bringen Sie die mitgelieferten Gleitschutzpolster an der Unterseite des Tieftöners an damit er stabil steht und nicht verrutschen kann Applicare i cuscinetti antiscivol...

Page 58: ...tor Připevněte dodané protiskluzové podložky na spodní stranu basového reproduktoru tím stabilizujete basový reproduktor a zabráníte jeho sklouznutí A csúszásgátló korongok subwoofer re helyezése Helyezze a csúszásgátló korongokat a subwoofer aljára hogy azok stabilizálják a subwoofer t és megakadályozzák annak elcsúszását Przymocuj do subwoofera osłony antypoślizgowe Przymocuj dostarczane z wypos...

Reviews: