background image

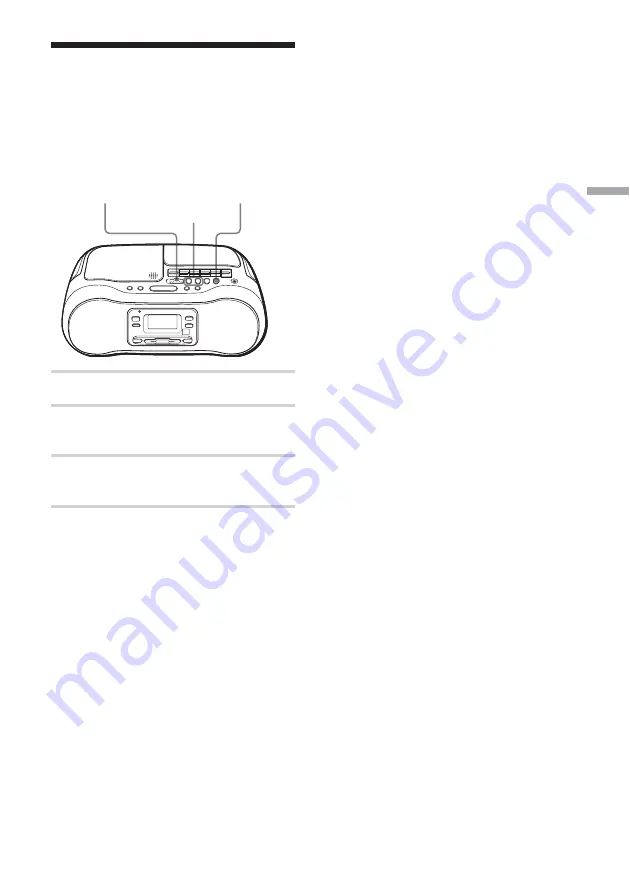
라디오

21

KR

저장한 라디오 선국 듣

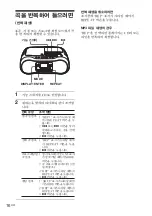
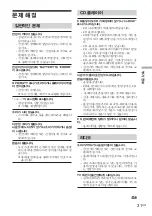
선국을 저장한 후에는 PRESET 버튼을 이
용하여 즐겨 듣는 선국을 쉽게 찾을 수 있습
니다.

.

,

>

BAND/
AUTO PRESET

1

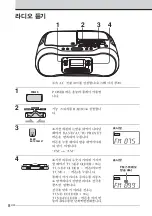
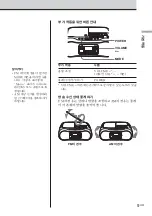
기능 스위치를 RADIO로 설정합니다.

2

BAND/AUTO PRESET 버튼을 눌
러 원하는 방송 대역을 선택합니다.

3

.

 또는 

>

 버튼을 여러 번 눌러 저

장된 선국을 찾아 봅니다.

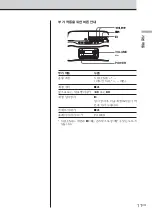
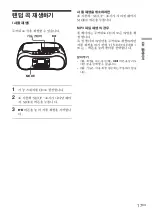
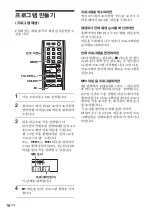
리모컨 사용

1

방송 대역을 선택하려면 BAND 버튼을 누
릅니다.

2

번호 버튼을 눌러 저장된 선국을 찾습니다.

10번 이상의 저장된 선국을 찾으려면 먼저

>

10을 누르고 해당 번호 버튼을 누릅니다.

(예: 저장되어 있는 12번 선국을 찾으려면

>

10을 누르고 먼저 1을 누른 후, 2를 누릅니

다.)

기능 스위치


Summary of Contents for CSD-AM700

Page 1: ...2 893 765 11 1 2006 Sony Corporation CSD AM700 CD Radio Cassette Recorder Operating Instructions KR GB...

Page 2: ...2KR AC AC Fraunhofer IIS Thomson MPEG Layer 3...

Page 3: ...3KR KR CD MP3 4 8 10 12 CD 14 15 16 17 18 20 21 S BASS 22 23 24 26 27 29 31 33 34 MP3 35 37...

Page 4: ...4KR AC 27 1 POWER 2 CD 3 ZPUSH OPEN CLOSE CD CD CD 4 CD CD MP3 CD 1 2 5 3 4 POWER ZPUSH OPEN CLOSE ZPUSH OPEN CLOSE...

Page 5: ...5KR u x ZPUSH OPEN CLOSE POWER VOLUME VOLUME VOL x u X u N CD ZPUSH OPEN CLOSE POWER VOLUME u 5 u N MP3 CD 6 BAND AUTO PRESET 1 x...

Page 6: ...6KR CD 1 CD 5 MP3 CD u x TUNE FOLDER ZPUSH OPEN CLOSE 1 POWER 2 CD 3 ZPUSH OPEN CLOSE CD CD CD 4 CD 5 u N CD MP3 MP3 CD MP3 CD MP3 MP3...

Page 7: ...R MP3 255 512 32 14 A Z a z 0 9 _ ID3 1 1 ID3 TUNE FOLDER TUNE FOLDER FOLDER MP3 CD R CD RW 3 2 1 2 4 5 3 6 7 8 4 9 5 0 6 1 CD R CD RW CD DA CD R CD RW CD ROM MP3 CD DA Compact Disc Digital Audio CD M...

Page 8: ...8KR AC 27 1 POWER 2 RADIO 3 BAND AUTO PRESET FM t AM 4 TUNE FOLDER TUNE FOLDER TUNE TUNE FOLDER TUNE FOLDER 1 2 3 4 POWER BAND AUTO PRESET FOLDER FOLDER TUNE FM...

Page 9: ...9KR POWER MODE VOLUME VOLUME VOL POWER VOLUME FM AM FM AM FM MODE Mono AM 27...

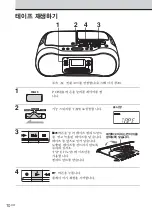
Page 10: ...10KR AC 27 1 POWER 2 TAPE 3 xZ TYPE I 4 N 1 2 4 3 POWER...

Page 11: ...11KR xZ m M X POWER VOLUME VOLUME VOL xZ m M X xZ POWER VOLUME N...

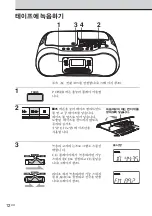
Page 12: ...12KR AC 27 1 POWER 2 xZ TYPE I 3 CD CD CD 4 RADIO 8 1 3 4 2 POWER...

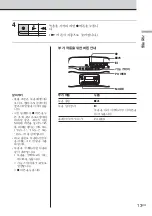
Page 13: ...13KR xZ X MODE POWER z xZ X POWER 22 4 z AM MODE ISS 1 ISS 2 ISS 3 AC 1 2 TAPE 3 z 4 z N...

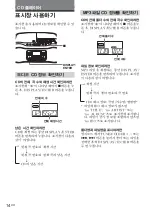
Page 14: ...14KR CD CD x DISPLAY ENTER CD CD 00 x DISPLAY ENTER CD DISPLAY ENTER r r CD t MP3 CD CD 00 x DISPLAY ENTER MP3 DISPLAY ENTER r r ID3 ID3 no TITLE no ARTIST no ALBUM no ID3 TUNE FOLDER DISPLAY ENTER t...

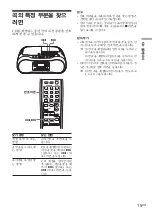
Page 15: ...CD 15KR CD VOL BAND CD RADIO CD 1 2 3 4 5 0 10 10 6 7 8 9 SLEEP DISPLAY MODE POWER S BASS TUNE REPEAT FOLDER AC ONLY RADIO CD CD SHUF PGM x 10 10 23 10 2 3 10 0 10 10 1 0 10 100 10 102 10 1 0 10 2...

Page 16: ...16KR u DISPLAY ENTER MODE REPEAT 1 CD 2 1 REP1 REPEAT 2 3 u 1 REP REPEAT 2 u 1 PGM MODE 2 18 3 3 REP REPEAT 4 u 1 SHUF MODE 2 REP REPEAT 3 u REP REPEAT MP3 REP CD...

Page 17: ...CD 17KR u MODE 1 CD 2 SHUF MODE 3 u SHUF MODE MP3 CD TUNE FOLDER...

Page 18: ...O CD 1 2 3 4 5 0 10 10 6 7 8 9 SLEEP DISPLAY MODE POWER S BASS TUNE REPEAT FOLDER AC ONLY RADIO N MODE FOLDER 1 CD 2 PGM MODE 3 10 10 23 10 2 3 DISPLAY ENTER 4 N PGM MODE DISPLAY ENTER CD x CD MP3 3 F...

Page 19: ...CD 19KR MP3 1 PGM FOLDER MODE 2 TUNE FOLDER DISPLAY ENTER 3 2 CD z...

Page 20: ...ISPLAY ENTER TUNE FOLDER BAND AUTO PRESET 1 RADIO 2 BAND AUTO PRESET 3 AUTO BAND AUTO PRESET 2 4 DISPLAY ENTER 1 RADIO 2 BAND AUTO PRESET 3 TUNE FOLDER 4 DISPLAY ENTER 2 5 6 DISPLAY ENTER 1 BAND 2 3 2...

Page 21: ...21KR PRESET BAND AUTO PRESET 1 RADIO 2 BAND AUTO PRESET 3 1 BAND 2 10 10 12 10 1 2...

Page 22: ...22KR S BASS S BASS S BASS S BASS...

Page 23: ...23KR MODE DISPLAY ENTER CLOCK 27 1 CLOCK 2 DISPLAY ENTER 3 DISPLAY ENTER 00 12 24 3 MODE CLOCK...

Page 24: ...24KR 23 DISPLAY ENTER POWER VOLUME ALARM TIMER SNOOZE 1 POWER 2 CD RADIO TAPE TAPE 3 CD RADIO CD CD 4 ALARM TIMER 5 DISPLAY ENTER DISPLAY ENTER 6 VOLUME DISPLAY ENTER TAPE 7 POWER 60...

Page 25: ...25KR ALARM TIMER DISPLAY ENTER DISPLAY ENTER 2 3 ALARM TIMER POWER SNOOZE 5 6 SNOOZE 7 ALARM TIMER 5...

Page 26: ...26KR 10 20 30 60 90 120 POWER SLEEP 1 2 SLEEP 3 SLEEP SLEEP 60 t 90 t 120 t OFF t 10 t 20 t 30 t 60 SLEEP 4 OFF SLEEP POWER...

Page 27: ...27KR AC AC IN 3 1 1 AC AC AC IN AM AM 9 kHz AM 1 RADIO 2 BAND AUTO PRESET AM 3 DISPLAY ENTER 2 4 AM 9 AM 10 BAND AUTO PRESET 2 5 9 kHz AM 9 10 kHz AM 10 6 DISPLAY ENTER 2 R6 AA 2 6...

Page 28: ...28KR 3 R20 D 6 AC OPR BATT CD 1 1...

Page 29: ...29KR CD AC AC R20 D 6 10mm CD CD...

Page 30: ...30KR A B 90 CD CD CD CD LP CD CD CD CD CD R CD RW CD CD DA CD R CD RW CD DA Compact Disc Digital Audio CD CD CD A A B...

Page 31: ...31KR CD CD CD no DISC CD CD CD CD CD R CD RW CD R CD RW CD R CD RW CD R CD RW CD CD CD R CD RW CD TV AM TV TV FM TV AC IN BATTERY ERROR OPR BATT c c c...

Page 32: ...32KR REC z 33 TYPE II TYPE IV TYPE I 33 33 TYPE II TYPE IV TYPE I AC...

Page 33: ...33KR CD 10 20 30...

Page 34: ...Hz 9 kHz step 530 1 610 kHz 10 kHz step IF FM 10 7 MHz AM 450 kHz FM AM 4 2 Sony C 60 120 TYPE I 80 10 000 Hz 8 cm dia 4 2 PHONES 16 68 4 W CD 220 V AC 60 Hz 9 V DC 6 R20 D 3 V DC 2 R6 AA AC 15 W FM S...

Page 35: ...35KR 255 512 MP3 44 1kHz 128 kbps Disc at Once MP3 MP3 MP3 MP3 MP3 MP3 MP3 MP3 MPEG 1 Audio Layer 3 1 10 MP3 MP3 CD R CD RW ISO 9660 Level 1 Level 2 Joliet MP3 8 mp3 MP3 mp3 ID3...

Page 36: ...36KR ID3 ID3 MP3 ID3 1 1 ID3 1 1 ID3 MP3...

Page 37: ...37KR 27 28 15 8 20 21 20 31 16 9 5 22 27 17 23 AC 27 22 27 27 16 17 21 10 CD 4 33 33 26 24 33 12 14 14 18 18 CD 14 MP3 7 14 MP3 35 S BASS 22 SNOOZE 25...

Page 38: ...ce in a confined space such as a bookcase or built in cabinet To prevent fire or shock hazard do not place objects filled with liquids such as vases on the appliance Connect the apparatus to an easily...

Page 39: ...Playing tracks in random order Shuffle Play 17 Creating your own program Program Play 18 The Radio Presetting radio stations 20 Playing preset radio stations 21 The Audio Emphasis Selecting the audio...

Page 40: ...et the function switch to CD 3 Press ZPUSH OPEN CLOSE to open the lid of the CD compartment and place a CD on the CD compartment 4 Close the lid of the CD compartment Playing an audio CD or MP3 files...

Page 41: ...previous track remove the CD ZPUSH OPEN CLOSE turn on off the player POWER VOLUME and u have a tactile dot 5 Press u N on the remote The player plays all the tracks once To play a CD with MP3 files s...

Page 42: ...CD Playing a CD with MP3 files u x TUNE FOLDER ZPUSH OPEN CLOSE 1 Press POWER to turn on the player 2 Set the function switch to CD 3 Press ZPUSH OPEN CLOSE to open the lid of the CD compartment and...

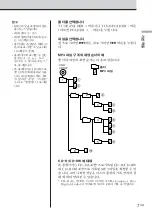
Page 43: ...um name can be displayed To select a folder Press TUNE FOLDER or TUNE FOLDER FOLDER on the remote To select a file Press to go forward and to go backward Example of MP3 file structure and playing orde...

Page 44: ...the band changes as follows FM t AM 4 Hold down TUNE FOLDER or TUNE FOLDER TUNE on the remote until the frequency digits begin to change in the display The player automatically scans the radio freque...

Page 45: ...on off the player POWER VOLUME has a tactile dot To improve broadcast reception Reorient the aerial for FM Reorient the player itself for AM for FM for AM Tips If the FM broadcast is noisy press MODE...

Page 46: ...ction switch to TAPE 3 Press xZ to open the tape compartment and insert a recorded tape Push the tape forward until it stops Be careful not to touch the exposed tape Use TYPE I normal tapes only Close...

Page 47: ...X POWER VOLUME To Press adjust the volume VOLUME VOL on the remote stop playback xZ fast forward or rewind the tape m or M pause playback X Press the button again to resume play after pause eject the...

Page 48: ...forward until it stops Be careful not to touch the exposed tape Use TYPE I normal tapes only 3 Select the program source you want to record To record from the CD player set the function switch to CD...

Page 49: ...ect the recording level If the AM program makes a whistling sound after you have pressed z in step 4 press MODE to select the beat mode ISS 1 ISS 2 or ISS 3 that decreases the noise the most For the b...

Page 50: ...the information of a CD with MP3 files To check the total folder number and total track number on the CD Press x until 00 appears in the display then press DISPLAY ENTER To check the file information...

Page 51: ...forward or backward in pause until you find the point Notes Locating a specific track using the number buttons is only available for the tracks in the selected folder You cannot locate a specific tra...

Page 52: ...ntil REP1 appears 2 Press or to select the track you want to repeat 3 Press u 1 Press REPEAT until REP appears 2 Press u 1 In stop mode press MODE until PGM flashes 2 Program tracks see step 3 on page...

Page 53: ...y To cancel shuffle play Press MODE until SHUF disappears from the display When playing MP3 files The player plays all files of a CD in random order To play only the files in the specified folder in r...

Page 54: ...Press N to start program play To cancel the program In stop mode press MODE until PGM disappears from the display To check the order of tracks before play Press DISPLAY ENTER on the player repeatedly...

Page 55: ...lay 2 Press TUNE FOLDER or on the player to select a folder and then press DISPLAY ENTER on the player 3 Repeat step 2 Tips You can play the same program again since the program is saved until you ope...

Page 56: ...witch to RADIO 2 Press BAND AUTO PRESET to select the band 3 Tune in the station you want with TUNE FOLDER or 4 Hold down DISPLAY ENTER for 2 seconds until the preset number starts flashing 5 Select t...

Page 57: ...ess BAND AUTO PRESET to select the band 3 Press or repeatedly to tune in the stored station On the remote 1 Press BAND to select the band 2 Press the number buttons to tune in the stored station To tu...

Page 58: ...ecting the audio emphasis S BASS You can adjust the audio emphasis of the sound you are listening to S BASS Reinforcing the bass sound Press S BASS S BASS appears in the display To return to normal so...

Page 59: ...il the hour digits flash 2 Press or to set the current hour then press DISPLAY ENTER The minute digits flash Set the minutes by pressing or until the correct minutes are displayed 3 Press DISPLAY ENTE...

Page 60: ...n ALARM TIMER until the hour digits flash Timer Alarm 5 Set the timer to the hour you want the music or alarm to start by pressing or then press DISPLAY ENTER The hour stops flashing and the minutes s...

Page 61: ...tune in the station you want to listen to before you turn off the player To cancel the timer alarm standby mode Press ALARM TIMER twice so that the timer alarm indication disappears To restore the sta...

Page 62: ...after you pressed SLEEP the minutes in the display are entered When the preset time has passed the player goes off automatically To cancel the sleep timer Press SLEEP repeatedly until OFF is displayed...

Page 63: ...the function switch to RADIO 2 Press BAND AUTO PRESET repeatedly to select AM 3 Hold down DISPLAY ENTER for 2 seconds until the preset number start flashing 4 Hold down BAND AUTO PRESET for 2 seconds...

Page 64: ...icator dims or when the player stops operating Replace all the batteries with new ones Notes Before you replace the batteries be sure to take out the CD from the player When you operate the player on...

Page 65: ...te indicating operating voltage power consumption etc is located at the bottom On placement Do not leave the player in a location near heat sources or in a place subject to direct sunlight excessive d...

Page 66: ...the CD After playing store the CD in its case If there is a scratch dirt or fingerprints on the CD it may cause tracking error About CD Rs CD RWs This CD player can play CD Rs CD RWs recorded in the...

Page 67: ...eak Move the player away from the TV If you are using the remote while listening to an AM program noise may be heard This is unavoidable The picture of your TV becomes unstable If you are listening to...

Page 68: ...tely Clean the erase head see page 33 Replace all the batteries with new ones if they are weak The source which was recorded on a TYPE II high position or TYPE IV metal tape using this unit is being p...

Page 69: ...er which tape travels before each recording After cleaning insert a tape when the areas cleaned are completely dry Erase head Capstan Pinch roller Record playback head Lens Demagnetizing the tape head...

Page 70: ...ding system 4 track 2 channel stereo Fast winding time Approx 120 sec with Sony cassette C 60 Frequency response TYPE I normal 80 10 000 Hz General Speaker Full range 8 cm dia 4 cone type 2 Output PHO...

Page 71: ...g We recommend that you do not save other types files or unnecessary folders on a disc that has MP3 files About MP3 What is the MP3 MP3 MPEG 1 Audio Layer 3 is a standard technology and format for com...

Page 72: ...album name etc to MP3 files This player conforms to Version 1 1 of the ID3 tag format If the file has the ID3 tag information song title artist name and album name can be displayed Note If you use a v...

Page 73: ...ng a specific point 15 M N O MP3 About MP3 35 Display 14 playing order 7 P Q Playing a CD 4 a tape 10 preset radio stations 21 tracks in random order 17 tracks repeatedly 16 Power sources 27 Presettin...

Page 74: ......

Page 75: ......
Page 76: ...Sony Corporation Printed in China...

Reviews: