background image

46

GB

If various angles (multi-angles) for a scene are 
recorded on a DVD, you can change the viewing 
angle.
For example, while playing a scene of a train in 
motion, you can display the view from either the 
front of the train, the left window of the train, or 
from the right window without having the train’s 
movement interrupted.

1

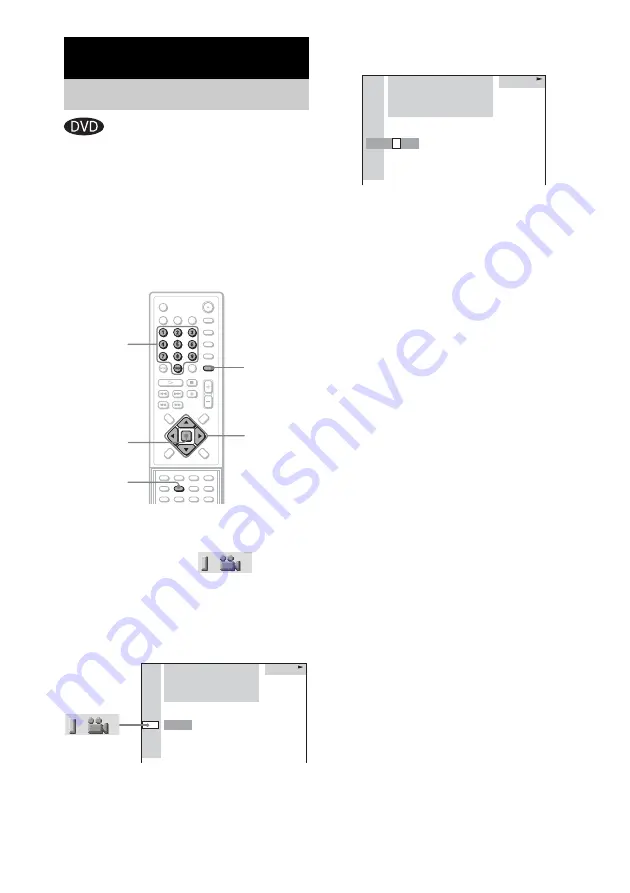
Press DVD DISPLAY during playback.

The Control Menu appears.

2

Press 

X

/

x

 to select 

 (ANGLE).

The angle number appears.

The number in parentheses indicates the 
total number of angles. The “ANGLE” 
indicator lights up in green when angles are 
recorded on the disc.

3

Press 

c

 or ENTER.

The angle number changes to “-.” 

4

Select the angle number using the 
number buttons or 

X

/

x

, then press 

ENTER.

The angle is changed to the selected angle.

To turn off the Control Menu

Press DVD DISPLAY repeatedly until the 
Control Menu is turned off.

Note

Depending on the DVD, you may not be able to change 
the angles, even if multi-angles are recorded on the 
DVD.

Tip

You can select the angle directly by pressing ANGLE. 
Each time you press the button, the angle changes.

Using Various Additional Functions

Changing the Angles

C

/

X

/

x

/

c

ENTER

Number 
buttons

ANGLE

DVD 
DISPLAY

DVD

1 2 ( 2 7 ) MAKING SCENE

1 8 ( 3 4 )
T       1 : 3 2 : 5 5

DVD

1 ( 9 )

DVD

1 2 ( 2 7 ) MAKING SCENE

1 8 ( 3 4 )
T       1 : 3 2 : 5 5

DVD

– ( 9 )

Summary of Contents for AVJ-X5

Page 1: ... 2003 Sony Corporation 4 250 905 11 1 Compact AV System Operating Instructions AVJ X5 ...

Page 2: ... if you do not intend to use it for an extended period of time To disconnect the cord pull it out by the plug never by the cord Installing Allow adequate air circulation to prevent internal heat buildup Do not place the unit on surfaces rugs blankets etc or near materials curtains draperies that may block the ventilation slots Do not install the unit near heat sources such as radiators or air duct...

Page 3: ... the LED remains lit for a while the system is completely off On adjusting volume Do not turn up the volume while listening to a section with very low level inputs or no audio signals If you do the speakers may be damaged when a peak level section is suddenly played On cleaning Clean the cabinet panel and controls with a soft cloth slightly moistened with a mild detergent solution Do not use any t...

Page 4: ...der 30 Shuffle Play Playing Repeatedly 31 Repeat Play Searching for a Particular Point on a Disc 32 Scan Slow motion Play Searching for a Title Chapter Track Index Album File 33 Viewing Disc Information 35 Sound Adjustments Changing the Sound 40 Enjoying Surround Sound 42 Using the Sound Effect 44 Singing along Karaoke 44 Using Various Additional Functions Changing the Angles 46 Displaying Subtitl...

Page 5: ... Additional Information Troubleshooting 66 Specifications 68 Glossary 70 Index to Parts and Controls 72 Language Code List 77 DVD Setup Menu List 78 Index 79 Quick reference for Remote Commander Back cover ...

Page 6: ...Section of a picture or a music piece on a VIDEO CD CD or MP3 Index CD Video Index VIDEO CD A number that divides a track into sections to easily locate the point you want on a VIDEO CD Depending on the disc no indexes may be recorded Scene On a VIDEO CD with PBC functions page 24 the menu screens moving pictures and still pictures are divided into sections called scenes File Section of a picture ...

Page 7: ...ose recorded in the following formats music CD format video CD format MP3 JPEG format that conforms to ISO9660 Level 1 Level 2 or its extended format Joliet Data part of CD Extras DVD ROMs DVD Audio discs DVD RAMs DVD RWs in VR Video Recording mode A logical format of files and folders on CD ROMs defined by ISO International Standard Organization Do not load the following discs A DVD with a differ...

Page 8: ...everse engineering or disassembly is prohibited This system incorporates with Dolby Digital and Dolby Pro Logic II adaptive matrix surround decoder and the DTS Digital Surround System Manufactured under license from Dolby Laboratories Dolby Pro Logic and the double D symbol are trademarks of Dolby Laboratories Manufactured under license from Digital Theater Systems Inc DTS and DTS Digital Surround...

Page 9: ...NDEX CD only page 34 Displays the index to be played TIME page 35 Checks the elapsed time and the remaining playback time Inputs the time code for picture and music searching AUDIO DVD only page 40 Changes the audio setting SUBTITLE DVD only page 47 Displays the subtitles Changes the subtitle language ALBUM JPEG only page 27 Selects the album JPEG to be played 2 FRENCH 3 SPANISH 1 ENGLISH Select S...

Page 10: ...e angles are recorded on the disc FILE JPEG only page 27 Selects the file JPEG to be played DATE JPEG only page 39 Displays the date information ANGLE DVD only page 46 Changes the angle PLAYMODE VIDEO CD CD MP3 JPEG only page 31 Selects the play mode REPEAT page 31 Plays the entire disc all titles all tracks one title chapter track album or contents of program repeatedly CUSTOM PARENTAL CONTROL pa...

Page 11: ...the compartment When using the remote point it at the remote sensor on the system Notes Do not leave the remote in an extremely hot or humid place Do not use a new battery with an old one Do not drop any foreign object into the remote casing particularly when replacing the batteries Do not expose the remote sensor to direct light from the sun or lighting apparatus Doing so may cause a malfunction ...

Page 12: ...t any speakers other than those supplied with this system To obtain the best possible surround sound specify the speaker parameters distance level etc on page 21 Required cords Speaker cords The connector and the colour tube of the speaker cords are the same colour as the label of the jacks to be connected Step 1 Speaker System Hookup Colour tube ...

Page 13: ... Connect the To the Front speakers SPEAKER FRONT L white and R red jacks Surround speakers SPEAKER SURR L blue and R grey jacks Center speaker SPEAKER CENTER green jack Subwoofer SPEAKER WOOFER purple jack R AM LOOP AUDIO OUT VIDEO OUT OUTPUT TO TV AUDIO IN VIDEO IN R L L VIDEO 1 ANTENNA EURO AV SPEAKER SPEAKER WOOFER 3 SURR R 5 CENTER 5 SURR L 5 FRONT R 5 FRONT L 5 FM75 COAXIAL Front speaker R Ce...

Page 14: ...he speakers are connected correctly For details on outputting a test tone see page 64 If no sound is heard from a speaker while outputting a test tone or a test tone is output from a speaker other than the one currently displayed in the front panel display the speaker may be short circuited If this happens check the speaker connection again Note Be sure to match the speaker cord to the appropriate...

Page 15: ...Attaching While pressing the plug down against a flat surface insert the new speaker cords Note that the cord marked with a line should be attached to the minus side of the plug Note Be careful not to damage the surface you use desk etc when attaching detaching the speaker cords Tips You can use any commercially sold speaker cable of gauge cord AWG 18 AWG 24 Before attaching a new cable strip off ...

Page 16: ...AM loop antenna s connector into the AM LOOP terminal If you connect the system to an outdoor antenna earth it to protect against lightning To prevent a gas explosion do not connect the earth wire to a gas pipe Step 2 Antenna Hookups Connect the To the AM loop antenna AM LOOP terminal FM wire antenna FM 75ΩCOAXIAL jack R AM LOOP AUDIO OUT VIDEO OUT OUTPUT TO TV AUDIO IN VIDEO IN R L L VIDEO 1 ANTE...

Page 17: ...ng Started 17GB Tip If you have poor FM reception use a 75 ohms coaxial cable not supplied to connect the system to an outdoor FM antenna as shown below AM LOOP FM75 COAXIAL ANTENNA Outdoor FM antenna System ...

Page 18: ...When you connect using the SCART EURO AV cord check that the TV conforms to S video or RGB signals If the TV conforms to S video change the input mode of the TV to RGB signals Refer to the operating instructions supplied with the TV to be connected Note When recording on another unit connected to the VIDEO 1 AUDIO OUT jacks do not change the Sound Field page 42 press KARAOKE adjust the music pitch...

Page 19: ...e VCR If you want to use your VCR s SmartLink function connect the VCR to your TV s SmartLink jack The SmartLink function may not work properly if your VCR is connected to your TV via this system If you connect the system to your TV via the SCART EURO AV jacks the TV s input source synchronizes with the system automatically when you start playback or press any button except for 1 on the system or ...

Page 20: ...20GB Before connecting the mains leads of this system to a wall outlet connect the speakers to the system see page 12 Step 4 Connecting the Mains Leads ...

Page 21: ...sed TV or projector install the subwoofer at least 0 3 metre from the TV set If it is installed too close colour irregularity may occur on the screen If colour irregularity occurs turn off the TV set once then turn it on after 15 to 30 minutes If colour irregularity occurs again place the subwoofer farther away from the TV set If colour irregularity still occurs after performing the above make sur...

Page 22: ... on the TV screen You can play the disc interactively by following the instructions on the menu DVD page 24 VIDEO CD page 24 To remove the disc Press A on the system EJECT appears in the front panel display Remove the disc after it is ejected from the system To turn on the system Press 1 on the remote or press 1 on the system The system turns on To turn off the system Press 1 on the remote or pres...

Page 23: ...press x to stop playback RESUME appears in the front panel display so you can restart the disc from the point where you stopped the disc If RESUME does not appear Resume Play is not available 2 Press H The system starts playback from the point where you stopped the disc in Step 1 Notes Depending on where you stop the disc the system may not resume playback from exactly the same point The point whe...

Page 24: ...ayed during DVD playback for approximately one hour the system automatically turns off With PBC Playback Control functions you can enjoy simple interactive operations search functions and other such operations PBC playback allows you to play VIDEO CDs interactively by following the menu on the TV screen 1 Start playing a VIDEO CD with PBC functions The menu for your selection appears 2 Select the ...

Page 25: ...format 1 Load a data disc recorded in MP3 into the system 2 Press H The system starts to play the first MP3 audio track in the first album on the disc Notes The system can play MP3 MPEG1 Audio Layer3 audio The system cannot play audio tracks in MP3PRO format This system can play Multi Session CDs when an MP3 audio track is located in the first session Any subsequent MP3 audio tracks recorded in th...

Page 26: ...g X x and press ENTER The selected track starts playing To return to the previous display Press O RETURN or C To turn off the display Press DVD DISPLAY Notes Only alphabetical letters and numbers can be used for album or track names Anything else is displayed as If the MP3 file you play back has an ID3 tag the ID3 tag information is displayed as a track name ID3 tag applies only to version 1 Tip W...

Page 27: ...he disc appears 3 Select an album you want to play using X x and press ENTER 4 Select FILE using X x and press ENTER The list of files contained in the current album appears When the list of all files or albums cannot be displayed on the window the jump bar appears Press c to select the jump bar icon and then scroll the jump bar to display the rest of the list using X x Press C or O RETURN to retu...

Page 28: ...e the interval time of Slide Show Each time you press M during Slide Show the interval time changes With each press the indication changes as follows The FF3M interval time is faster than FF2M Note Slide Show can play in only one direction To rotate the current image Rotate the current image using C c Each time you press c the image turns clockwise by 90º Each time you press C the image turns coun...

Page 29: ...Press C or O RETURN to return to the track or album list 3 Select the track you want to program For example select track 7 4 Press X x or the number buttons to select 7 then press ENTER 5 To program other tracks repeat Steps 2 to 4 The programmed tracks are displayed in the selected order Creating Your Own Program Program Play ENTER C X x c Number buttons CLEAR PLAY MODE H REPEAT FM MODE ORETURN P...

Page 30: ...ferent playing order 1 In stop mode press PLAY MODE repeatedly until SHUF appears in the front panel display When you play an MP3 disc you can play all tracks in albums in random order For details on album shuffle see page 31 2 Press H To return to normal play In stop mode press PLAY MODE repeatedly until SHUF disappears from the front panel display SHUFFLE cancelled The same applies to cancel SHU...

Page 31: ...UE SHUFFLE ALBUM t CONTINUE ALBUM You can play all the titles tracks files or a single title chapter track on a disc In Shuffle or Program Play mode the system repeats tracks in the shuffled or programmed order You cannot perform Repeat Play during PBC playback of VIDEO CDs page 24 1 Press DVD DISPLAY The Control Menu appears 2 Press X x to select REPEAT then press ENTER If you do not select OFF t...

Page 32: ... Press CLEAR Notes Depending on the DVD disc repeat play does not work Repeat Play is cancelled when you eject the disc If ALL is selected repeat play is limited to 5 times Tips You can set Repeat Play during stop mode After selecting the REPEAT item press H The system starts Repeat Play You can quickly display the REPEAT status Press REPEAT FM MODE on the remote You can perform Repeat Play for DV...

Page 33: ...OW 1 SLOW 1 You can search a title DVD chapter DVD track CD VIDEO CD MP3 index VIDEO CD album MP3 JPEG and file JPEG As titles tracks albums and files are assigned unique names on the disc you can select the desired one from the Control Menu Also chapters and indexes are assigned unique numbers on the disc so you select the desired one by entering its number Or you can search a particular point us...

Page 34: ...DISPLAY The Control Menu appears 2 Press X x to select the search method x When playing a DVD CHAPTER x When playing a VIDEO CD INDEX Example when you select CHAPTER is selected refers to a number The number in parentheses indicates the total number of titles chapters tracks or indexes 3 Press ENTER changes to 4 Press X x or the number buttons to select the chapter or index number you want to sear...

Page 35: ...k number displayed is the same number recorded on the disc You cannot search a scene of a VIDEO CD If you play a DVD input the playing time of the current title using the time code If you play a CD VIDEO CD or MP3 input the playing time of the current track using the time code Tip You can change the display to show playing time or remaining time For details see Checking the Playing Time and Remain...

Page 36: ...of the current title Playing time and number of the current chapter Remaining time of the current chapter Title name a Current sound field b Volume b Playing time and current track number When playing a CD Remaining time of the current track Playing time of the disc Remaining time of the disc Track name a Current sound field b Volume b ...

Page 37: ...es Anything else is displayed as In the following cases elapsed playing time and current track remaining time may not be displayed accurately when an MP3 file of VBR variable bit rate is played during fast forward reverse Tips When playing VIDEO CDs with PBC functions only the playing time of the scene is displayed The playing time and remaining time of the current chapter title track scene or dis...

Page 38: ...r Playing time of the menu or current title without a chapter x When playing a VIDEO CD with PBC functions Playing time of the current scene x When playing a VIDEO CD without PBC functions or CD T Playing time of the current track T Remaining time of the current track D Playing time of the current disc D Remaining time of the current disc x When playing an MP3 T Playing time of the current track T...

Page 39: ...ars Exchangeable Image File Format is a digital camera image format defined by the Japan Electronics Information Technology Industries Association Note If there is no date information or data is damaged on the disc the system cannot display the date information Tip You can change the date information order in JPEG DATE of CUSTOM SETUP page 63 DVD DISPLAY MOUNTAIN FAMILY 1 2 0 BIRTHDAY 01 01 2003 J...

Page 40: ...s are displayed they represent the language code Refer to the language code list on page 77 to see which language the code represents When the same language is displayed two or more times the DVD is recorded in multiple audio formats 4 Press ENTER To turn off the Control Menu Press DVD DISPLAY repeatedly until the Control Menu is turned off Notes For discs not in multiple audio format you cannot c...

Page 41: ...k are displayed numerically as follows For Dolby Digital 5 1 ch The display examples are as follows PCM stereo Dolby Surround Dolby Digital 5 1ch DTS Tip When the signal contains surround signal components such as LS RS or S the surround effect is enhanced DVD 1 2 2 7 MAKING SCENE 1 8 3 4 T 1 3 2 5 5 DOLBY DIGITAL 3 2 1 PROGRAM FORMAT DVD 1 ENGLISH Current audio format DOLBY DIGITAL 3 2 1 Surround...

Page 42: ...nt panel display Using only the front speaker and subwoofer 2 CHANNEL STEREO This mode outputs the sound from the front left and right speakers and subwoofer Standard two channel stereo sources completely bypass the sound field processing Multi channel surround formats are downmixed to two channels This allows you to play any source using only the front left and right speakers and subwoofer Press ...

Page 43: ...ts the sound from the headphone L R Standard 2 channel stereo sources completely bypass the sound field processing Multi channel surround formats are downmixed to two channels x HEADPHONE SURROUND This mode outputs the sound as surround from headphone L R To turn the surround effect off Press AUTO FORMAT DIRECT on the remote A F D AUTO appears in the front panel display When you press AUTO FORMAT ...

Page 44: ... Sound effect is cancelled when you select VF MPX L MPX R connecting a microphone or when KEYCON is activated You can sing along with any stereo CD or music DVD by reducing the level of the original vocals You need to connect an optional microphone 1 Connect an optional microphone to the MIC1 or MIC2 jack The microphone indicator in the front panel display lights up 2 Press KARAOKE on the remote W...

Page 45: ... VIDEO 1 AUDIO OUT output level becomes low When you cancel KARAOKE mode the last selected sound effect is activated Monaural sound sources may reduce not only vocals but also instrumental Depending on the music the system may not effectively reduce the level of vocals for the following types of sound sources Instrumental music Duet Music containing a lot of ambient chorus sound Singers of broad r...

Page 46: ...in green when angles are recorded on the disc 3 Press c or ENTER The angle number changes to 4 Select the angle number using the number buttons or X x then press ENTER The angle is changed to the selected angle To turn off the Control Menu Press DVD DISPLAY repeatedly until the Control Menu is turned off Note Depending on the DVD you may not be able to change the angles even if multi angles are re...

Page 47: ...to select the language Depending on the DVD the choice of language varies When 4 digits are displayed they indicate the language code Refer to the language code list on page 77 to see which language the code represents 4 Press ENTER To cancel the SUBTITLE setting Select OFF in Step 3 To turn off the Control Menu Press DVD DISPLAY repeatedly until the Control Menu is turned off Note Depending on th...

Page 48: ...sc is playing press x to stop playback 2 In stop mode press DVD DISPLAY The Control Menu appears 3 Press X x to select CUSTOM PARENTAL CONTROL then press ENTER CUSTOM PARENTAL CONTROL is selected 4 Press X x to select ON t then press ENTER x If you have not entered a password yet The display for registering a new password appears Enter a 4 digit password by using the number buttons then press ENTE...

Page 49: ...then press ENTER The display for entering the password appears 2 Enter your 4 digit password using the number buttons then press ENTER 3 Enter a new 4 digit password using the number buttons then press ENTER 4 To confirm your password re enter it using the number buttons then press ENTER Playing the disc for which Custom Parental Control is set 1 Insert the disc for which Custom Parental Control i...

Page 50: ...or registering a new password appears Enter a 4 digit password using the number buttons then press ENTER The display for confirming the password appears x If you have already registered a password The display for entering the password appears 4 Enter your password using the number buttons then press ENTER The display for setting the playback limitation level and changing the password appears ENTER...

Page 51: ...ord Playing the disc for which Parental Control is set 1 Insert the disc and press H The PARENTAL CONTROL display appears 2 Enter your 4 digit password using the number buttons then press ENTER The system starts playback Notes If you play a DVD which does not have the Parental Control function playback cannot be limited on this system Depending on the DVD you may be asked to change the parental co...

Page 52: ... 2115 Finland 2165 France 2174 Germany 2109 Hong Kong 2219 India 2248 Indonesia 2238 Italy 2254 Japan 2276 Korea 2304 Malaysia 2363 Mexico 2362 Netherlands 2376 New Zealand 2390 Norway 2379 Pakistan 2427 Philippines 2424 Portugal 2436 Russia 2489 Singapore 2501 Spain 2149 Sweden 2499 Switzerland 2086 Taiwan 2543 Thailand 2528 United Kingdom 2184 ...

Page 53: ...our TV TV CATV Other Operations Controlling the TV with the Supplied Remote TV CH TV VIDEO Number buttons VOLUME TV TV 1 ENTER Manufacturer Code number SONY 001 DAEWOO 002 004 005 006 007 015 FISHER 008 GRUNDIG 017 034 HITACHI 002 013 014 015 ITT NOKIA 021 022 JVC 016 LG 002 003 011 012 015 034 MAGNAVOX 002 003 018 MITSUBISHI MGA 002 003 019 NEC 002 003 020 PANASONIC 009 024 PHILIPS 015 018 PIONEE...

Page 54: ...the VIDEO 1 or VIDEO 2 jacks Refer to the operation manual supplied with the unit for further information on its operation Press FUNCTION repeatedly until VIDEO 1 or VIDEO 2 that you connected the unit to appears in the front panel display Each time you press FUNCTION the mode of the system changes in the following sequence TUNER FM t TUNER AM t VIDEO 1 t VIDEO 2 t TV t DVD t TUNER FM When selecti...

Page 55: ...TUNING or until AUTO appears in the front panel display then release Scanning stops when the system tunes in a station TUNED and for stereo program appear in the front panel display 3 Press TUNER MENU MEMORY appears in the front panel display 4 Press ENTER A preset number flashes in the front panel display 5 Press X x to select the preset number you want 6 Press ENTER The station is stored 7 Repea...

Page 56: ...in Step 2 For manual tuning press TUNING or on the remote repeatedly For automatic tuning press and hold TUNING or on the remote Press x when you stop the automatic tuning Tips If an FM program is noisy press REPEAT FM MODE on the remote so that MONO appears in the front panel display There will be no stereo effect but the reception will improve Press the button again to restore the stereo effect ...

Page 57: ...asts Simply select a station from the FM band When you tune in a station that provides RDS services the station name appears in the display If an RDS broadcast is not received the station name may not appear in the display You can set the system to turn off at a preset time so you can fall asleep listening to music You can preset the time in 10 minute decrements Press SLEEP Each time you press thi...

Page 58: ...ghtness of the front panel display Press DIMMER You can change the brightness of the front panel display by three steps Each time you press DIMMER the brightness changes tDims the front panel display r Turns the SLOT LEDs off Front panel display remains dim r Brightens the front panel display and turns the SLOT LEDs on ...

Page 59: ...Then press ENTER or c The selected Setup item appears Example SCREEN SETUP 3 Select an item using X x then press ENTER or c The options for the selected item appear Example TV TYPE 4 Select a setting using X x then press ENTER The setting is selected and setup is complete Example 4 3 PAN SCAN Settings and Adjustments Using the Setup Display ENTER DVD SETUP C X x c LANGUAGE SETUP OSD DVD MENU AUDIO...

Page 60: ...ay Switches the display language on the screen Selects the language from the displayed list x DVD MENU DVD only Selects the desired language for the DVD menu x AUDIO DVD only Switches the language of the sound track Selects the language from the displayed list x SUBTITLE DVD only Switches the language of the subtitle Selects the language from the displayed list Note If you select a language that i...

Page 61: ...V screen in stop mode or while playing a CD Settings for the Display SCREEN SETUP 16 9 Select this when you connect a wide screen TV or a TV with a wide mode function 4 3 LETTER BOX Select this when you connect a 4 3 screen TV Displays a wide picture with bands on the upper and lower portions of the screen 4 3 PAN SCAN Select this when you connect a 4 3 screen TV Automatically displays the wide pi...

Page 62: ...he sound track having the highest number of channels priority when you play a DVD on which multiple audio formats PCM MPEG audio DTS or Dolby Digital format are recorded Notes When you set the item to AUTO the language may change The TRACK SELECTION setting has higher priority than the AUDIO settings in LANGUAGE SETUP page 60 If PCM DTS MPEG audio and Dolby Digital sound tracks have the same numbe...

Page 63: ...efault setting when changing a setting Select the item then press CLEAR x SIZE When you do not connect center or surround speakers or move the surround speakers set the parameters for CENTER and SURROUND Since the front speaker and subwoofer settings are fixed you cannot change them Notes When you select an item the sound cuts off for a moment Depending on the settings of other speakers the subwoo...

Page 64: ...m Front speaker distance from the listening position can be set in 0 2 metre increments from 1 0 to 7 0 metres CENTER 3 0 m Center speaker distance can be moved up to 1 6 metres closer to the listening position from the front speaker distance in 0 2 metre increments SURROUND 3 0 m Surround speaker distance can be moved up to 4 6 metres closer to the listening position from the front speaker distan...

Page 65: ...ce 5 From your listening position adjust the value of BALANCE and LEVEL using C X x c The test tone is emitted from both left and right speakers simultaneously 6 Press ENTER when you have finished making adjustments 7 Press X or x repeatedly to select TEST TONE then press ENTER 8 Press X or x repeatedly to select OFF then press ENTER Note When you adjust the speaker settings the sound cuts off for...

Page 66: ...N SETUP the picture does not fill the screen The aspect ratio on the disc is fixed Sound There is no sound The speaker cord is not connected securely Press MUTING on the remote if MUTING ON is displayed in the front panel display The system is in pause mode or in Slow motion Play mode Press H to return to normal play mode Fast forward or fast reverse is performed Press H to return to normal play m...

Page 67: ...ve the disc and leave the system turned on for about half an hour page 2 The MP3 audio track cannot be played The DATA CD is not recorded in an MP3 format that conforms to ISO9660 Level 1 Level 2 or Joliet The MP3 audio track does not have the extension MP3 The data is not formatted in MP3 even though it has the extension MP3 The system can only play MP3 MPEG1 Audio Layer3 audio Remove the disc an...

Page 68: ... The subtitle cannot be turned off The DVD prohibits turning off subtitles The angles cannot be changed Multi angles are not recorded on the DVD being played page 46 The DVD prohibits changing the angles A disc cannot be ejected and LOCKED appears in the front panel display Contact your Aiwa dealer or local authorized Sony service facility The system does not work normally If the system s operatio...

Page 69: ...edance 5 ohms Dimensions approx 85 141 155 mm w h d Mass approx 0 8 kg Center Speaker system Bass reflex magnetically shielded Speaker unit 60 120 mm cone type Rated impedance 5 ohms Dimensions approx 250 76 166 mm w h d Mass approx 0 9 kg Subwoofer Speaker system Bass reflex magnetically shielded Speaker unit 200 mm dia cone type Rated impedance 3 ohms Dimensions approx 191 341 424 mm w h d Mass ...

Page 70: ...recisely To take full advantage of Dolby Surround Pro Logic you should have one pair of surround speakers and a center speaker The surround speakers output monaural sound DTS Digital audio compression technology developed by Digital Theater Systems Inc This technology conforms to 5 1 channel surround This format comprises of stereo surround channels and a discrete subwoofer channel DTS provides th...

Page 71: ...The system can also play discs with the mark Even when the region code is not shown on the DVD the region limit may still be activated Scene On a VIDEO CD with PBC playback control functions the menu screens moving pictures and still pictures are divided into sections called scenes Title The longest section of a picture or music feature on a DVD movie etc in video software or the entire album in a...

Page 72: ...22 E A eject 22 F H play 22 G X pause 23 H x stop 23 I PRESET 23 55 J VOLUME control 22 64 K BASS 44 L SOUND FIELD 42 43 M DISPLAY 35 N FUNCTION 22 54 56 O Front panel display 73 P remote sensor 11 Q VIDEO 2 ANALOG IN jack 18 R MIC2 jack 44 S MIC1 jack 44 T PHONES jack 22 Index to Parts and Controls 1 2 3 4 5 678 9 0 qa qs qd qf qj qk qh qg ql w ...

Page 73: ...rrent surround format Current title number Playing time Current sound effect Current mode Current sound Lights up during PBC playback VIDEO CD only Playing time Current mode Playing status Current track number Current sound effect Lights up when album names are contained in the disc Preset number Current band Current station Current sound effect Monaural Stereo effect continued ...

Page 74: ...74GB When playing back a JPEG Lights up when album names are contained in the disc Playing Status Current mode Current file number ...

Page 75: ... 18 C EURO AV OUTPUT TO TV jack 18 D SPEAKER jacks 12 E VIDEO 1 ANALOG OUT jack 18 F AM LOOP terminal 16 R AM LOOP AUDIO OUT VIDEO OUT OUTPUT TO TV AUDIO IN VIDEO IN R L L VIDEO 1 ANTENNA EURO AV SPEAKER SPEAKER WOOFER 3 SURR R 5 CENTER 5 SURR L 5 FRONT R 5 FRONT L 5 FM75 COAXIAL continued ...

Page 76: ... 31 33 40 46 47 48 55 J TV 53 K TUNER MENU 55 L DVD SETUP 50 59 M ANGLE 46 N SUBTITLE 47 O NIGHT MODE 44 P KARAOKE 44 Q MIC VOL 44 R MIC ECHO 44 S 1 standby 22 T CLEAR 29 30 31 33 U MUTING 23 V REPEAT FM MODE 29 31 56 W TUNER BAND 55 56 X FUNCTION 22 54 56 Y DVD DISPLAY 26 27 31 33 38 40 46 47 Z ENTER 53 wj VOLUME 53 56 wk x STOP 24 48 wl X PAUSE 23 e DVD MENU ALBUM 24 26 27 ez O RETURN 24 26 27 4...

Page 77: ...russian 1059 Bulgarian 1060 Bihari 1061 Bislama 1066 Bengali Bangla 1067 Tibetan 1070 Breton 1079 Catalan 1093 Corsican 1097 Czech 1103 Welsh 1105 Danish 1109 German 1130 Bhutani 1142 Greek 1144 English 1145 Esperanto 1149 Spanish 1150 Estonian 1151 Basque 1157 Persian 1165 Finnish 1166 Fiji 1171 Faroese 1174 French 1181 Frisian 1183 Irish 1186 Scots Gaelic 1194 Galician 1196 Guarani 1203 Gujarati...

Page 78: ...ist SCREEN SETUP TV TYPE SCREEN SAVER BACKGROUND LINE 16 9 4 3 LETTER 4 3 PAN SCAN ON OFF PICTURE GRAPHICS BLUE BLACK JACKET VIDEO RGB CUSTOM SETUP PARENTAL CONTROL TRACK SELECTION OFF 8 7 NC17 STANDARD 6 R 5 4 PG13 3 PG 2 1 G USA OTHERSt CHANGE PASSWORD LEVEL OFF AUTO SPEAKER SETUP SIZE DISTANCE FRONT CENTER SURROUND YES YES NONE YES SUBWOOFER NONE YES FRONT 1 0m 7 0m CENTER 1 0m 7 0m SURROUND 1 ...

Page 79: ...NGUAGE SETUP 60 LEVEL 64 LINE 62 M MP3 25 Multi angle function 46 71 Multilingual function 40 71 MUTING 23 N NIGHT MODE 44 O On screen display Control Menu display 9 OSD 60 P PARENTAL CONTROL 50 62 71 PBC Playback 24 71 PLAY MODE 29 30 Power Saving 22 Preset Station 55 Program Play 29 R Radio 56 RDS 57 Rear Panel 75 Region Code 7 71 Remote 53 76 REPEAT FM MODE 31 56 RESET 60 Resume Play 23 S Scan ...

Page 80: ...hanges the angles when playing a DVD N Displays the SUBTITLE menu in the Control Menu display O Makes sound clear at low volume P Selects Karaoke mode Q Adjust the microphone volume R Adjust the echo volume S Turns on and off the power of the system T Press to return to the Continuous play etc U Mutes the sound V Disc Displays the REPEAT display on the TV screen Radio Switches monaural or stereo o...

Reviews: