

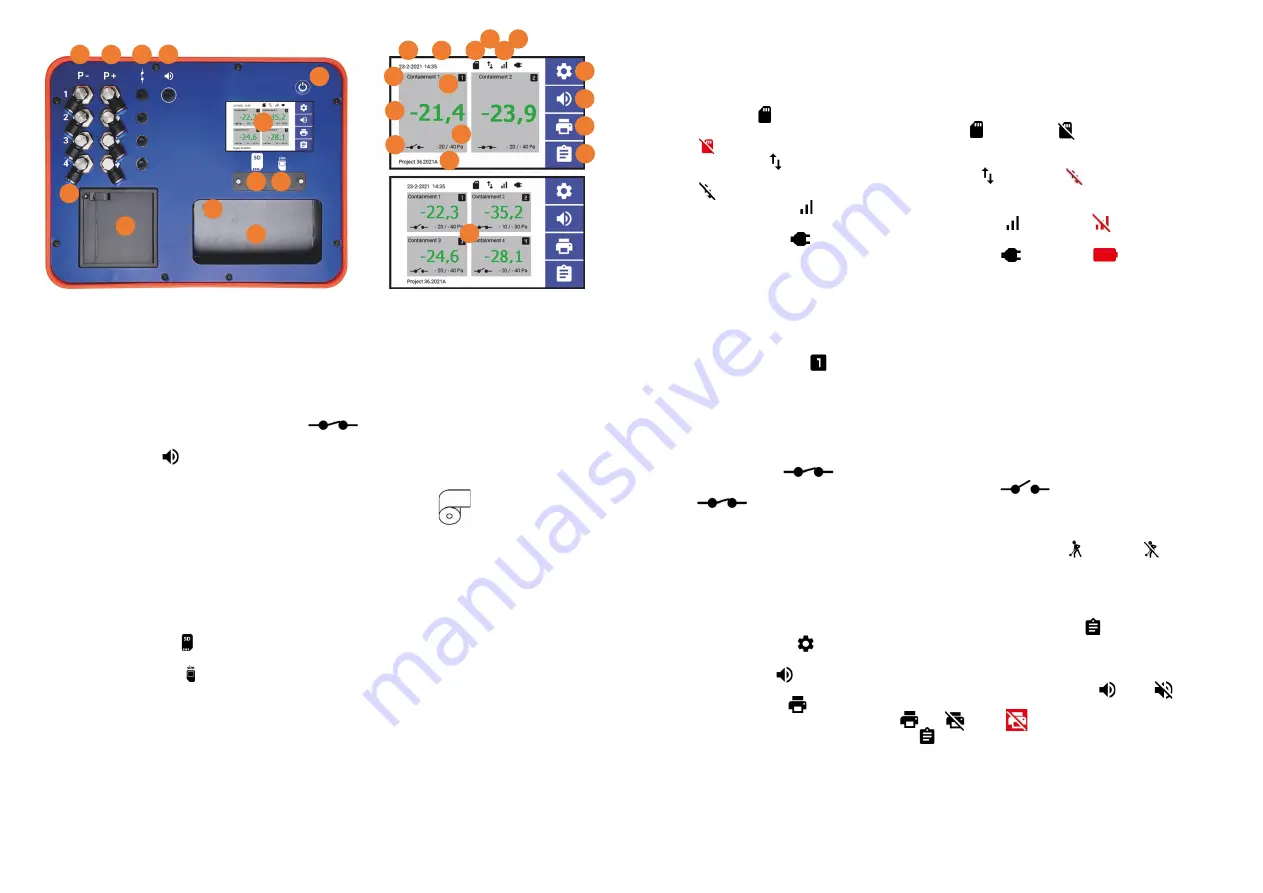
1. P- Connection point for pressure sensor 1, 2, 3, 4
P- Negative pressure hose connection for channel 1, 2, 3*, 4*.
Attention!
Press the hose gently into the nozzle. By pushing the hose too far, the hose
can get stuck. To remove the hose, press the blue ring and gently pull out the hose.
Only use the original supplied hoses.
2. P+ Measuring point overpressure channel 1, 2, 3, 4
P+ Measuring point overpressure for channel 1, 2, 3*, 4* (do not connect any hose!).
3. External relays blok channel 1, 2, 3, 4
External relay block connection for channel 1, 2, 3*, 4*.
4. External horn
Combined external horn connection for channel 1, 2, 3*, 4*.
5. Printer
Thermal printer for 25 meters thermal printing roll.
Attention!
Place the print roll in the right direction of rotation.
6. Paper feed button
Attention!
Never pull on the print roll. This may damage the printer! For paper feed,
use the paper feed button on the printer.
7. On off switch
On and off options for closing the project.
8. Touchscreen
Touchscreen for display and control monitor.
9. Location SD-card
Remove the cover to install/remove the SD card.
10. Location SIM-card
Remove the cover to install/remove the SIM card.
11. Storage 12-Volt adapter
Internal storage for the 12-volt adapter.
12. Inlet 12-Volt adapter
Inlet for 12-Volt adapter. Only use the supplied adapter! Using any other adapter may
result in fire or damage to the monitor.
13. Date
Date display. The date can be adjusted in; Settings (26) > System > Date Time**.
14. Time
Time display. The time can be adjusted in: Settings (26) > System > Date & Time**.
15. SD-Card
This icon indicates the status of the SD card. Status OK, Status not OK,
SD card missing.
16. Send data
This icon indicates the status of sending data*. Status OK, Status not OK,
Internet off.
17. Signal strength
This icon indicates the status of the signal strength. Status OK, Status not OK.
18.
Power supply
This icon indicates the status of the power supply. AC power, battery.
19. Channel display per channel 1, 2, 3*, 4*
Display measured value, (containment) name and status for each channel. Tapping on
the “channel” will take you to the channel's quick settings menu for adjusting the
settings. More settings can be adjusted in: Settings (26) > Channel > Channel #.
20. Containment name
Displays the name of the channel/containment.***
21. Channel number
Displays the channel number (1, 2, 3*, 4*).
22. Measured value (in Pa)
Displays measured value negative pressure, measured values are always displayed in
Pascal (Pa). Values within measuring limit*** will be displayed in
green
, Values outside
measuring limit will be displayed in
red
. The text
Off
will be displayed when a channel
is turned off.
23. Relays block
This icon indicates the status of the relay block***. standby,
activated (up to a max. of -35 Pa).
24. Minimum / maximum negative pressure value
Displays the minimum and maximum set negative pressure value for the alarm. The
channel's shortcut menu allows you to quickly switch between work and rest
modes.
The values can be set in; Settings (26) > Channel > Channel #.
25. Project name / Monitor name
Display of project name/monitor name.
This name can be changed in; Input Project name/Monitor name (29)
26. Settings menu
Tapping on this will open the settings menu.
27. Horn on/off
Tapping on this will switch the internal and (optional) external horn on or off.
28. Printer on/off
Tapping on this will switch printer on, off or status not OK.
29. Input Project Name/Monitor Name
Tapping on this will open the (project) name input.
* Channel 3 and 4 are optional (RM-404T)
** Date and time of web-based monitors are synchronized according to the provider's
system time.
*** Can be adjusted in the channel's quick settings menu.
Or in: Settings (26) > Channel > Channel #.
13
14
15
16
17
18
19
20
-
21
-
22
-
23
3-
24
-
25
-
26
-
27
-
28
-
29
-
1
2
3
4
5
6
7
8
9
10
11
12


