AirTies Air 5450 User Manual Download Page 13

13

This section is for DHCP related settings. The settings you can change are the  

following:

DHCP is enabled by default. In this section you can assign an address range from 
which the router can assign local IP addresses to clients and the lease time. The 
default IP address range for your router is 192.168.2.2 through 192.168.2.254. 

Maximum lease time for an IP address is set as 3600 seconds, which means the 

assigned IP address will be renewed every 3600 seconds.
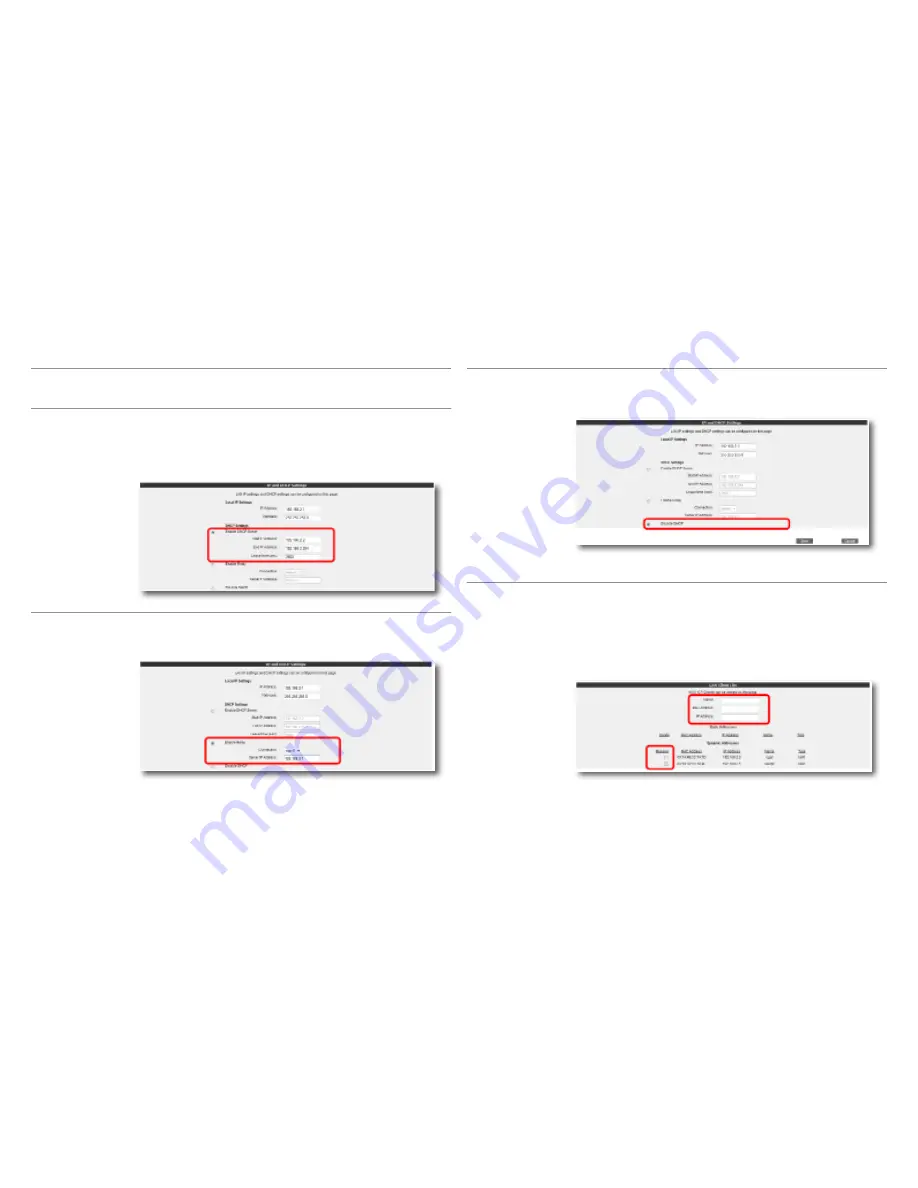
Enable DHCP Server 

DHCP Settings

DHCP relay makes it possible for a DHCP server on a different network to assign 
local IP addresses to clients connected to the router. To do this, the address of the 
device (modem, server, etc.) that runs the DHCP service needs to be known.

Important: 

If DHCP Relay is enabled,  the DHCP server of your router is disabled 

and does not assign IP addresses to clients

Enable DHCP Relay

Stops all DHCP activity on the device. When in this mode, clients connected to 

the router need to be assigned an IP address manually or they have to get an IP 
address from another DHCP server in order to communicate with the network.

In order for any changes made to the IP or DHCP settings to take effect, you need to 

click “

Save”.

Disable DHCP 

You can see all the clients connected to your router and their connection details 
by selecting “

LAN Clients” under the “LAN” menu of your router’s Web interface. 

Through this menu, you can also reserve an IP address for a client. When an IP 
address is reserved for a client, it cannot be assigned to any other client. Whenever 
the client connects to the router, it can get the IP address reserved for it.

You can see the IP addresses that are reserved in the “

Static Addresses”  table.  

Dynamic Addresses” table shows the IP addresses assigned but not reserved.

Click “

Save” for the changes you have made in the “LAN Clients” page to take 

effect.

5.2.2 

LAN Clients

Summary of Contents for Air 5450

Page 1: ...User manual 300 Mbps Wireless ADSL2 Router Air 5450 CD 7 24 8 800 100 02 80 8 800 507 44 40...

Page 2: ...AirTies Mesh settings 10 5 ADVANCED SETTINGS 11 5 1 HOMEPAGE 12 5 2 LAN 12 5 2 1 IP and DHCP Settings 12 5 2 2 LAN Clients 13 5 3 FIREWALL settings 14 5 3 1 Access control 14 5 3 2 MAC address filter...

Page 3: ...or disassemble the device Call AirTies Technical Support In order to prevent electric shock do not operate the device in wet or damp areas In the event of a gas leak do not use the device Do not turn...

Page 4: ...000 XP Vista The router does not need to be connected to a computer during normal operation With Air 5450 which uses 802 11n technology transfer wireless data watch videos or upload your pictures to t...

Page 5: ...ll MAC URL and IP address based filtering for Internet access Easy installation with animated instructions with the Easy Setup CD Automatic Firmware Upgrade Automatic firmware upgrade capability with...

Page 6: ...6 Using the Ethernet cable provided in the box connect your PC to any of the four Ethernet ports of your router 3 ADSL SETTINGS 2 To enter your ADSL settings click the Edit button in this table The P...

Page 7: ...ur router s Web interface All ADSL modes are enabled by default On this screen you can disable enable the modes as you choose Click Save when you are done with the mode setup Important Please choose y...

Page 8: ...cryption protocols used to encrypt the data traffic within the wireless network MAC Address Filtering allows you to control which wireless terminals can connect to the AirTies router and share your In...

Page 9: ...n the Passphrase field Make sure you choose a key that is not easy to guess Click Save 6 You must enter the same passphrase for all the wireless clients that will commu nicate with your device Your Ai...

Page 10: ...s that will be allowed access to the wireless network select Just Allow MAC Addresses in MAC List instead of Just Deny MAC Addres ses in MAC List and enter the MAC addresses 4 4 MAC Filtering AirTies...

Page 11: ...on and basic connection settings ADSL and Wireless of your router using the Easy Setup CD included with your product The Easy Setup CD helps you do the initial installation of your device quickly and...

Page 12: ...t will have a local network connection to your router can be done through the LAN menu of the Web interface and its submenus When you click on the LAN menu the LAN Client List screen will come up All...

Page 13: ...IP addresses to clients Enable DHCP Relay Stops all DHCP activity on the device When in this mode clients connected to the router need to be assigned an IP address manually or they have to get an IP...

Page 14: ...oose a name that is easy to remember In the LAN Interface field enter the LAN interface to which the rule will apply Routers that support VLAN have more than one LAN interface Select the PVC to which...

Page 15: ...he Enable URL Filter box In the SELECT CLIENT section specify the IP or MAC addresses of the clients that the URL filtering rule will apply to clicking the Add button after each entry Enter the URL s...

Page 16: ...are defining SELECT CLIENT This section is for specifying the clients that the port forwarding rule will apply to Enter the IP address of the client in the New IP Address field or select the IP addres...

Page 17: ...Web interface You now need to enter a destination IP and how to get to it Destination IP Enter the IP address of the destination Netmask Enter the Netmask for the destination IP address Connection En...

Page 18: ...u will have to use this new password to login to the Web interface 5 6 1 Password Settings The MANAGEMENT menu of your router s Web interface lets you configure local and remote management settings 5...

Page 19: ...ction can be done automatically via remote Automatic Configuration Servers ACS There are a few simple settings to be configured to use TR 069 for automa tic configuration For these settings go to TR 0...

Page 20: ...entry you can change the active account You can also edit or delete the DDNS accounts you have previously entered To enable DDNS check the Enable DDNS box and click Save Restore Config lets you restor...

Page 21: ...rrent time and date from Internet time servers using the SNTP protocol Default factory settings include some time servers To change the time servers used by your router go to Time Settings under the T...

Page 22: ...DoS SPI firewall IP and MAC address filtering URL filtering Port forwarding DMZ Static Routing RIPv1 RIPv2 routing DNS Proxy DHCP server and client NAT NAPT PPP PAP CHAP MSCHAP IGMPv1 v2 UPnP Univers...

Page 23: ...www airties com 3 CD 7 24 8 800 100 02 80 8 800 507 44 40 3 7 24 8 800 100 02 80 8 800 507 44 40 3...

Reviews: