


AirVelocity 1500 Installation Guide
DUG01560
Airspan Commercial and Internal Use
17
4 AirVelocity 1500 Installation
AirVelocity 1500 supports ceiling (suspended ceiling and conventional ceiling) and wall mounting by
using these elements.
AirVelocity 1500 Mounting Kit:
Ceiling mounting plate
– used for mounting on either a suspended ceiling or a
conventional ceiling
Rail plate
– used for mounting on a suspended ceiling – 4 provided
Rail bracket (with screws, M5x 8mm x4) in AirVelocity 1500 package
– to be attached to the
AirVelocity unit for ceiling mount (suspended or conventional) & wall mount.
Note:
AirVelocity 1500 Mounting kits are available separately.
4.1 Ceiling Mount
The following defines the AirVelocity 1500 ceiling mount assembly procedure for a suspended ceiling
and a conventional ceiling.
Note:
Prior to assembly, in any mounting scenario, determine where the unit it to be installed.
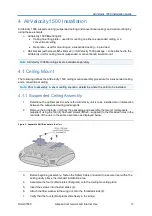
4.1.1 Suspended Ceiling Assembly
1.
Determine the optimal position where the AirVelocity unit is to be installed at an intersection
between the suspended ceiling rail supports.
2.
Remove the AirVelocity unit from the packaging and assemble the two (2) rail brackets
(supplied) using the four (4) flat-head screws (M5x8
– supplied) to the threaded holes in the
rear side of the unit, in the same orientation as displayed below:
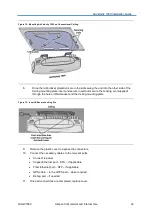
Figure 3: Assemble Rail Brackets to the Unit
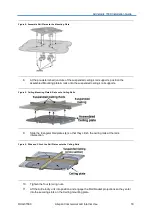
3.
Before beginning assembly - fasten the Safety Cable (included) to a secure riser within the
ceiling cavity above the intended installation area.
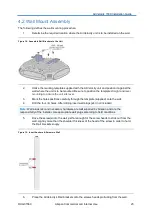
4.
Assemble the four (4) Rail plates (triangular) onto the Ceiling mounting plate.
5.
Insert the screws into the stud slides (4).
6.
Attach the fiber washer & the wing nut onto the threaded studs (4).
7.
Verify that the four (4) Rail plates slide freely in the slot(s).