background image

Step 3


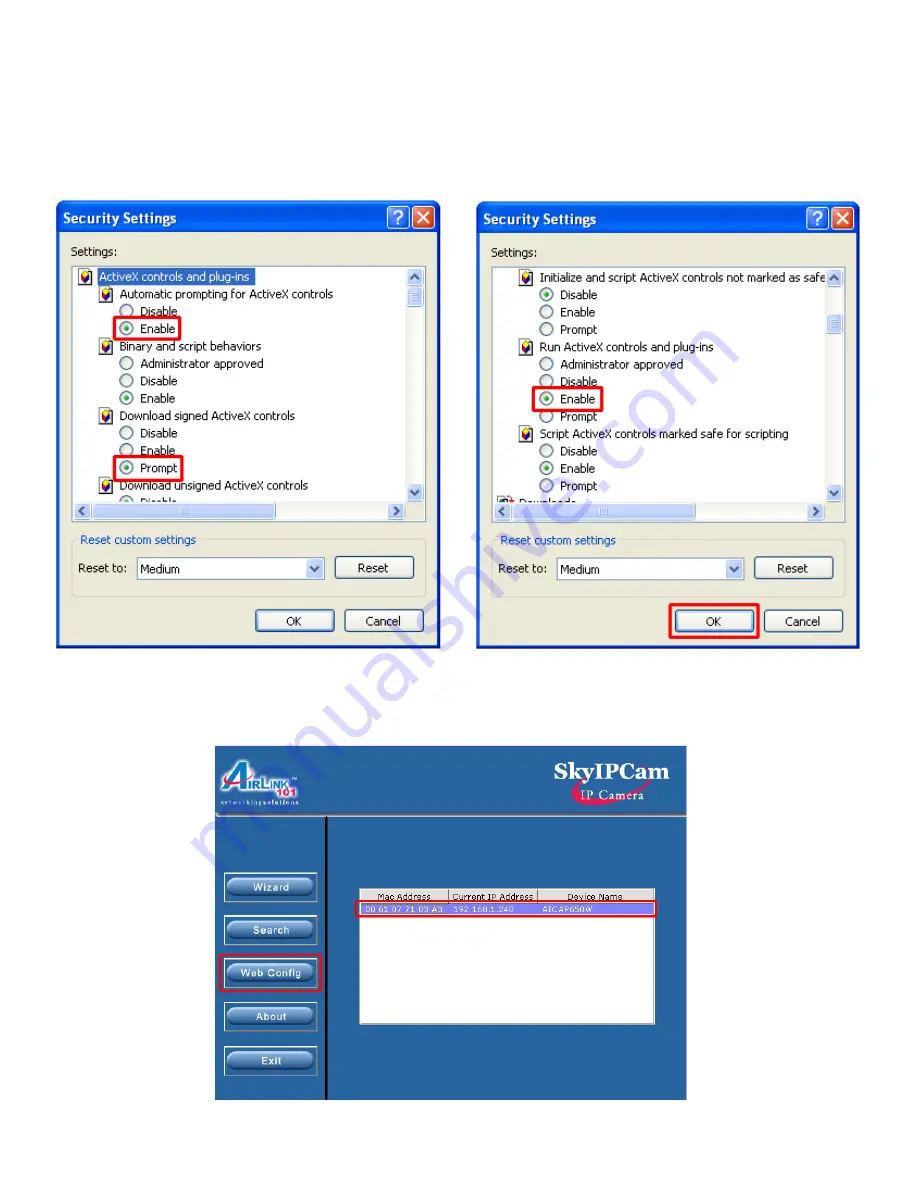
Verify the following settings are selected. Click 

OK 

when done:

•  Automatic prompting for ActiveX controls: 

Enable

•  Download signed ActiveX controls: 

Prompt

•  Run ActiveX controls and plug-ins: 

Enable

Step 4


Close Internet Explorer and re-launch the 

Web Config

 screen.

Summary of Contents for AICAP650W

Page 1: ...Ver 1 0 Quick Installation Guide Model AICAP650W SkyIPCam650W...

Page 2: ...above This Quick Installation Guide only provides the basic instructions For more detailed information please refer to the User s Manual in the supplied CD Caution The IP Camera is designed for indoo...

Page 3: ...mera and connecting the other end to an electrical outlet Step 4 Verify that the LED lights on the Camera are lit If not verify that all the connections are secure and try again Step 2 Connect one end...

Page 4: ...ovided CD and wait for the autorun screen to appear Step 2 Click on Install Setup Wizard Note If the autorun screen does not appear automatically go to Start Run and type D Setup Setup exe where D is...

Page 5: ...Step 4 Click Yes to accept the License Agreement Step 5 Click Next to accept the default Destination Folder Step 6 Click Finish to complete the installation...

Page 6: ...g the Setup Wizard Step 1 Go to Start All Programs AirLink101 IP Camera Setup Wizard AirLink101 IP Camera Setup Wizard Step 2 Select the IP Camera you want to configure from the list and click on the...

Page 7: ...not receive this message skip to Step 6 Step 5 The Wizard will automatically generate an IP address for the camera if this address is not in use by any other device in your local network click OK Othe...

Page 8: ...password Step 7 If you need to change the Camera s IP address because another network device is already using the same address you can assign a new address here and click Next Step 8 Enter the SSID of...

Page 9: ...the same WEP Code Key as your wireless router Click Next and skip to Step 10 Step 9b Enter the same WPA Share Key as your wireless router and click Next Step 10 Verify that all the fields are correct...

Page 10: ...ton Step 2 Enter the password for the camera Default is admin and click OK Note The following steps describe how to view images from within the same local area network as the IP Camera To view images...

Page 11: ...he live videos For more information please refer to the next section Step 3 The welcome page appears If you did not change the default password you will be prompted to do so before accessing the camer...

Page 12: ...tiveX If no image appears on the web browser Internet Explorer follow the steps below to enable and install ActiveX Step 1 Open Internet Explorer and go to Tools Internet Options Step 2 Select the Sec...

Page 13: ...ings are selected Click OK when done Automatic prompting for ActiveX controls Enable Download signed ActiveX controls Prompt RunActiveX controls and plug ins Enable Step 4 Close Internet Explorer and...

Page 14: ...the ActiveX Control prompt Step 6 Select Install ActiveX Control Step 7 Click on Install to install theActiveX Control Step 8 After theActiveX Control is installed you should see the live video on In...

Page 15: ...up Wizard you may unplug the Camera s network cable from the wireless router and place the camera at the desired location To access the camera from a wireless computer open the web browser Internet Ex...

Page 16: ...E mail support airlink101 com Toll Free 1 888 746 3238 Web Site www airlink101 com Section 7 Technical Support...

Page 17: ...g volume of network traffic building materials and construction mix of wireless products used radio frequency interference e g cordless telephones and microwaves as well as network overhead lower actu...

Reviews: