AIRIS T920 User Manual Download Page 11

Understanding the Hardware Features

10

© 2006 ...  Directions Ltd
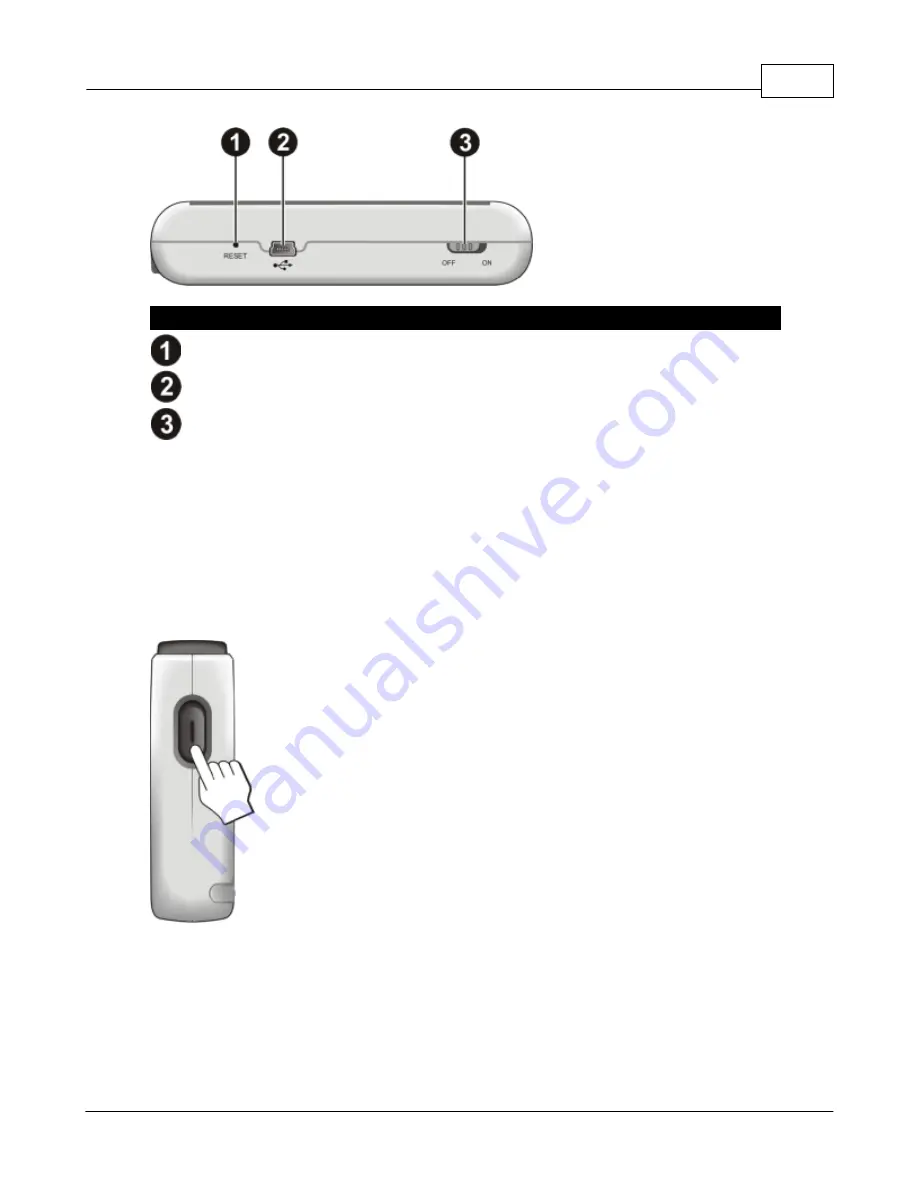
Ref

Component

Description

Reset Button

Restarts your device (soft reset)

Mini-USB Connector

Connects to the Car Charger adapter or USB
cable

ON/OFF Switch

The main power/battery cutoff switch

4

Basic Skills

This chapter familiarizes you with the basic operations of your device such as using the
Home screen and the hardware components.

4.1

Turning Your Device On and Off

Use the power button on the side of your device to turn on and off your device.

When you press the power button to turn off the unit, your device actually enters into a
suspend state and the system stops operating.
Once you turn on the system again, it resumes at the same place.

Home Screen

The first time you turn on your device, the Home screen appears. The Home screen is your

Summary of Contents for T920

Page 1: ... 2006 Directions Ltd Airis T920 ...

Page 2: ...ing Your Device in a Vehicle Part III Understanding the Hardware Features 7 Part IV Basic Skills 10 10 1 Turning Your Device On and Off 12 2 Using the Stylus 12 3 Using a SD MMC Card Part V System Settings 13 13 1 Using System Settings 14 2 Backlight 15 3 Volume 16 4 Screen 17 5 Power 18 6 Date Time 20 7 Change Language 21 8 Back Index 0 Airis T920 I 2006 Directions Ltd ...

Page 3: ...for the performance of GPS Any change to the GPS system can affect the accuracy of all GPS equipments GPS satellite signals cannot pass through solid materials except glass When you are inside a tunnel or building GPS positioning is not available A minimum of 4 GPS satellite signals is needed to determine current GPS position Signal reception can be affected by situations such as bad weather or de...

Page 4: ...rns on and displays the Change Language screen You can tap the left right arrow to select a language if your region of purchase is a country with multiple languages Tap to continue NOTE If multiple languages are available you can change the language later on by tapping Setting Change Language 3 The Date Time screen appears tap the appropriate arrow button to select the time zone date and time Then...

Page 5: ...ng Setting Date Time 4 The Home screen appears as shown below You can now use your new device 2 2 Connecting and Charging the Battery Fully charge the battery before using your device for the first time Connect the USB cable to the bottom of your device and the other end to a USB port on your computer ...

Page 6: ...A car holder and a car charger are supplied with your device Using the Car Holder CAUTION Select an appropriate location for the car holder Never place the holder where the driver s field of vision is blocked If the car s windshield is tinted with a reflective coating an external antenna optional mbe needed to route the antenna to the top of the car through a window When closing thcar window be ca...

Page 7: ... your device against sudden charges in current connect the car charger only after the car engine has been started 1 Connect one end of the car charger to the power connector of your device 2 Connect the other end to the cigarette lighter in the car to power and charge your device the indicator on the car lights green to show that power is being supplied to your device ...

Page 8: ...ef Component Description Charge Indicator Glows bright amber to indicate that the battery is charging and turns green when the battery is fully charged Touch Screen Displays the output of your device Tap the screen with the stylus to select menu commands or enter information Back Components ...

Page 9: ... its slot to use it and store it in the slot when not in use External Antenna Connector This connector under rubber dust cover allows use of an optional external antenna with magnetic mount which may be positioned on top of the carfor better signal reception in areas with poor reception Speaker For music sounds and voice prompts Left Side Components Ref Component Description ...

Page 10: ...de Components Ref Component Description Power Button Turns the device on and off Top Components Ref Component Description GPS Antenna Receives signals from the GPS satellites overhead SD MMC Slot Accepts an SD Secure Digital or MMC MultiMediaCard card for accessing map data Bottom Components ...

Page 11: ...he basic operations of your device such as using the Home screen and the hardware components 4 1 Turning Your Device On and Off Use the power button on the side of your device to turn on and off your device When you press the power button to turn off the unit your device actually enters into a suspend state and the system stops operating Once you turn on the system again it resumes at the same pla...

Page 12: ...Directions Ltd starting place for various tasks Tap a button to start an application or open another menu screen Button Description Starts the Pocket Navigator 6 navigation software Allows you to customize system settings ...

Page 13: ...e stylus on the screen and drag up down left right or across the screen Tap and hold Tap and hold the stylus until an action is complete or a result or menu is shown 4 3 Using a SD MMC Card Your device has a SD MMC slot where you can insert an optional Secure Digital or MultiMediaCard storage card NOTE Make sure that no foreign objects enter the slot Keep a SD or MMC card in a well protected box t...

Page 14: ...ings Your device has default system settings You can customise the settings to suit your own personal needs Once you change the settings your new settings will remain until you change them again 5 1 Using System Settings To open the Settings screen tap the Setting button on the Home screen The Settings screen contains seven buttons as shown below The following sections describe these buttons and t...

Page 15: ... 2006 Directions Ltd 5 2 Backlight 1 Tap the Setting button on the Home screen to open the Settings screen 2 Tap the Backlight button on the Settings screen 3 Tap the left or right arrow to darken or brighten the screen ...

Page 16: ... Tap the button to save the changes and go back to the Settings screen 5 3 Volume 1 Tap the Setting button on the Home screen 2 Tap the Volume button on the Settings screen 3 Tap the left or right arrow to decrease or increase the volume ...

Page 17: ...n to save the changes and go back to the Settings screen 5 4 Screen You can calibrate the touch screen if it is not responding accurately to your stylus taps 1 Tap the Setting button on the Home screen 2 Tap the Screen button 3 Tap to start the calibration ...

Page 18: ...ap and hold the centre of the new target Repeat each time to complete the calibration process 6 When completed tap button to return to the Settings screen 5 5 Power To check the remaining power level of your battery and or set up the power saving feature 1 Tap the Setting button on the Home screen 2 Tap the Power button ...

Page 19: ...ith the USB lead or the car charger You can set a timer to automatically turn off your device when it is idle for a set period of time The options include Never 30 minutes 20 minutes and 10 minutes 4 Tap the button to save the changes and go back to the Settings screen 5 6 Date Time To set the date and time 1 Tap the Setting button on the Home screen 2 Tap to go to the next page ...

Page 20: ...date tap the down arrow in the Date item A calendar pops up Tap the left arrow on the calendar to go to the earlier month and year or the right arrow to the later month and year Alternatively you can tap the month or year on top of the calendar to directly change the month or year When the calendar shows the current month tap the date on the calendar ...

Page 21: ...ncrease or down arrow to decrease the value 7 Tap the button to save the changes and go back to the Settings screen 5 7 Change Language To change the system and voice language 1 Tap the Setting button on the Home screen 2 Tap to go to the next page 3 Tap the Change Language button 4 Tap the left or right arrow to select the system language ...

Page 22: ...Airis T920 21 2006 Directions Ltd 5 Tap the button to save the changes and go back to the Settings screen 5 8 Back The Back button brings you back to the Home screen ...

Reviews: