Air Design Volt Manual And Service Book Download Page 18

34 


For long-term storage do not pack the glider too tightly. Leave the rucksack zip open 
when possible to allow any moisture to evaporate. 


Transport: 

Some materials used in the construction of the glider are sensitive to temperature. Therefore, 
the pilot should ensure that the glider is not exposed to excessive heat. For instance, do not 
leave the glider in a car during hot summer days.  
When packing to send by post use appropriate packing material. 

Cleaning: 

For cleaning just use only a soft sponge and clean water. 
Do not use solvents, cleaners or abrasives. 

Repairs: 

Repairs must be done exclusively by the manufacturer, importer or authorised persons. 
Use only original parts.   
In case of questions please contact AIRDESIGN directly. 

Material wear: 

The VOLT consists mainly of Nylon cloth.  
This material does not lose much strength or become porosity through exposure to UV 
radiation. However, despite this, the pilot should take care to not expose the glider 
unnecessarily to sunlight. Unpack shortly before take-off and pack the glider right after landing. 


The VOLT is lined with unsheathed Aramid lines in the top- and middle cascades and with 
sheathed Aramid-lines at the main-lines. Take care not to stress any line mechanically. 
Overloading should be avoided as a stretching is non-reversible. Continuous bending of Aramid 
lines at the same spot weakens the strength.  
When putting the glider to the ground avoid dirt and dust as much as possible. Dirt can get 
between the fibres of the lines which may shorten the lines and damage the covering.  
When lines get caught during take-off, they can stretch or even break. Do not step on lines. 
Sharp edges on the ground can damage the sheathing.  
A brake line tangled around other lines can tear or cause damage.  
Take care that no snow, stones or sand get into the canopy. The weight can pull down the 
trailing edge and slows the glider. In the worst case scenario, the glider can be caused to stall. 
When launching in strong winds the canopy can, if not controlled, overshoot and hit the 
ground hard. This can lead to tears in the ribs or damage the sail or stitching.  
When landing, avoid the leading edge hitting the ground in front of the pilot. This can damage 
the materials in the leading edge.  
After landings in trees or water the line length must be checked. After contact with salt water 
wash the glider immediately with clean water.  
Avoid contact between the fabric and sweat.  
Do not pull the glider over rough ground; his can damage the cloth at the contact points.  
Do not too pack the glider too tightly. 
 
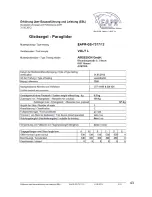
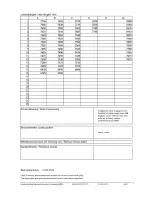
The total line length documents for each size of the VOLT are found in the annex. 
 

Summary of Contents for Volt

Page 1: ...EN LTF C Betriebshandbuch und Serviceheft Manual and Service Book Seriennummer Serial Number Rev3 18 06 2012 AIRDESIGN GmbH Rhombergstraße 9 A 6067 Absam AUSTRIA Tel 43 5223 22480 Tel 43 664 3307715 e mail info ad gliders com ...

Page 2: ...g 27 h Landing 27 i Towing and winching 28 j Asymmetric and frontal collapses 28 k Reopening a cravat 28 l Negative spin 29 m Full stall 29 n Rapid decent manoeuvres 29 i Spiral 29 ii B line stall 30 iii Big ears 30 iv Big ears with B line 31 8 Maintenance and Repairs 31 9 Checking the glider 35 10 The Final Word 35 A ANHANG ANNEX 36 a Übersichtszeichnung Overview 36 b Leinenplan line plan 37 c Tr...

Page 3: ...etails If you wish you can register for the AIRDESIGN newsletter Simply provide us with your e mail address and you will always be up to date with the very latest news from the AIRDESIGN world Up to the minute news and information is available on our Facebook page under AIRDESIGN gliders Become a fan and you are online with us whenever you login to Facebook More information about the VOLT can be f...

Page 4: ...to monitor and to maintain the airworthiness of this paraglider To make sure the paraglider always flies with optimum characteristics take care of the paraglider and make regular checks Any change made to the structure of the paraglider renders it uncertified non conformity of type testing and invalidates any warranty Structural repairs to paragliders must only be made by an appropriately experien...

Page 5: ...esult is the brand new VOLT The VOLT is aimed at sports class cross country and competition pilots who want ease of handling with top end performance in the class VOLT is the result of another year of development testing and trimming and combines the characteristics and flying sensations of the big brother PURE with the handling and recovery of the recreational sport class VOLT performance is beyo...

Page 6: ... leading edge keep the profile in perfect shape and improve stability and launch characteristics 3D Cut a technical sail cutting method used across the leading edge area This produces improved air flow and increased performance The 2 in 1 progressive brake line layout improves climb characteristics The center brake fan is attached slightly in from the trailing edge to improve climb At the tips the...

Page 7: ...ect sports class glider suitable for improving pilots moving up into the Sports class as well as those who maybe unsure about the latest LFT EN D gliders All pilots flying in this class should be flying regularly and be experienced in active flying in all conditions LTF and EN category The AirDesign VOLT has been classified as EN C and LTF C The glider has been type tested for one seated use only ...

Page 8: ...s risers maillons and canopy should be checked for damage Do not take off if there is the smallest amount of visible damage Ensure that the main Karabiners between harness and risers are undamaged and are closed The harness must be put on with greatest care and all straps secured correctly Check the correct position of the reserve rescue handle and make sure the pins of the reserve rescue are in p...

Page 9: ...ng is recommended in strong wind The glider has split A risers For launching you can take either just the inner A line riser or both For launching in tail wind it might help to use just the inner A line riser to avoid the tips accelerating ahead of the centre of the wing while inflating d Turning flight Your will notice the very precise handling from the first flight The VOLT is easy to turn at an...

Page 10: ...too short May lead to fatigue from flying with your hands in an unnatural position May impede recovery from certain manoeuvres Will certainly reduce your glider s speed range Brake lines that are too long will Reduce pilot control during launch Reduce control in extreme flying situations Make it difficult to execute a good flare when landing Each brake line should be tied securely to its control h...

Page 11: ...ider speeds up but at the same time is more sensitive to deformation In spite of the exceptional stability of the VOLT any accelerated collapse will be more dynamic than the same event experienced at trim speed and will require quicker reactions to maintain normal flight Always keep both hands on the controls when flying fast or in turbulence and be ready to release the speed system immediately at...

Page 12: ...due to the difference in inertia between the pilot and the canopy You must wait until you pendulum back under the canopy before dealing with the deflation Reacting too early can risk stalling the glider completely Release the speed bar immediately if you have a big collapse during accelerated flight and while keeping weight shift neutral apply slight brake to the open side Let the glider enter a t...

Page 13: ... of the brake travel and then hold at this level Holding at this position allows the wing to refill slightly across the span When releasing the brakes without pre filling the ears mostly will most probably hook in the lines and this can result in a cravat After pre filling the glider stabilizes its movements and the brakes can be leased until the glider recovers speed and flies again ATTENTION The...

Page 14: ...derate to rapid descent but doesn t allow any forward speed Initiation Take hold of the B risers both sides at same time just above the maillons and slowly but smoothly pull them down twisting your hands until the canopy shows a span wise crease at the B line attachment points and stops flying forward It is difficult to pull at first but becomes easier as the airfoil creases Your sink rate will in...

Page 15: ...ably during a safety training course Before initiating a manoeuvre make sure that the airspace below is clear of obstructions or other pilots During manoeuvres watch both the glider and altitude above the ground 8 Maintenance and Repairs The materials used to construct your VOLT have been carefully chosen for maximum durability If you treat your glider carefully and follow these guidelines it will...

Page 16: ...ling edge of the wing Collect the lines together and lay them as much as possible on top of the wing fabric This protects the lines during packing and storage 2 Starting either at one tip or at the centre of the wing gather all the leading edge cell walls together so that the polyamide rods are side by side IMPORTANT NOTE if you are packing the glider on rough ground first gather the wing into a c...

Page 17: ... other way then dry it as soon as possible away from direct sunlight and heat Be careful to avoid storing your canopy when damp or wet this is the most common reason for canopy degradation Do not let your glider come into contact with seawater If it does rinse the lines canopy and risers with fresh water and dry it away from direct sunlight before storing After flight or when storing always use th...

Page 18: ...ne mechanically Overloading should be avoided as a stretching is non reversible Continuous bending of Aramid lines at the same spot weakens the strength When putting the glider to the ground avoid dirt and dust as much as possible Dirt can get between the fibres of the lines which may shorten the lines and damage the covering When lines get caught during take off they can stretch or even break Do ...

Page 19: ...e www ad gliders com Ground handling times must be multiplied by factor of 2 due to the greater contact with abrasive surfaces Respecting nature and environment Finally we would ask each pilot to take care of nature and our environment Respect nature and the environment at all times but most particularly at take off and landing places Respect others and paraglide in harmony with nature Do not leav...

Page 20: ...36 A ANHANG ANNEX a Übersichtszeichnung Overview ...

Page 21: ...37 b Leinenplan line plan ...

Page 22: ...38 ...

Page 23: ...39 c Tragegurt Riser Die Längen des Tragegurtes sowie der Beschleunigerwege entnehmen sie bitte der EBL DDP unter Anhang C Please find length for riser and accelerator in EBL DDP in section C ...

Page 24: ...gel Bottom Sail Dominico 30D Rippen Ribs Dominico 30D hard Leinen Lines Gallerie Leinen Top lines EDELRID 8000 U 090 Gabel Leinen Middle lines EDELRID 8000 U 130 Haupt Leinen Main lines EDELRID 7343 280 Tragegurt Riser COUSIN 12mm Technora Schraubschäkel Maillons 4 3mm JOO TECH Korea ...

Page 25: ...41 C EBL DDP ...

Page 26: ...42 ...

Page 27: ...43 ...

Page 28: ...44 ...

Page 29: ...45 ...

Page 30: ...___________________________________ Family name Nachname _________________________________________ Street Straße __________________________________________________ City Wohnort __________________________________________________ Post code PLZ __________________________________________________ Country Land __________________________________________________ Telephone Telefon _________________________...

Page 31: ...____ Email _________________________________________________________ Pilot 3 Owner Halter First name Vorname ____________________________________________ Family name Nachname _________________________________________ Street Straße __________________________________________________ City Wohnort __________________________________________________ Post code PLZ ________________________________________...

Page 32: ...______ Type of service Art der Serviceleistung Service 2 Date Datum _______________________________________ Type of service Art der Serviceleistung Service 3 Date Datum _______________________________________ Type of service Art der Serviceleistung stamp signature Stempel Unterschrift stamp signature Stempel Unterschrift stamp signature Stempel Unterschrift ...

Page 33: ... _______________________________________ Type of service Art der Serviceleistung Service 5 Date Datum _______________________________________ Type of service Art der Serviceleistung Service 6 Date Datum _______________________________________ Type of service Art der Serviceleistung stamp signature Stempel Unterschrift stamp signature Stempel Unterschrift stamp signature Stempel Unterschrift ...

Page 34: ......

Page 35: ...e Vorname _______________________________________________________ Address Adresse ___________________________________________________________ _________________________________________________________________________ Tel ______________________________________________________________________ Fax ______________________________________________________________________ Email ____________________________...

Reviews: