background image

1

Connecting the camcorder to TV

Please follow the below instructions to connect your camcorder and  

TV via accessory AV cables for real-time display. You can display your 

video clips and still pictures on your TV, sharing them with your friends 

and family.

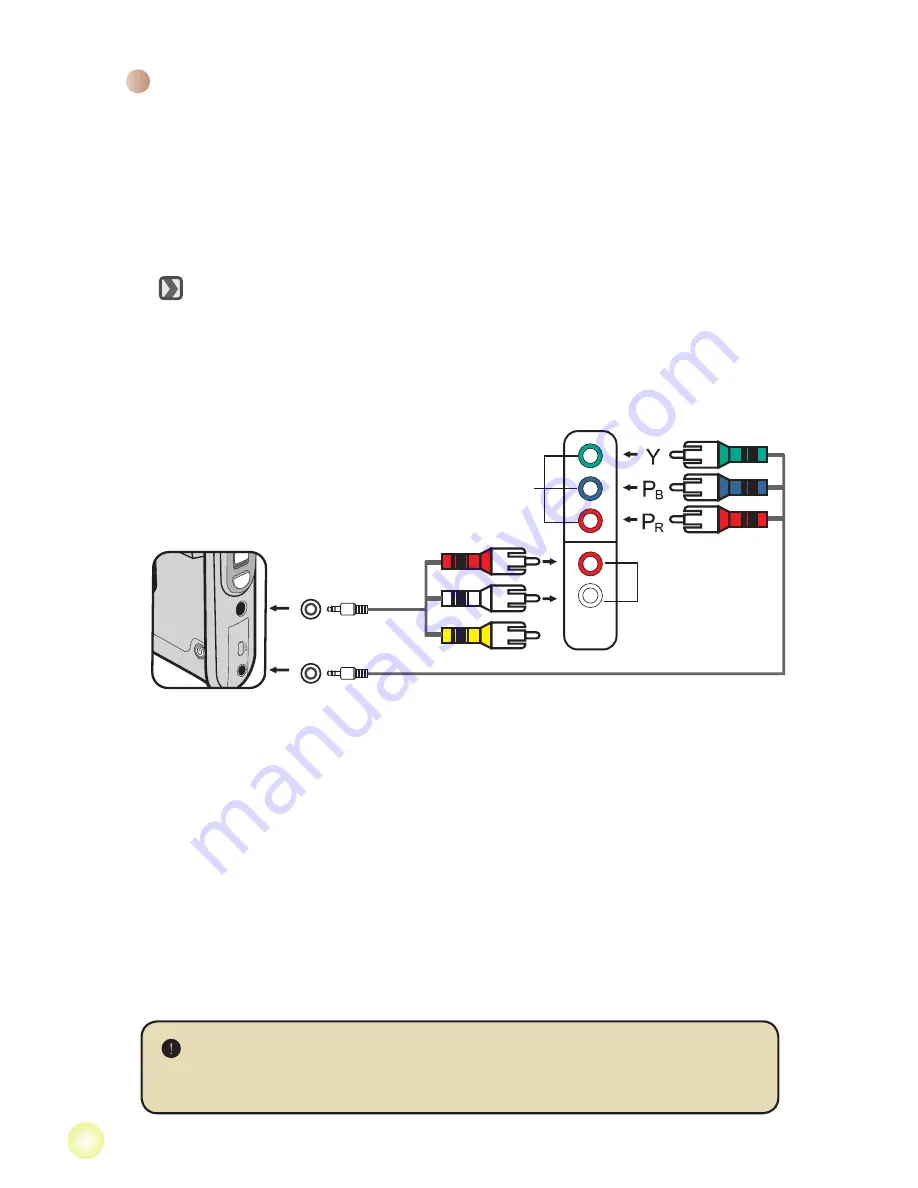
 Connecting the camcorder to HDTV


1. Turn on your HD TV.  
2. Turn on the Camcorder.
3. Plug one end of the component video cable into the (Component 

Video IN) port on the HDTV and the other end into the (HD OUT) port 

on Camcorder. 

4. Plug one end of the other AV cable into the (Component Audio IN) port 

on the HDTV and the other end into the (AV OUT) port on Camcorder.  

(Please do not plug in the yellow connector to HDTV’s AV-IN.) 

5. Press the input switch mode on HD TV and select “Component Input”.   

 If you record an HD resolution clip while connected to your HD TV, the TV  

display video resolution will down size to D1 (480P) resolution due to data 

bit rate, but the recorded file will remain HD (720P) with no change.

HD TV hereby means the HDTV built-in component input ports, thus can perform 

HD (720P) high resolution quality while connected.

AV OUT

HD OUT

HD TV

Component Audio in

Component Video in

<Component Video cable>

<AV cable>

(red)

(yellow)

(white)

(green)

(red)

(blue)

(Do not plug in Yellow Cable)

Summary of Contents for Go-HD

Page 1: ......

Page 2: ...ler or an experienced radio television technician for additional suggestions You are cautioned that any change or modifications to the equipment not expressly approved by the party responsible for com...

Page 3: ...perations 6 Recording a video clip 6 Taking a still picture 7 Recording a voice clip 8 Recording TV program 9 Playing back your recordings 10 Playing back your recordings on PC 11 Connecting the camco...

Page 4: ...ous button Fast backward button LCD monitor Zoom in out button Record button MENU button Next button Fast forward button Play Pause button Macro mode switch LED lights switch White balance switch Flas...

Page 5: ...The charging LED turns red and the charge starts 3 When the charging is interrupted or the battery pack is fully charged the charging LED will turn green When using a PC to charge the battery do not...

Page 6: ...or press and hold down the Power button for 1 second to turn on the camcorder To turn off the camcorder press and hold down the Power button for 1 3 seconds or close the LCD monitor Turning on off yo...

Page 7: ...Joystick up down to select a language 6 When done press OK to confirm the setting Setting time 1 Power on the camcorder 2 Press the MODE key to enter the MODE menu 3 Use the Joystick switch to the Set...

Page 8: ...de Macro mode Histogram mode Battery life Selftimer mode Zoom ratio indicator NightShot mode SD card inserted Recording time 00 06 40 00 00 05 The LCD will display 16 9 ratio while setting as HD 720P...

Page 9: ...e the Zoom button up or down to zoom in or zoom out the screen The optical magnification is 3X 3 Press the Record button to start recording 4 Press the Record button again to stop recording The zoom f...

Page 10: ...to auto focus When the focus frame turns green press the button fully down to take a still picture Taking a still picture Adjust other advanced settings if necessary If the surroundings are dark you c...

Page 11: ...order 2 Press the MODE key to enter the MODE menu 3 Use the Joystick switch to select the Voice Recorder mode and press OK to enter the menu screen 4 Press the Record button to start recording 5 Press...

Page 12: ...nds of the AV cable yellow white red color to the TV AV OUT jacks 5 Connect the other end of the AV cable to the AV In port on your camcorder When the pop up message appears on the screen please selec...

Page 13: ...or right Video Audio Start playing When selected in full screen mode the file automatically starts playing Pause Resume playing During playing While paused press the OK key Adjust the volume level Du...

Page 14: ...ayer is designed for playing back the mov files recorded by our camcorder with Windows Media Player 10 11 Connecting PC and Save files After the software is properly installed on your PC please follow...

Page 15: ...e into the Component Audio IN port on the HDTV and the other end into the AV OUT port on Camcorder Please do not plug in the yellow connector to HDTV s AV IN 5 Press the input switch mode on HD TV and...

Page 16: ...de 2 Connect the audio and video ends of the AV cable yellow white red color to the TV AV IN jacks 3 Power on the camcorder 4 Connect the other end of the AV cable to the AV out port on your camcorder...

Page 17: ...ture resolution to 3 mega pixels 5M Set picture resolution to 5 mega pixels 8M Set picture resolution to 8 mega pixels NightShot On Off Enabling this setting allows you to take a photograph with a dar...

Page 18: ...hlight On The flash is forced to fire in every shot Auto The flash automatically fires when the lighting is insufficient Off The flash is disabled Video Light On Auto Off This setting allows you to ad...

Page 19: ...ff Enable Disable OSD icons to display on the screen LCD Bright 2 2 Set LCD brightness A positive value makes the LCD brighter while a negative value makes the LCD dimmer Format Yes Format the storage...

Page 20: ...merica Taiwan China Japan Korea Thailand Setting 50Hz 60Hz 60Hz 50Hz 50 60Hz 60Hz 50Hz Icon Description Full battery life Moderate battery life Low battery life The flash strobe and the LED lights wil...

Page 21: ...life depends on your battery type and recharge level Battery Life Storage Capacity Memory Video min Still picture HD D1 CIF 8M 5M 3M SD card 256MB 7 18 40 95 145 230 SD card 512MB 15 36 80 190 290 460...

Page 22: ...G WAV Video frame rate 1280x720 up to 30fps 720x480 up to 30fps 352x240 up to 30fps External memory SD MMC card up to 32GB SDHC LCD display 2 4 LCD TV out HDTV Component out NTSC PAL system supported...

Page 23: ...0 or above CPU Pentium 4 3 0GHz or above System RAM 512MB 1GB recommended Display card nvidia Geforece 7600 or ATI X1600 or above with 256MB of RAM D1 720x480 30fps OS Windows 2000 XP Vista or above Q...

Page 24: ...82 455 90012v1 0...

Reviews: