Aiphone IX-DVF-4A Installation And Programming Manual Download Page 1

1

IX-DVF-4A

The IX-DVF-4A is an IX Series video door station with 4 call buttons for selective calling to IX-MV7 master 

stations. The IX-DVF-4A will connect to a network switch, and the call buttons are connected to contact 

inputs on the station. These inputs will be programmed to selectively call different master stations, or 

groups of master stations.

INSTALLATION AND PROGRAMMING GUIDE
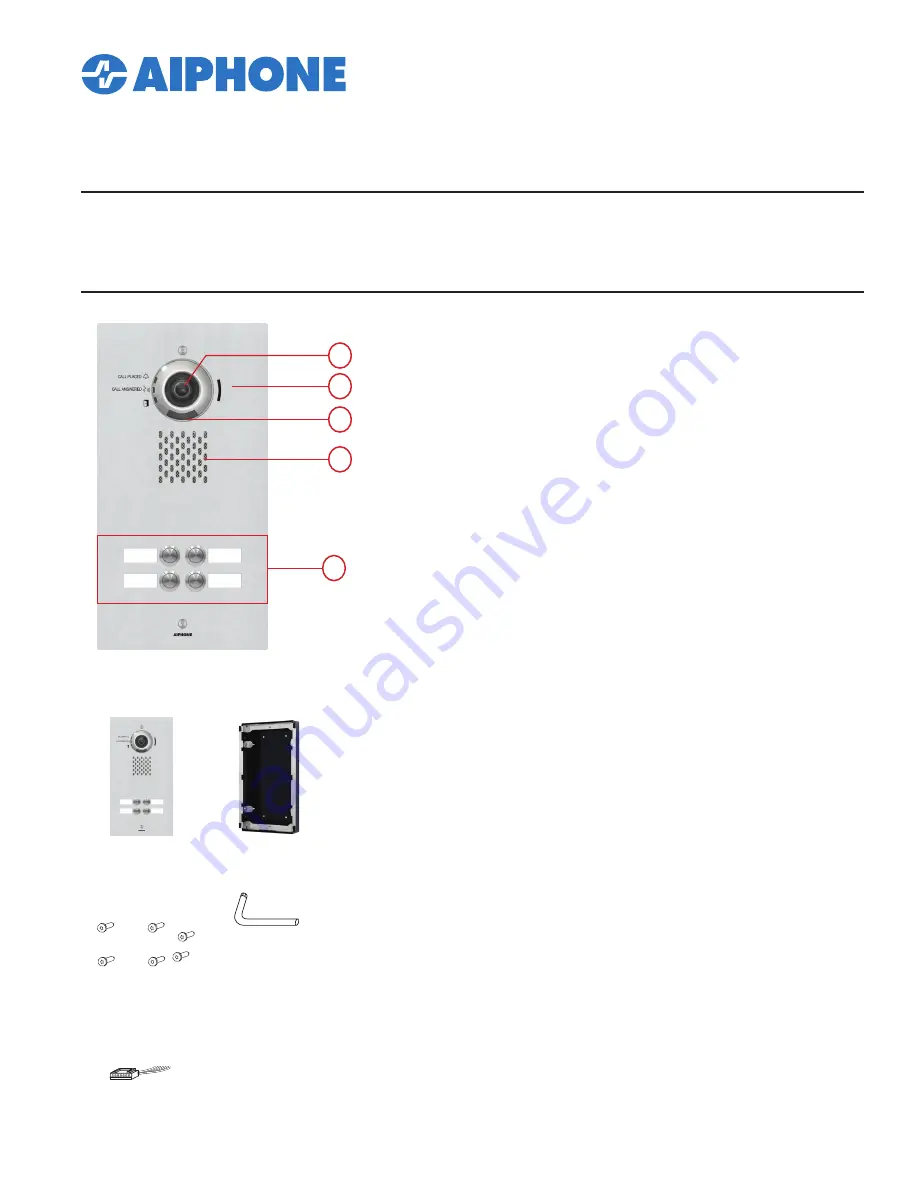
1

2

3

4

5

IX-DVF-4A

• IP video door station

• 4 Labeled Call Buttons

• Stainless steel faceplate with tamper resistant screws

Features

1.  Camera

2.  Microphone

3.  White LED for night viewing

4.  Speaker

5.  Call buttons

Names and Functions

PACKAGE CONTENTS

IX-DVF-4A

Door Station

Flush mount backbox and 

mounting bracket

2 Security Screws

4 Bracket Screws

Security Driver

Label Template 

Page

For flush mounting, recess the supplied back box 

into the wall, then attach the mounting bracket 

using the four provided bracket screws.

Back Box Dimensions: 12-1/2" H x 6-1/8" W x 2-3/8" D 

IX-DVF-4A Dimensions: 13-11/16" H x 7-3/16" W

For surface mounting, use the SBX-IXGDM7 surface 

mount box. This box can mount to a standard 

single gang box or to any flat surface.

To install the labels, cut along the template guides, then 

slide each side in to the label space on the panel.

Installation

Door Release 

wire harness

Accessories

 included

Installation Manual 

(this manual) x1

Option connector

 x1

T20 screwdriver 

bit 

x1

Chinese RoHS paper 

x1

Special Screw

 x4

Back Box

x1

Summary of Contents for IX-DVF-4A

Page 1: ...r 5 Call buttons Names and Functions PACKAGE CONTENTS IX DVF 4A Door Station Flush mount backbox and mounting bracket 2 Security Screws 4 Bracket Screws Security Driver Label Template Page For flush m...

Page 2: ...60 C Wiring Distance 328 with CAT 5e 6 cable to switch Dimensions 13 11 16 H x 7 3 16 W w SBX IXGDM7 13 3 4 H x 7 5 16 W x 3 1 16 D If updating dimensions be sure to update the GLC layer too Please r...

Page 3: ...and click Create New System Enter in a System Name and select the No radial button for Wizard Programming Enter a system ID and Password Enter station quantities and then click Finish Creating a New...

Page 4: ...Network Settings IP Address On the Batch IP Address Configuration page enter a starting IP address and subnet mask Check the box beside each station or click Select to check all stations at once Click...

Page 5: ...a configuration in the Station Settings List at the top then select the station to assign it to in the Station List Click Apply and OK on the pop up to start the association process for that station...

Page 6: ...Input Relay Output Settings and select Option Input Call Button Settings Option Inputs In the Select Station to Edit menu use the Number drop down to select the IX DVF 6 then click Select Use the Opti...

Page 7: ...that will be used have a call group linked to them Programming Call Buttons Once all settings are configured select File F from the top bar and select Upload Settings to Station Click Select to check...

Reviews: