Aigis Mechtronics MLA Series Installation And Operating Instructions Manual Download Page 10

10

6.

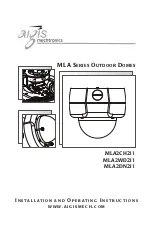
CAMERA POSITION ADJUSTMENT

1. Remove dome cover.
2. Loosen Thumbnuts (x3).

3. Make Pan adjustment by turning camera bracket in clockwise or counter

clockwise motion.

4. Tilt Lens into position, then rotate face plate to square image.

5. Tighten Thumbnuts.

Figure 3 Camera Position Adjustment Points

Tilt

Pan

Square Image

Summary of Contents for MLA Series

Page 1: ...Tilt an Sq MLA SERIES OUTDOOR DOMES MLA2CH211 MLA2WD211 MLA2DN211 I N S TA L L AT I O N A N D O P E R AT I N G I N S T R U C T I O N S W W W A I G I S M E C H C O M y...

Page 2: ...ance Attention Installation should be performed by qualified service personnel only in accordance with the National Electrical Code or applicable local codes 24 VAC Units Do Not Exceed 30 VAC Input Vo...

Page 3: ...ce qualifi conform ment la r glementation du Code Electrique National ou la r glementation locale Appareils 24 VCA Ne pas exc der 30 VCA La tension appliqu e l entr e d alimentation de l ap pareil ne...

Page 4: ...l gem jeweilig zutreffender Elektrovorschriften ausgef hrt werden 24 VAC Ger te Achtung 30 Volt Eingangswechselspannung darf f r 24 VAC Modelle nicht berschritten werden Normal betrieb findet bei 24 V...

Page 5: ...ersonal capacitado solo en acuerdo y en cumplimiento de nor mas del National Electric Code C digo El ctrico Nacional las normas del Gobierno Nacional Local Unidades de 24 VCA No exceder 30 VCA de entr...

Page 6: ...r may find the following booklet prepared by the Federal Communications Commission helpful How to Identify and Resolve Radio TV Interference Problems This booklet is available from the U S Government...

Page 7: ...with the threaded posts in the base fit the cover onto the base and tighten the retaining screws securely 5 INSTALLATION Attention Installations should be performed by qualified service personnel onl...

Page 8: ...ly wires into the 2 position terminal block supplied and tighten with a flat blade screwdriver Connect Video cable to the unit s BNC connector 5 2 Connecting Low Voltage Power Video Signals UTP Models...

Page 9: ...more sealant if needed Make all final service connections and secure the conduit Important Note on Service 1 When servicing the unit reapply silicon lubricant to the rubber gasket between the lid and...

Page 10: ...osen Thumbnuts x3 3 Make Pan adjustment by turning camera bracket in clockwise or counter clockwise motion 4 Tilt Lens into position then rotate face plate to square image 5 Tighten Thumbnuts Figure 3...

Page 11: ...t Kit Placement Zoom Knob Focus Knob Desiccant Kit Placement RJ45 Jack U units only 7 LENS ADJUSTMENT 7 1 Adjustment Of Variable Focus Lens 1 Remove the dome cover before lens adjustment 2 Turn the zo...

Page 12: ...nics 1124 Louise Road Winston Salem NC 27107 5450 Tel 336 785 7740 Fax 336 785 7744 Data subject to change without notice 97 8 153 5 6 04 79 3 11 135 6 5 34 3 85 61 1 2 41 153 5 6 04 144 3 5 68 Thread...

Reviews: