background image

ii

SAFETY INSTRUCTIONS

Before getting started, please read the following important cautions:
•  All cautions and warnings on the equipment or in the manuals should be noted.
•  Most electronic components are sensitive to electrical static discharge. Therefore, be 

sure to ground yourself at all times when installing the internal components.

•  Use a grounding wrist strap and place all electronic components in static-shielded 

devices. Grounding wrist straps can be purchased in any electronic supply store.

•  Be sure to turn off the power and then disconnect the power cords from your system 

before performing any installation or servicing. A sudden surge of power could damage 
sensitive electronic components.

•  Do not open the system’s top cover. If opening the cover for maintenance is a must, 

only a trained technician should do so. Integrated circuits on computer boards are 
sensitive to static electricity. Before handling a board or integrated circuit, touch 
an unpainted portion of the system unit chassis for a few seconds. This will help to 
discharge any static electricity on your body.

•  Place this equipment on a stable surface when install. A drop or fall could cause injury.
•  Please keep this equipment away from humidity.
•  Carefully mount the equipment into the rack, in such manner, that it won’t be 

hazardous due to uneven mechanical loading.

•  This equipment is to be installed for operation in an environment with maximum 

ambient temperature below 35°C.

•  The openings on the enclosure are for air convection to protect the equipment from 

overheating. DO NOT COVER THE OPENINGS.

•  Never pour any liquid into ventilation openings. This could cause fire or electrical 

shock.

•  Make sure the voltage of the power source is within the specification on the label 

when connecting the equipment to the power outlet. The current load and output 
power of loads shall be within the specification.

•  This equipment must be connected to reliable grounding before using. Pay special 

attention to power supplied other than direct connections, e.g. using of power strips.

•  Place the power cord out of the way of foot traffic. Do not place anything over the 

power cord. The power cord must be rated for the product, voltage and current 
marked on the product’s electrical ratings label. The voltage and current rating of the 
cord should be greater than the voltage and current rating marked on the product.

•  If the equipment is not used for a long time, disconnect the equipment from mains to 

avoid being damaged by transient over-voltage.

•  Never open the equipment. For safety reasons, only qualified service personnel should 

open the equipment.

Summary of Contents for SB401-LB

Page 1: ...SB401 LB Storage Server Barebone User s Manual UM_SB401 LB_v4_070218...

Page 2: ...Setup 7 2 1 Central Processing Unit CPU 7 2 2 System Memory 13 2 3 Removing and Installing the Chassis Top Cover 17 2 4 Removing and Installing the Hard Disk Drive 18 2 5 Removing and Installing the F...

Page 3: ...Copyright 2018 AIC Inc All Rights Reserved This document contains proprietary information about AIC products and is not to be disclosed or used except in accordance with applicable agreements...

Page 4: ...eption It is essential that only the supplied power cord be used 2 Use only shielded cables to connect I O devices to this equipment 3 You are cautioned that changes or modifications not expressly app...

Page 5: ...from humidity Carefully mount the equipment into the rack in such manner that it won t be hazardous due to uneven mechanical loading This equipment is to be installed for operation in an environment...

Page 6: ...of breakage 7 Please disconnect this equipment from the AC outlet before cleaning Do not use liquid or detergent for cleaning The use of a moisture sheet or cloth is recommended for cleaning Module a...

Page 7: ...4 BIOS Configuration Settings This chapter introduces the key features of BIOS including the descriptions and option keys for discrete functions These details provide users to maintain and configure...

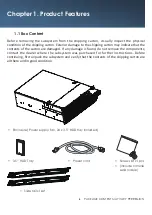
Page 8: ...und do not remove the components contact the dealer where the subsystem was purchased for further instructions Before continuing first unpack the subsystem and verify that the contents of the shipping...

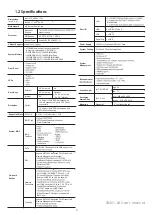
Page 9: ...ansion Slots PCIe 3 0 2 x16 1 x16 x8 mode 3 x8 System BIOS BIOS Type FLASH Interface BIOS Features interface redirection Mode On board Devices SATA Built in SATAcontroller with RAID support on IPMI As...

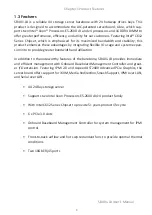
Page 10: ...on into to provide greater bandwidth and utilization In addition to the noteworthy features of the barebone SB401 LB provides immediate and efficient management with Onboard Baseboard Management Contr...

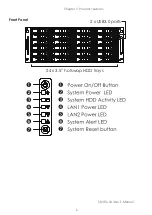
Page 11: ...4 SB401 LB User s Manual Chapter 1 Product Features Front Panel 2 x USB3 0 ports 24 x 3 5 hotswap HDD trays...

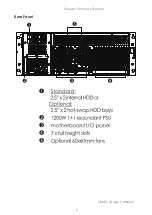
Page 12: ...5 SB401 LB User s Manual Chapter 1 Product Features Rear Panel...

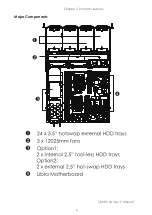
Page 13: ...6 SB401 LB User s Manual Chapter 1 Product Features Major Components...

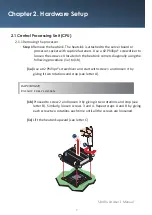
Page 14: ...screw 1 and loosen it by giving it two rotations and stop see letter A 1b Proceed to screw 2 and loosen it by giving it two rotations and stop see letter B Similarly loosen screws 3 and 4 Repeat steps...

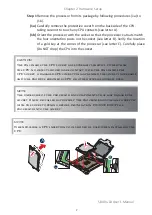
Page 15: ...inappropriate for your server CAUTION ESD and handling processors Reduce the risk of electrostatic discharge ESD damage to the processor by doing the following 1 Touch the metal chassis before touchi...

Page 16: ...see letter C Carefully place Do NOT drop the CPU into the socket CAUTION The pins inside the CPU socket are extremely sensitive Other than the CPU no object should make contact with the pins inside t...

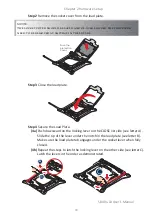
Page 17: ...er A Slide the tip of the lever under the notch in the load plate see letter B Make sure the load plate tab engages under the socket lever when fully closed 4b Repeat the steps to latch the locking le...

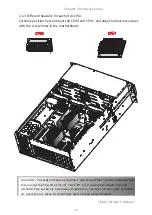
Page 18: ...s screwdriver start with screw 1 and engage screw threads by giving it two rotations and stop see letter C Do not fully tighten 5c 2 Proceed to screw 2 and engage screw threads by giving it two rotati...

Page 19: ...CPU0 and CPU1 and align the heatsink screws with the screw holes in the motherboard Caution Possible thermal damage Avoid moving the heatsink after it has contacted the top of the CPU Too much movemen...

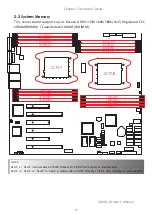
Page 20: ...tered ECC SDRAM RDIMM Load Reduced DIMM LRDIMM JDIMME0 JDIMME1 JDIMMF0 JDIMMF1 JCPU1 JCPU0 JDIMMH1 JDIMMH0 JDIMMG1 JDIMMG0 JDIMMC0 JDIMMC1 JDIMMD0 JDIMMD1 JDIMMB1 JDIMMB0 JDIMMA1 JDIMMA0 JBMC_DP note...

Page 21: ...1 CPU0 DIMM Numbers DIMM ARRANGMENT 2 DIMMs CPU1 CPU0 JDIMM_G0 JDIMM_A0 JDIMMF1 JDIMMD1 JDIMMC1 JDIMMC0 JDIMMD0 JDIMMF0 JDIMME1 JDIMME0 JDIMMG0 JDIMMG1 JDIMMH0 JDIMMH1 JDIMMA0 JDIMMA1 JDIMMB0 JDIMMB1...

Page 22: ...DIMMD1 JDIMMC1 JDIMMC0 JDIMMD0 JDIMMF0 JDIMME1 JDIMME0 JDIMMG0 JDIMMG1 JDIMMH0 JDIMMH1 JDIMMA0 JDIMMA1 JDIMMB0 JDIMMB1 CPU0 CPU1 CPU1 CPU0 JDIMM_G0 JDIMM_A0 JDIMM_G1 JDIMM_A1 JDIMM_H0 JDIMM_B0 JDIMM_F...

Page 23: ...User s Manual 2 2 2 DIMM Installation Procedure Unlock a DIMM socket by pressing the retaining clips outward Insert module vertically and press down until it snaps into place Note DIMM notch and socke...

Page 24: ...lling the Chassis Top Cover 2 3 1 Removing the chassis top cover Step 1 Push the button on both sides Step 2 Push the top cover towards the rear panel and lift up the cover from the enclosure 2 3 2 In...

Page 25: ...stalling the Hard Disk Drive 2 4 1 Installing the Hard Disk Drive Place the HDD into tool less HDD tray untli it snaps Please check if the screw holes on HDD match the dimples on HDD tray HDD can also...

Page 26: ...1 LB User s Manual 2 4 2 Insert the drive tray into chassis HDD cage Make sure the drive tray is correctly secured in place when its front edge aligns with the edge of the bay Push the tray lever unti...

Page 27: ...Chapter 2 Hardware Setup 20 SB401 LB User s Manual 2 5 Removing and Installing the Fan Module 2 5 1 Removing the fan module Pull the fan module out of the fan slot...

Page 28: ...21 Chapter 2 Hardware Setup SB401 LB User s Manual 2 5 2 Installing the fan module Make sure the 4 rubbers and connector are inserted firmly into the enclosure...

Page 29: ...User s Manual 2 6 Removing and Installing the HDD Backplane Module 2 6 1 Removing the HDD backplane Step 1 Unplug all the connectors and HDDs from HDD backplane Step 2 Release the lock pin Step 3 Remo...

Page 30: ...Hardware Setup SB401 LB User s Manual 2 6 2 Installing the HDD backplane module Step 1 Align the backplane with the hooks and insert it into the enclosure firmly Step 2 Lock the backplane and secure i...

Page 31: ...pply Unit Module 2 7 1 Removing the power supply unit module Step 1 Removing power cable and loosen the thumb screw Step 2 Pushing the latch and hold the tray handle Step 3 Pull the PSU module tray ha...

Page 32: ...ling the PCIe card Step 1 Turn off your Storage Server Barebone and disconnect the power supply Step 2 Remove PCI bracket slot cover Step 3 Take the card and check for downside printedbord connectors...

Page 33: ...the side right between the edge of the motherboard and the wall of the enclosure Step 5 Press firmly to completely insert the card into the PCI slot and the screws in enclosure Step 6 Check your earth...

Reviews: