AI-OPTIC 71739 User Manual Download Page 14

11

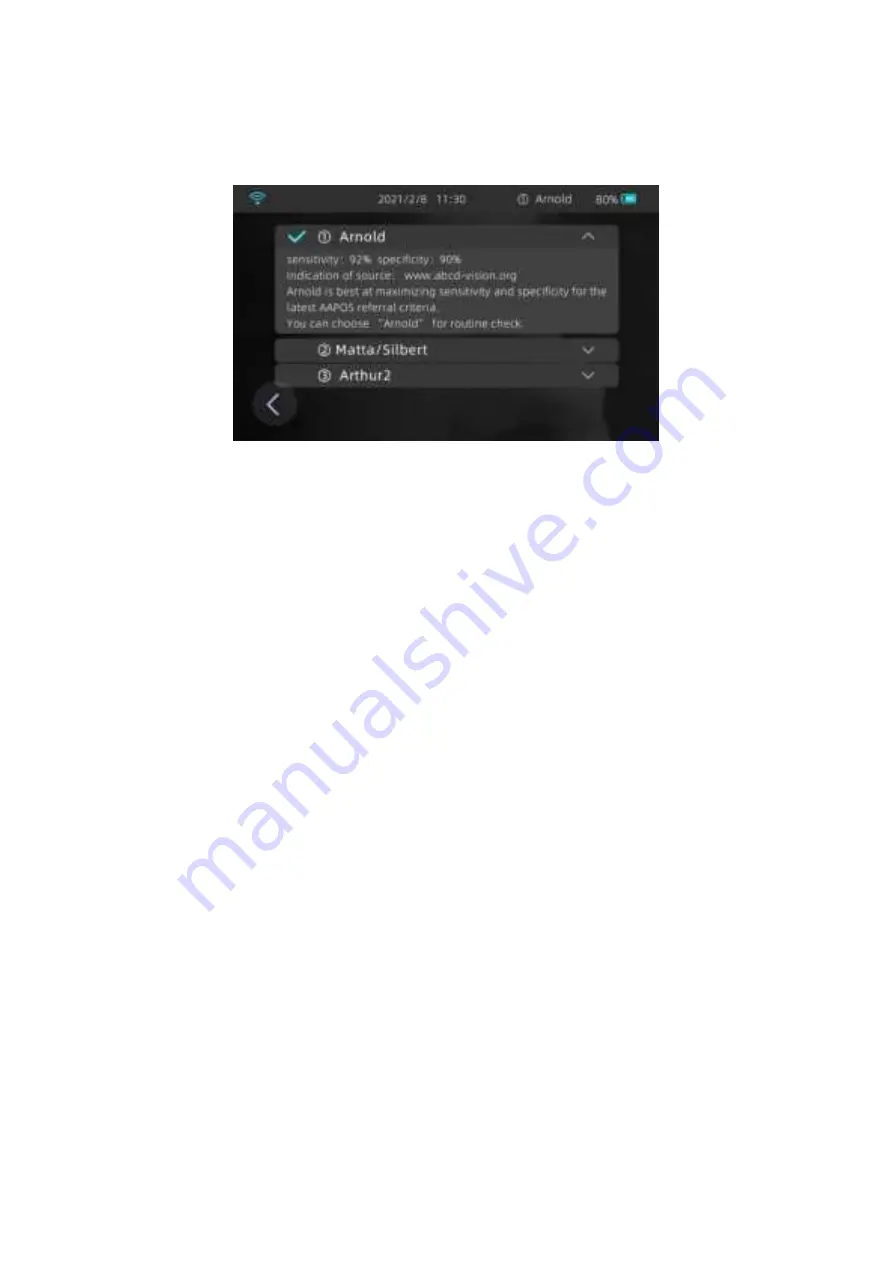
Arthur2. This option features high specificity and thus helps reduce
unnecessary referrals.

Figure 2- 5 Referral criteria

2.6 Screen Off Time

On the

Screen Off Time

settings screen, you can set

Auto-Timeout

and

Auto-Power off

. In the

Auto-Timeout

drop-down list box, tap the down arrow

and select a value as required. In the

Auto-Power off

drop-down list box, tap

the down arrow and select a value as required.

2.7 System Update

In the system upgrade interface, if you need to check the update, click "Yes",
the machine will check whether there is the latest version in the state of
networking, if there is, you can download and install the latest software.

2.8 Machine ID

Each AI-Optic Vision Screener has a unique ID. You can click Machine ID on
the setting interface and scan the QR code on the screen to obtain the ID.

2.9 IP Address

This is set up before delivery by the manufacturer, and users do not need to
make any operation changes.

Summary of Contents for 71739

Page 1: ......

Page 2: ... 5 Referral Criteria 10 2 6 Screen Off Time 11 2 7 System Update 11 2 8 Machine ID 11 2 9 IP Address 11 Short Manual 3 Examination Procedure 12 1 Select a referral criterion 12 2 Enter the basic information of the Subject 12 3 Prepare the examination environment 13 4 Check the examination distance 13 5 Start examination 14 6 View examination results 15 7 Operations related to subject information 1...

Page 3: ... 3 The screen suddenly turns off 19 4 Common reasons for measurement failure 19 4 1 The image is not clear 20 4 2 The subject does not look at the camera 20 4 3 Glasses are found 20 4 4 No pupils are found 21 4 5 The brightness value is excessively large 21 4 6 The measurement is not completed 21 4 7 Eyes are closed or blocked 21 ...

Page 4: ...ranty information refer to the paper user manual included with the product You can also download the electronic user manual by visiting www ai optic com and finding the Support section 1 Packing list Once you receive the product make sure that the packaging is undamaged and that all contents are accounted for If the outer packaging is damaged or anything in the package is missing contact the AI Op...

Page 5: ...receiving power from an external power source Battery mode is when the device is unplugged from a power source Be sure to charge the AI Optic Vision Screener before using it for the first time To charge the battery plug the Type C connector into the USB port of the device and the Type A connector into the USB port of a power source or computer Figure 1 2 Charging connection When the screen display...

Page 6: ... hour charge When the battery is less than 20 the system automatically displays a low battery icon as shown in Figure 1 4 In this case plug the Type C connector into the USB port of the device to charge the device Figure 1 4 Low battery icon You can use the device even while it is being charged ...

Page 7: ...onds to turn on the device Figure 1 5 Position of the power button Power off Tap the Power off icon in the navigation bar on the Home screen or press and hold the power button for 4 seconds and tap Yes in the confirmation dialog box that appears Figure 1 6 Power off button ...

Page 8: ...es unused for 5 minutes the screen automatically turns off To wake it up just tap anywhere on the screen If the device is idle for 10 minutes the device is automatically powered off To use the device you need to power the device on again To change the screen off protection settings choose Settings Screen Off Time on the Home screen and specify a desired value Figure 1 8 Screen Off Time settings ...

Page 9: ...he screen and touch sensor are protected by a thin glass cover 6 USB port The AI Optic Vision Screener has a USB power port for intended only for charging not for data transmission with other devices Do not plug any external devices into this USB port Otherwise the device may be damaged Figure 1 9 Position of the USB port 7 Daily use When you use the AI Optic Vision Screener place it in the way sh...

Page 10: ...series of photos The subject must look into the camera otherwise the examination could fail 8 Serial number The serial number is at the bottom of the product You will need to provide it in the event that you need to contact our customer service center Figure 1 11 Serial number at the bottom of the product ...

Page 11: ... 2 1 Wi Fi configuration screen Select your desired Wi Fi network enter the password and click Connect to complete the Wi Fi connection To change the Wi Fi settings choose Settings Wi Fi on the Home screen select another network and enter the password to connect to this network 2 Settings Tap Settings on the Home screen to go to the Settings screen ...

Page 12: ...he lower left corner to return to the Home screen 2 1 Language On the Settings screen you can tap Language to change the system language The system supports two languages English and Chinese 2 2 Wi Fi On the Settings screen tap Wi Fi to go to the Wi Fi configuration screen Select your desired Wi Fi network enter the password and tap Connect ...

Page 13: ...e Zone on the Settings screen and select the country and the corresponding time zone The system automatically updates the time based on your local time zone Figure 2 4 Time and time zone settings 2 5 Referral Criteria The AI Optic Vision Screener features three examination settings Arnold Matta Silbert and Arthur2 The default setting is Arnold The sensitivity and specificity of the Arnold setting ...

Page 14: ...e down arrow and select a value as required 2 7 System Update In the system upgrade interface if you need to check the update click Yes the machine will check whether there is the latest version in the state of networking if there is you can download and install the latest software 2 8 Machine ID Each AI Optic Vision Screener has a unique ID You can click Machine ID on the setting interface and sc...

Page 15: ...ty and specificity of the Arnold setting is best suited for a routine examination If you are in a medically developed country or region you can choose Matta Silbert This option is more sensitive and designed for children to receive an examination If you are in a medically underdeveloped country or region you can choose Arthur2 This option features high specificity and thus helps reduce unnecessary...

Page 16: ... flash Then you can start the procedure The examination environment must be quiet and free from distraction The subject must hold still during the procedure so make sure that if the patient is a child that they are able to hold still 4 Check the examination distance The recommended examination distance is 3 4 feet away from the device First place the device at eye level of the subject about 3 4 fe...

Page 17: ...ing the examination The subject should sit up straight with the body facing the camera Please remove glasses or contact lenses before starting the exam 5 Start examination To start the examination tap the camera icon on the screen During shooting make sure that the camera is oriented vertically and keep the camera at eye level of the subject Figure 3 4 Orientation of the AI Optic Vision Screener d...

Page 18: ...e 3 5 You can tap Result to check the examination results Figure 3 5 Shooting completed 6 View examination results After the scan is completed the examination results will be ready within approximately 10 seconds After you tap Result the name of the subject the date of examination the spherical degrees and cylinder degrees of both eyes and the pupillary distance are displayed If the examination re...

Page 19: ...s related to subject information 7 1 Input the information of a new subject You can input the information of a new subject directly on the Home screen 7 2 Retrieve the information of an existing subject Tap the Retrieval icon at the bottom of the Home screen to go to the retrieval screen Enter the name of the subject and verify the date of birth of the subject to avoid mistakes caused by duplicate...

Page 20: ...lly saves the examination results by default To delete a result tap the Retrieval icon on the Home screen enter the name of the subject find the corresponding entry and then delete the result Figure 3 9 Deleting the historical record or starting a new examination 7 4 Exporting Data After the check if you need to export the data for easy viewing you can click the export button in the menu bar below...

Page 21: ...18 Figure 3 10 Click the Export Data button Figure 3 11 Enter your email address ...

Page 22: ...the charging status on the screen Restart in about 30 minutes 3 The screen suddenly turns off The screen will automatically turn off when the device is idle for a specified period This is to save power You can touch the screen to wake it up If the screen does not wake up the device is powered off You just need to power on the device again Note You can tap Screen off Time on the Settings screen to ...

Page 23: ...nd the eyelashes and eyebrows of the subject can be clearly seen on the screen When the measurement distance displayed on the screen is 95 105 cm you can start measuring 4 2 The subject does not look at the camera Cause When the subject is not facing the device or looking away from the camera during the examination Solution Remind the subject to turn their body towards the camera and look directly...

Page 24: ...o affect the performance of the examination but fluorescent and LED lights are okay If the brightness value on the screen is less than 5 tap the flash icon to turn on the flash 4 6 The measurement is not completed Cause If the subject closes their eyes or blinks frequently during the measurement process the process can read as incomplete This can also happen when the Wi Fi network is unstable Solu...

Reviews: