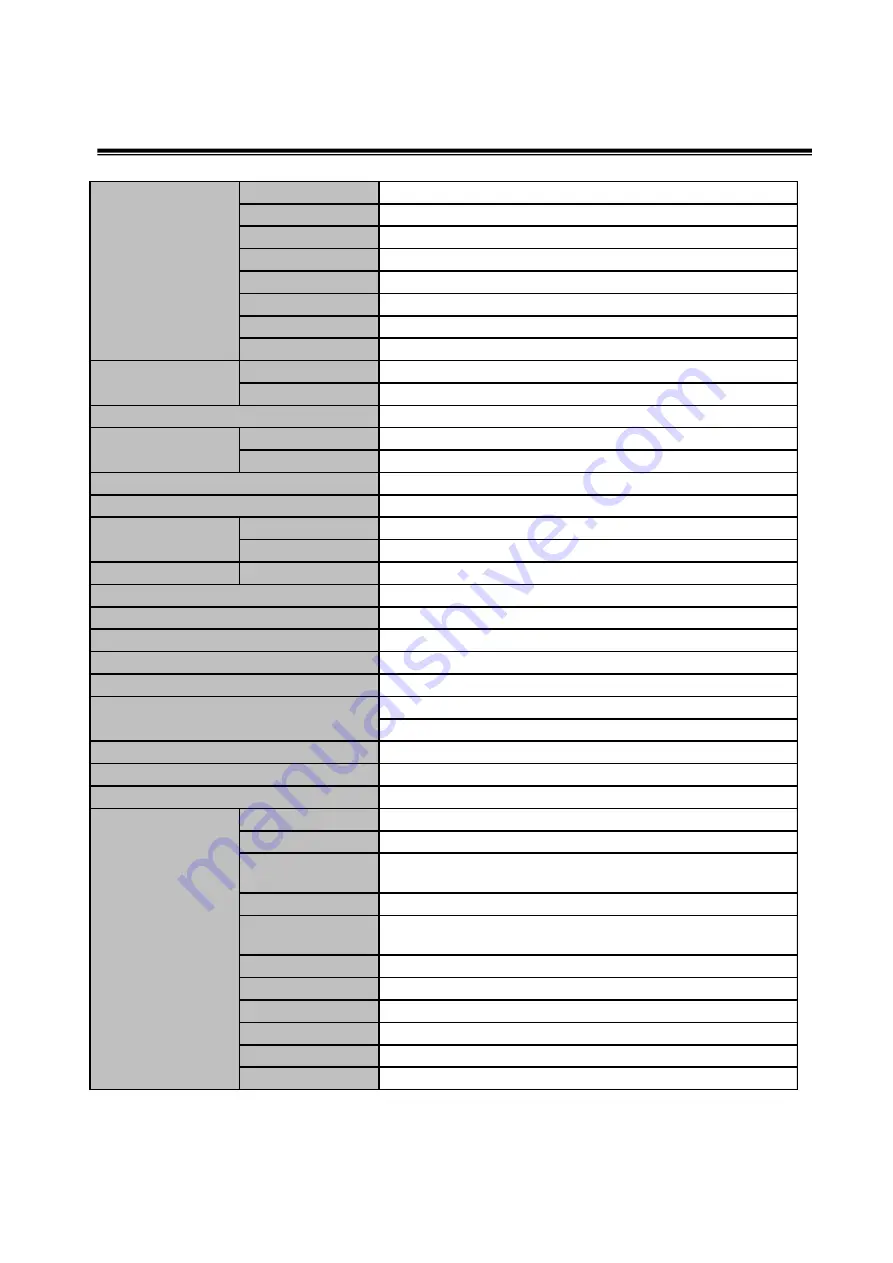
AHA Cybox AHALTM-151 User Manual Download Page 16

16

SPECIFICATIONS

15 INCH

Size

15-inch

Panel Type

TFT Active Matrix

Pixel Pitch

0.297×0.297 mm

Viewing Angle

180° (Right/Lef/UP/DOWN)

Contrast Ratio

500 : 1 contrast ratio

Brightness

 280cd/m2 brightness

Response Time

40typ. (25ms. -2H '05)

Color Filter

RGB vertical stripe

Horizontal

30∼80 KHz

Vertical

56∼77 Hz

140 MHz

Max

1024×768@75Hz

Optima

1024×768@60Hz

16.2M Colors

304.1(H)×228.0(V)

Sync

H/V separate(TTL)

Video

15 pin mini D-sub (RGB analog)

Speaker

Max. Output

2W ( Left 1W + Right 1W)(optional)

Pen-input Screen

Anti-Scratch Protective Glasses

VESA DDC Compatible

DC 12V, 3.33A

35 Watt 

427(W)×415(H)×159(D) mm(with stand)

427(W)×358(H)×66(D) mm(without stand)

5.4Kg / 7.0 Kg 

EPA, VESA DPMS, NUTEK Compliant

10~40°C /50~104°F

Technology

Electromagnetic/Handwriting Tablet 

Resolution

660 DPI

Pressure

Sensitivity

512 levels

Accuracy

±0.5mm (±0.02" )

Max. Reading

Height

8mm

Data Report Rate

125 reports/ per second

Data Interface

USB Port

OS support

Window 98 / Me / 2000 / XP

Power Voltage 

+ 5 Voltage 

Power Consumed 

0.03A (0.15 Watts) 

Battery Life

2,000 hours

Weight-net/gross

Power Consumption

Dimension-W x H x D

Power Saving

Operating Temperature

Tablet

PLUG & PLAY 
Power Source

Special features 

Display screen 

Colors

Resolution

Display Area

PC Input Signal

Panel

Synchronization

Video Bandwidth

Summary of Contents for Cybox AHALTM-151

Page 1: ...1 LCD Tablet Monitor User s Manual 15 Inch 17 Inch 19 Inch ...

Page 2: ...ing on it 11 Follow all warnings and instructions marked on the monitor 12 For added protection for this monitor during a lightning storm or when it is left unattended and unused for long periods of time unplug it from the wall outlet This will prevent damage to the monitor and or the computer due to lightning and power line surges 13 Do not overload wall outlets and extension cords as this can re...

Page 3: ...o which the receiver is connected Consult the dealer or an experienced radio or TV technician for help CAUTION Any changes or modifications not expressly approved by the party responsible for compliance could void the user s authority to operate the equipment CANADIAN NOTICE This Class B digital apparatus meets all requirements of the Canadian Interference Causing Equipment Regulations AVIS CANADI...

Page 4: ... Connecting the Display 8 Operation Adjustment Front Panel Controls 9 KEY PROCESS 10 HOT KEY 11 ADJUSTMENT PROCEDURE 12 OSD FUNCTIONS WITH USING PC 13 SELF DIAGNOSIS 15 Specifications 16 Factory Preset Timings 20 Display Dimensions 21 Troubleshooting 24 Pen Input Driver Software Installation 25 ...

Page 5: ...screen controls to adjust the color temperature RGB gain value for the best possible screen color and intensity Press the menu button and activate the Self Diagnosis menu to determine whether your monitor is functioning normally not receiving a signal or is receiving a signal that is out of scanning range Activate the higher refresh rates of the monitor to stabilize the screen and eliminate the an...

Page 6: ...nce LCD Tablet Monitor 15 pin signal cable DVI Cable Optional Adaptor AAA Battery Application Software Pen Soft Application Software Pen InputDriver Application Software eduplus 5 0 USB cable Pen Refill x 2 For Pen Input Screen Pen Figure of Pen Tweezers Power cord User s Manual If any item is missing or damaged please contact your dealer Please keep the box and packing materials so that you may p...

Page 7: ...7 Display Overview Front View Rear View LCD Display Panel Controls Stand Installation ...

Page 8: ...ews 4 Connect the Audio In cable from audio input port of your display to the Audio out port of your computer 5 Connect the USB signal cable to the USB connector of your host computer 6 Connect the DVI D signal cable to the DVI D connector of your host computer 7 Turn on your computer and display To ensure the LCD display can work well with your computer please configure the display mode of your g...

Page 9: ...the OSD window Moves cursor to the left or high window in the OSD window and decreases value of any selected function While the OSD screen is off you can adjust the volume directly Moves cursor to the right or low window in the OSD window and increases the value of any selected function While the OSD screen is off you can adjust the brightness directly Launches the AUTO TRACKING function directly ...

Page 10: ...CESS COLOR PICTURE SOUND LANGUAGE OSD MENU FUNCTION BRIGHTNESS CONTRAST COLOR TEMP BRIGHTNESS CONTRAST COLOR TEMP Sound icon will be displayed only for Built in speaker model SELECT MENU MENU MENU SELECT OSD OFF ...

Page 11: ...if you press this BRIGHTNESS button you can adjust the brightness directly decreases brightness increases brightness The screen will be brightened progressively by 10 If you carry out general PC works such as document edition on the Movie mode you may shorten the life span of LCD panel Thus it is recommended to verify the selected mode before use ...

Page 12: ... Auto tracking Is the H SIZE proper Perform the AUTO POSITION Adjust the CLOCK control Adjust the CLOCK FINE until the screen is cleared Is the noise displayed on the screen yet Is the noise displayed on the screen End NO NO YES YES YES ...

Page 13: ...just the position of the display horizontally left or right and vertically up or down Adjust the width horizontal size of the screen image Remove any horizontal noise and clear or sharpen the image of characters Selects input signal in order DIGITL ANALOG Choose automatically the proper horizontal position and vertical position size of the screen image Select powerlight mode PC Game Movie Reset th...

Page 14: ...LANGUAGE MUTE VOLUME Adjust the OSD position horizontally left or right and vertically up or down Adjust the display OSD Menu Adjust the OSD Transparency Select language for OSD Turn the audio sound on or off Increase or decrease audio volume ...

Page 15: ...t of range or None support No Signal screen is displayed when the DSub signal connector is connected but the status of the monitor is on DPMS mode Out of Range screen is displayed when the applied frequency is under or over normal range Normal range Non interlaced mode only H 30 80 KHz V 56 77 Hz Check cable screen is displayed when the signal cable is disconnected ...

Page 16: ...asses VESA DDC Compatible DC 12V 3 33A 35 Watt 427 W 415 H 159 D mm with stand 427 W 358 H 66 D mm without stand 5 4Kg 7 0 Kg EPA VESA DPMS NUTEK Compliant 10 40 C 50 104 F Technology Electromagnetic Handwriting Tablet Resolution 660 DPI Pressure Sensitivity 512 levels Accuracy 0 5mm 0 02 Max Reading Height 8mm Data Report Rate 125 reports per second Data Interface USB Port OS support Window 98 Me...

Page 17: ...ompatible DC 12V 3 33A 35 Watt 383 W x 376 H x 159 mm with stand 383 W x 321 H x 65 mm without stand 4 6Kg 6 0 Kg 10 1 13 2 Lbs EPA VESA DPMS NUTEK Compliant 10 40 C 50 104 F Technology Electromagnetic Handwriting Tablet Resolution 660 DPI Pressure Sensitivity 512 levels Accuracy 0 5mm 0 02 Max Reading Height 8mm Data Report Rate 125 reports per second Data Interface USB Port OS support Window 98 ...

Page 18: ...ses VESA DDC Compatible DC 12V 3 33A 35 Watt 383 W x 376 H x 159 mm with stand 383 W x 321 H x 65 mm without stand 4 6Kg 6 0 Kg 10 1 13 2 Lbs EPA VESA DPMS NUTEK Compliant 10 40 C 50 104 F Technology Electromagnetic Handwriting Tablet Resolution 660 DPI Pressure Sensitivity 512 levels Accuracy 0 5mm 0 02 Max Reading Height 8mm Data Report Rate 125 reports per second Data Interface USB Port OS supp...

Page 19: ...anged without any prior notice to improve the quality of the product The LCD panel may have some defective pixels e g slightly light or dark due to a characteristic of the LCD panel But there is no defect in your LCD product itself ...

Page 20: ...interlaced 75 67 5 1152 X 864 75Hz SXGA Non interlaced 75 80 0 1280 X1024 75Hz SXGA Non interlaced 60 64 0 1280 X1024 60Hz SXGA Non interlaced 75 60 0 1024 X 768 75Hz XGA Non interlaced 70 56 5 1024 X 768 70Hz XGA Non interlaced 60 48 4 1024 X 768 60Hz XGA Non interlaced 75 46 9 800 X 600 75Hz SVGA Non interlaced 72 48 1 800 X 600 72Hz SVGA Non interlaced 60 37 9 800 X 600 60Hz SVGA Non interlaced...

Page 21: ...21 Display Dimensions 15INCH Front View Top View Side View 383 321 300 65 178 5 ...

Page 22: ...22 Display Dimensions 17INCH Front View Top View Side View Front View Top View Side View 383 321 300 65 178 5 ...

Page 23: ...23 Display Dimensions 19INCH Front View Top View Side View Front View Top View Side View 427 358 300 66 178 5 ...

Page 24: ... H V Center to get the proper image Image is not centered too small or too large Check if the signal cable is suitable to the video card Image is unstable Check if power switch is in the on position Check if the power cord is correctly connected POWER LED is not lit Check if power switch and computer power switch are in the on position Check if the signal cable is correctly connected to the video ...

Page 25: ...lling this driver 5 Click Finish button 6 Select Eduplus Setup 7 Select next button 8 Click start button 9 Click Next button to make sure installing this program 10 Click Accept button 11 Click Next button 12 Click Install button 13 Click Finish button 14 Select Window Media Encoder 15 Click Setup 16 Click Next button to make sure installing this program 17 Select Accept and click Next button 18 C...

Page 26: ...ting and Calibration 1 Open Control Panel of the system 2 Double click USB Tablet icon 3 Select the item you want to set up and change the setting values These setting change are effective when these setting have been changed Pen Input Usage Notice 1 When computer equipment changes needs to calibrate the accuracy adjustment 2 When Pen changes needs to redetects the frequency of Pen Refer to Troubl...

Reviews: