Agilent Technologies U1177A Operating Instructions Manual Download Page 19

Preliminary Draft

19

Preliminary Draft

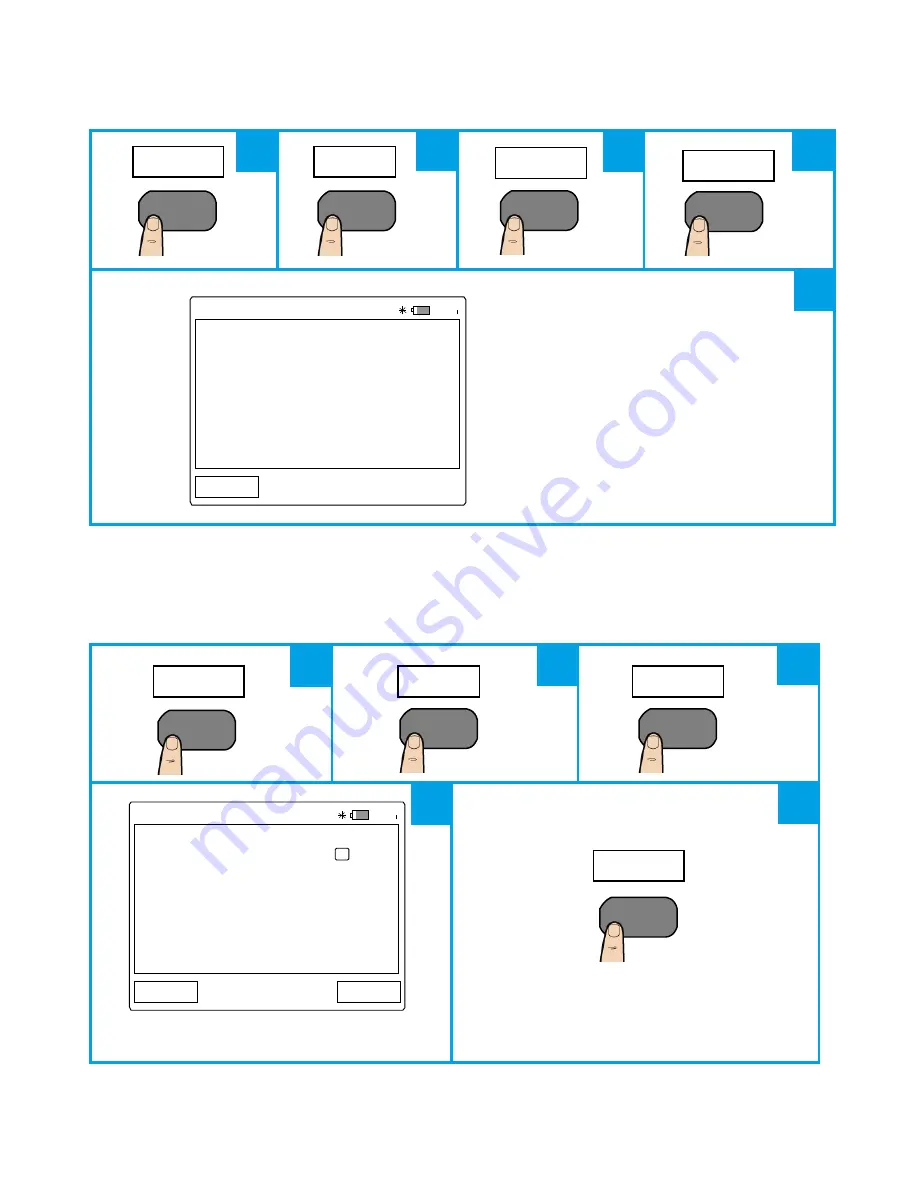
Viewing the System Info

                                                        Typical 

System Info 

display.

 Enabling/Disabling the Beeper

Typical 

Utility 

display.

Toggle the check box to enable or 

disable the beeper.

Sys Info

01:01

System Info

Model

U1115A

Serial

MY51080009

Fw version

01.00

Device Name U1115A-6A1F81

Back

SETTINGS

F4

More

F4

System

F3

F4

01:01

Utility

Beeper

Back

Toggle

SETTINGS

F4

More

F4

Utility

F4

Toggle

F4

1

2

3

4

5

1

2

3

4

5

Summary of Contents for U1177A

Page 1: ...ark and logos are registered trademark owned by Bluetooth SIG Inc and any use of such marks by Agilent is under license Other trademark and trade names are those of their respective owners 2 The Agile...

Page 2: ...f mode current consumption 3 mA Warranty One year Does not cover normal wear and tear of mechanical parts and batteries Bluetooth Bluetooth SPP profile Class 1 device Compatibility Agilent Handheld Me...

Page 3: ...ween the radiator antenna and all persons at all times and must not be colocated or operating in conjunction with any other antenna or transmitter La operaci n de este equipo est sujeta a las siguient...

Page 4: ...tion keys Meter key Figure 2 Front view of the U1115A Wireless Logging Display Side View Slide power switch Stand External power port micro USB port Figure 3 Side view of the U1115A Wireless Logging D...

Page 5: ...Not Connected annunciator will appear on the display 2 Subsequently the annunciator will only appear after 15s 20s Supplying External Power to the U1115A 1 Plug the micro USB head to the micro USB po...

Page 6: ...placing the batteries To avoid the U1115A being damaged from battery leakage Always remove dead batteries immediately Always remove the batteries and store them separately if the U1115A is not going t...

Page 7: ...f necessary Press to enter the Connection Manager Typical Connection Manager display Press to add devices Press to scan for devices Typical Available Devices display Press to navigate to desired devic...

Page 8: ...U1115A and the IR to Bluetooth adapter s have matching PIN number s Select Connect at Startup to set the device to connect on startup By selecting this option it will determine the number of views as...

Page 9: ...the U1115A The U1115A screen display will show when below scenarios occur 1 No meter is connected 2 Meter s function mode is not supported by the U1115A 3 When the user changes the meter s function T...

Page 10: ...ted Press to select desired mode In this example ACV is selected Press to exit Mode menu U1273A MY51430008 U1272A MY52800017 B U1177A 2718DE U1252B MY51040033 C U1117A 2391BA Not Connected A U1117A 57...

Page 11: ...sions can be stored whichever occurs first Session ends when the U1115A powers off count mode ends restarts new logging or all connected meter s disconnect Performing Manual Logs Press to enter Data L...

Page 12: ...ecorded into the multimeter s memory at the interval specified in the setup menu Typical Interval Log display Log Counts x1 is displayed at the top left of the display once a value is logged 1 X denot...

Page 13: ...d to be logged It can be configured from 1 60 000 readings Changing Data Log setup options Press to enter Data Log mode Press to enter Datalogger Setup menu Typical Datalogger Setup display Press to n...

Page 14: ...val Log Data display Typical Manual Log Data display Press to navigate to desired logged data Press to view the selected data Interval Manual 01 01 Interval Log 1 2 25 Jan 2013 00 54 35 AM 4 pts Back...

Page 15: ...ick Add a device 4 Select U1115A XXXXXX1 and click Next 5 Type the default Bluetooth pairing code 1234 default and click Next 6 Once pairing is successful a notification window will appear Click Close...

Page 16: ...ess from lowest Backlight 1 to highest Backlight 7 The default is Backlight 3 SETTINGS Display U1273A MY51430008 U1272A MY52800017 B U1177A 2718DE U1252B MY51040033 C U1117A 2391BA Not Connected A U11...

Page 17: ...box next to the Auto Dim Enable function You may change the timeout period by editing the time stated next to the Auto Dim Timeout function By default it is set at 30s Enable or disable default auto...

Page 18: ...ss to restore the U1115A to factory stage Press to cancel 01 01 Date Time Date 21 June 2013 Time 00 29 24 Back Edit SETTINGS F4 More F4 System F3 Date Time F2 Edit F4 1 2 3 4 5 6 7 SETTINGS F4 More F4...

Page 19: ...eeper Typical Utility display Toggle the check box to enable or disable the beeper Sys Info 01 01 System Info Model U1115A Serial MY51080009 Fw version 01 00 Device Name U1115A 6A1F81 Back SETTINGS F4...

Page 20: ...Technologies Inc 2013 Printed in Malaysia July 15 2013 U1115 90103 Assistance For technical assistance contact your nearest Agilent Sales Office or visit the Agilent website at www agilent com find as...

Page 21: ......

Reviews: