

0
A.
: displays the configuration menu.
B. F1-F5: perform the functions as displayed.
C. Power Indicator: indicates power and battery
status.
D. Arrows: select lead groups to view in normal
ECG display or move the cursor on
configuration screen.
E. :
starts
an
ECG
recording
or
halts
any
cardiograph activity and restores the normal
ECG display; also used to print an Auto ECG
copy.
F.
: switches the cardiograph on and off.
0
(F1): selects Auto, Rhythm or Copy Report menus.
(F2): selects the report formats as shown below:
• Auto Formats: 3x4
⇒
3x4 1R
⇒
3x4 3R
⇒
6x2
⇒
12x1
(F3): selects rhythm lead(s).
(F4): selects chart speed 25 mm/sec
⇒
50 mm/sec
(F5): selects sensitivity 1.0
⇒
1.0 ½V
⇒
2.0
⇒
2.0 ½V
⇒
0.5
⇒
0.5 ½V
A: indicates leads that fall off B: indicates Artifact filter status (F means filter is on.)
0
1. Select
Configure the Cardiograph
from the main configuration menu.
2. Press
(F3) to change the filter’s setting.
3. Set up patient ID entry as
Auto
or
Manual
by pressing
(F3).
4. Select
Set Date and Time
by pressi
ng(F3) and enter the date and
time (24-hour) by selecting F1-F5. The digits that F1-F5 stand for can be switched
between 1-5 and 6-0 by pre
ssing.
5. Press
(F5) to exit the Configuration Menu and save your configuration data.
0
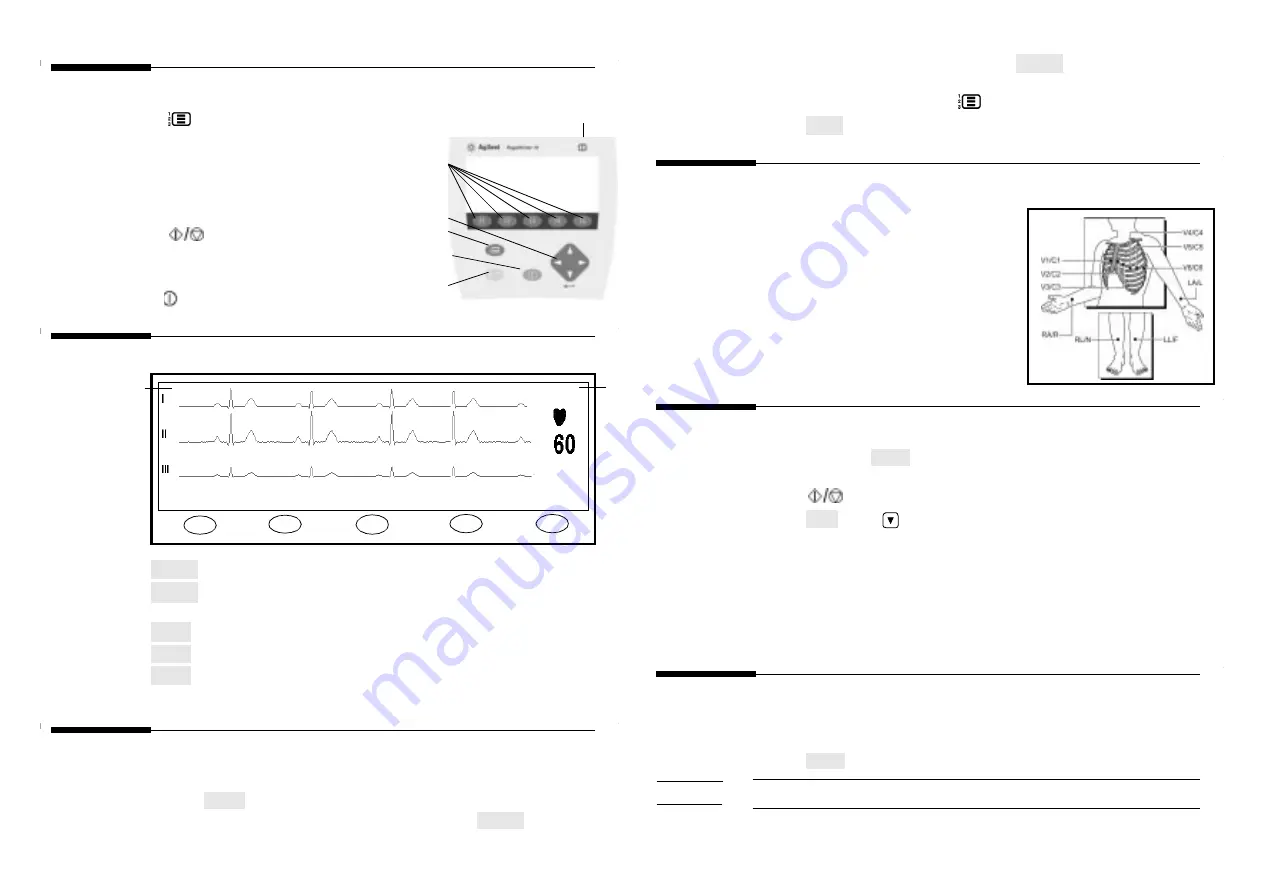
Prepare the patient by performing the following
steps:
1. Reassure and relax the patient.
2. Make sure the electrode site is not covered by
hair or clothing.
3. Gently clean and abrade the surface of the
skin with dry gauze.
4. Place electrodes on the patient according to
the right diagram.
5. Check “Leads Off” status and signal quality
0
1. Press F1 to select
.
2. Select the report format, leads, chart speed and sensitivity as necessary.
3. Press
on the front panel. Enter or edit patient information as prompted.
Press
(F5) or
to proceed.
4. The cardiograph starts recording an ECG and the status messages are displayed on
the screen.
5. If a printer is connected to the cardiograph, the ECG will be printed out. Refer to
the M2662A User Manual or relevant printer documentation for how to connect
the cardiograph to a printer.
6. A message
Store ECG?
will display on the screen. Press
Yes
to store the ECG
or
No
to discard the ECG.
0
1. Select
View Stored ECGs
from the main configuration menu.
2. Select the desired ECG from the ECG list.
3. Press
(F3) and the ECG trace will be displayed on the screen.
C
B
D
A
F
E
F1 F2 F3
F4
F5
Auto
3x4 1R II 25mm/s 1.0
Report Format
Leads
Speed Size
RL/N
F
A
B
Report
Format
Leads
Speed
Size
Select
Change
Select
Exit
Auto
Exit
View


