


3.
Connecting
the
T
est
Fixture
Selecting
Fixture
and
Holder
The
16454A
consists
of
two
xtures
,
a
large
one
and
a
small
one
.
The
applicable
MUT
size
for
each
xture
is
listed
in
T
able
5-1.
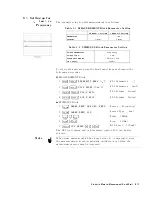
T
able
5-1.
MUT
Size
F
or
T
est
Fixtures
Fixture
Small
Large
Holder
A
B
C
D
MUT
Outer
Diameter
(mm)
8
mm
6
mm
20
mm
20
mm
MUT
Inner
Diameter
(mm)
3.1
mm
3.1
mm
6
mm
5
mm
MUT
Height
(mm)
3
mm
3
mm
10
mm
10
mm
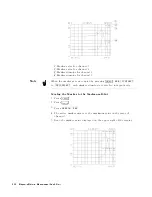
Figure
5-12
shows
the
dimensions
of
the
MUT
holder
.
Figure
5-12.
Dimensions
of
the
MUT
Holder
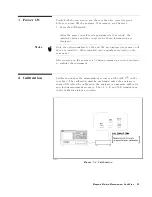
Connecting
the
T
est
Fixture
to
the
T
est
Head
T
o
connect
your
xture
to
the
T
est
Head,
perform
the
following
steps:
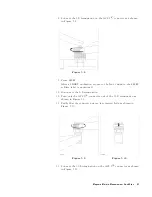
1.
Turn
the
APC-7
R
connector
on
the
test
head
as
shown
in
Figure
5-13.
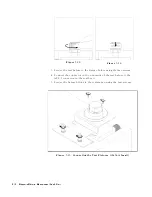
2.
V
erify
that
the
connector
sleeve
is
retracted
fully
as
shown
in
Figure
5-14.
Magnetic
Material
Measurement
Quick
Start
5-9
Summary of Contents for 4291B
Page 20: ......
Page 24: ...Figure 2 1 Contents 2 4 Installation and Set Up Guide ...
Page 26: ...Figure 2 2 Agilent Part Numbers of Power Cables 2 6 Installation and Set Up Guide ...
Page 34: ...Figure 2 7 Connecting a Keyboard 2 14 Installation and Set Up Guide ...
Page 60: ......
Page 104: ......
Page 130: ......
Page 152: ......
Page 158: ......


