background image


       tantra 2400 User Guide 


Private and Confidential  


32 

6.


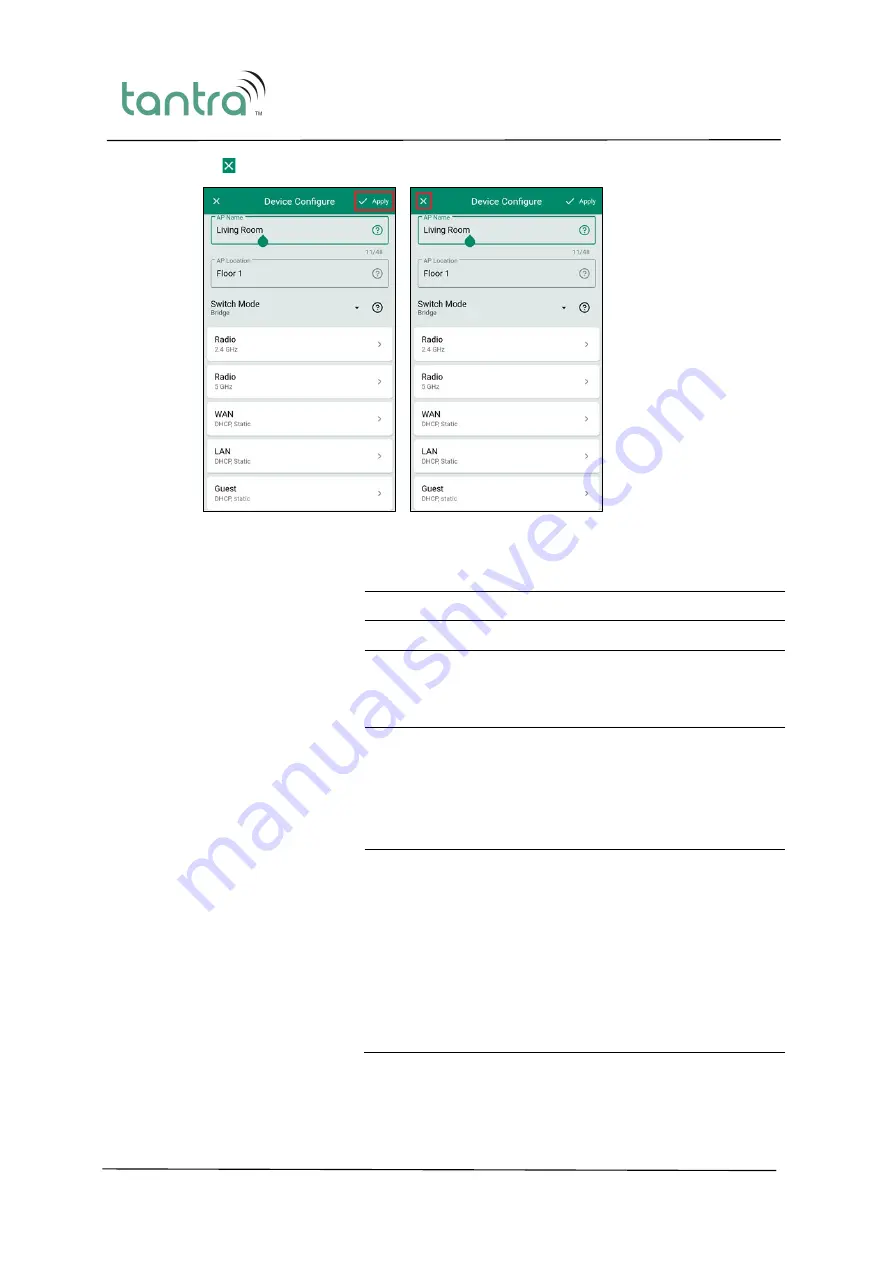
Click the   icon to discard the changes made. 


The following information lists the fields appearing on this page and includes a general 

description and detailed specifications for each. 
 

AP Name 

Name of the access point. 

AP Location 

Location for the access point. 

Switch Mode 

Network mode of the access point. Valid modes are: 


Gateway 


Bridge 

Radio 

Radio frequency parameters for 2.4 and 5 GHz channels. 

You can set the following parameters using this option: 


Channel 


Channel Bandwidth 


Transmit Power 

WAN 

WAN Interface protocol. Options are: 


DHCP 


PPPoE 


Static 

When 

Static 

is selected, you will be allowed to configure 

Static IP, Netmask, Gateway and DNS Server values. 

When 

PPPoE

 is selected, you will be allowed to configure 

PPP Username, PPP Password and PPP Access 

Concentrator. 

Summary of Contents for Tantra-2400

Page 1: ...info agami io www agami io User Guide tantra 2400 Smart Cloud Managed Mesh Wi Fi Router Agami Creations Pvt Ltd www agami io ...

Page 2: ...onfidential relationship All use reproduction and disclosure are strictly controlled and prohibited without the prior written consent of Agami Creations Pvt Ltd While every precaution has been taken in the preparation of this manual Agami Creations Pvt Ltd assumes no responsibility for errors or omissions This publication and features described herein are subject to change without notice Copyright...

Page 3: ...on Portal 6 Creating a Site 6 Adding Device Information 7 Creating Wi Fi Network 8 Private Network 8 Home Page 9 Viewing Devices Details 10 Connecting Clients 10 Wireless Network Configuration 11 Adding Additional Networks 12 WAN and LAN Configuration 13 Configuring Parental Control 15 tantra Mesh Configuration 22 tantra Mesh Features 22 Components of tantra Mesh 22 Access Point Modes 22 tantra Me...

Page 4: ...al Devices 33 Managing the WLANs SSIDs 34 tantraWiFi Mobile App Monitoring 35 Monitoring the Wi Fi Device s 35 Running Speed Test 38 Using the tantra Mesh Placement Tool 39 Configuring Parental Control 40 Usage Limit 42 Filters 43 Time Limit 44 Wi Fi Analytics Features 45 Band Steering and AP Steering 45 Band Steering 45 AP Steering 45 Channel Optimization 45 Power Optimization 46 Troubleshooting ...

Page 5: ...ocol ISP Internet Service Provider JSON JavaScript Object Notation LAN Local Area Network LED Light Emitting Diode MAC Media Access Control PoE Power over Ethernet PPPoE Point to Point Protocol over Ethernet REST Representational State Transfer RSSI Received Signal Strength Indicator SSID Service Set Identifier WLAN TCP Transmission Control Protocol URL Uniform Resource Locator USB Universal Seria...

Page 6: ...ilable in tantra 2400 AP 1 USB USB port 2 Eth2 LAN 10 100 1000BASE T Gigabit Ethernet port 3 Eth1 WAN PoE 10 100 1000BASE T Gigabit Ethernet port with 802 3af compliant Power over Ethernet PoE support 4 Reset Reset button to restore the AP to its original factory default settings 5 Power Receptor Receptor for the supplied power adapter ...

Page 7: ...shows a graphical representation of tantra 2400 AP deployment and management Cloud Server Eth2 LAN Connection tantra 2400 AP Power Connection WAN Connection Power Source Home Gateway Eth1 PoE Client Client Client Client Note Eth1 represents WAN connection and Eth2 represents LAN connection ...

Page 8: ...evice is up and a valid connection has been established LEDs 1 2 3 4 5 The following table lists the LEDs available in tantra 2400 AP 1 Power LED A solid orange light indicates that the device is synchronized with the cloud server 2 2G WiFi A solid green light indicates that the 2 4GHz wireless radio is enabled 3 5G WiFi A solid green light indicates that the 5 0GHz wireless radio is enabled 4 Eth...

Page 9: ...la Firefox 59 0 2 Microsoft Internet Explorer 10 and 11 Microsoft Edge 41 Safari 10 and 11 Accessing the User Interface New account creation is the first step to log in to the portal To create a new account follow the below steps 1 Enter a user name 2 Enter a valid Email Address 3 Enter the password Note The length of the password should be a minimum of 8 characters 4 Enter the password again to c...

Page 10: ...r the user name 3 Enter the password 4 Click Log In The home page is displayed Creating a Site Site defines a location like your home where your devices will be located and used for service Site creation is the first step to proceed with the management of the network The Setup window allows you to create a site To create a site and add devices follow the below steps Choice of the location determin...

Page 11: ...location at home If same names are provided for the location the user interface increments the name of the room by 1 Example Living room 1 1 Enter the location and serial number of the device Note The serial number is printed on the product label available at the rear side of the tantra unit Note If an incorrect serial number is entered you will not be able to complete the process of adding the de...

Page 12: ... home to access the network Private network name is limited to a maximum of 32 characters 2 Enter a unique password that members of the house can only access Note The minimum length of the password should be 8 characters The private network uses WPA2 recommended as its encryption option 3 Click Next A private Wi Fi network is created and by default a guest network is also created You can use the E...

Page 13: ...ate and view the list of devices configured in your home 1 Click the icon This takes you to the Home page where the Home site icon is displayed 2 Click the Home site icon 3 View the list of devices configured in your home 4 You can also view the pictorial representation of your devices by clicking Devices in the Home site icon ...

Page 14: ...ss client to the Wi Fi network that you had created follow the below steps 1 Select the SSID from the available Networks list 2 Type the password that you had set and click Connect 3 After the password authentication the client gets added to the Wi Fi network 4 You can view the connected client details in the Client List 5 Click the Client MAC address to view the client details ...

Page 15: ...figuration Service Set Identifier SSID defines the name of the Wi Fi network To configure the wireless networks follow the below steps 1 Click the Edit button on the left corner of the page 2 The following screen is displayed which allows you to edit the individual fields ...

Page 16: ...indow is displayed 4 Enter a unique name for SSID 5 Enter the password for the network Note The minimum length of the password should be 8 characters 6 Select the Encryption type The options in the drop down list are None WPA and WPA2 recommended Note If WPA or WPA2 is chosen as the encryption type it is mandatory to set the password for the additional wireless network The minimum length of the pa...

Page 17: ... DHCP When using Static protocol user must specify a valid IP address netmask gateway and DNS server When using PPPoE user must specify the username and password If incorrect values are entered connected mobile devices would not be able to access the internet Follow the below steps to configure and change the mode of the added devices 1 Click the device name on the Home page 2 Click Edit in the Ac...

Page 18: ...ly configured IP address netmask and default gateway When Static is selected you will be allowed to configure Static IP Netmask Gateway and DNS Server values PPPoE PPPoE server assigns an IP address from the configured range When PPPoE is selected you will be allowed to configure PPP Username PPP Password and PPP Access Concentrator 7 Under LAN section select one of the following options DHCP Assi...

Page 19: ...all Configuring Parental Control Parental control feature allows to set the data usage limit create schedules to restrict the internet access and filter out specific keywords Member is used to group clients For example member can be a person and all the clients belonging to that person can be added to a member and can be managed collectively To configure the parental control follow the below steps...

Page 20: ...rol parameters Parental Control parameters are grouped under four different sections Clients lists the client details allows to add clients and remove already included clients Data Limit allows to set the data usage limit for the day Time Limit allows to create schedules for accessing internet services Filters allows to add keyword filters to restrict access to specific Websites ...

Page 21: ...vate and Confidential 17 To add or delete a client 1 Select a member from the Members list 2 Click the button 3 In the Search Clients window select the clients and click Add 4 The selected client gets added to the Clients table ...

Page 22: ...tra 2400 User Guide Private and Confidential 18 5 To delete a specific client click the icon corresponding to that client 6 Click Yes to confirm the deletion 7 The client is removed from the Clients table ...

Page 23: ...e value for Allowed daily usage in MB This value sets the Megabytes of total traffic allowed per day Note The data limit value is the combined limit for all the clients of the member 3 Click Apply all to set the entered usage limit 4 You can monitor using the Data Usage field in the Parental Control home page ...

Page 24: ...name for the schedule 4 Select the time range using the slide menu 5 Select the days of the week from the list for which the schedule has to be applied 6 Click Apply and the time limit schedule gets added to Schedules table This is the duration during which the clients can access the internet Beyond this schedule range clients cannot access the internet ...

Page 25: ...3 The keyword gets added to the Keyword Filters table The members will not be allowed to access the Websites with the domain containing this keyword If you add book as filter keyword access to domain containing the term book is blocked For example facebook com bookmyshow com and so on 4 You can remove the added filter keyword using the icon ...

Page 26: ... without any hassle Components of tantra Mesh tantra Mesh has three main components and are as follows Mesh Node A mesh node is an access point that is configured to connect to the root or exit node Root Exit Node Root node or exit node are access point devices that are connected to the Home gateway through Ethernet WAN Root node is the primary access point which establishes a connection with othe...

Page 27: ...ateway WAN Root Node AP Mesh Access Point Bridge Node Client Client Client Mesh Access Point Bridge Node Public or Private Mesh Software Home SSID Figure 1 Daisy Chain Topology WAN Root Node AP Mesh Access Point Bridge Node Client Client Client Mesh Access Point Bridge Node Home Gateway Home SSID Public or Private Mesh Software Figure 2 Star Topology ...

Page 28: ...work section on the UI ensure Enable Mesh is True 4 The first access point must be connected to the LAN port on the home gateway 5 Place other access points in different rooms of the house Remove these access points from the WAN and connect it only to the power cable for the mesh to function effectively 6 The access point connected to the LAN port on the home gateway acts as an exit node This node...

Page 29: ...Statistics allows you to view the current placement status of your mesh nodes and determine if the mesh nodes are in the ideal RSSI ranges to provide good coverage Follow the below steps to verify and move your mesh nodes to be at ideal distance 1 The Mesh Statistics section provides information on the Mesh Placement 2 In the Wi Fi Management navigate to the Access Point page 3 Click the Profile s...

Page 30: ...g Firmware The notification icon notifies you of any firmware update available To update the firmware follow the below steps 1 Click the notification icon to view the available firmware update 2 Click Update to upgrade the firmware for all the available devices ...

Page 31: ...fering quality indicators and recommended resolutions to discovered issues Supported Platforms The following is the list of supported platforms and corresponding OS versions Android 4 4 to 9 0 iOS 10 0 to 12 0 1 Creating a New Account The Signup page allows you to create a new account in the tantraWiFi Mobile App Follow the below steps to download the App and create an account 1 Download and insta...

Page 32: ... an explicit logout Follow the below steps to log in to the mobile App 1 Launch the tantraWiFi Mobile App 2 Enter a valid username and password 3 Click Login 4 Click I accept button to accept the terms and conditions 5 The home page with topology view is displayed The Topology page displays the configured devices wireless networks and provides easy navigation to monitor your Wi Fi network more eff...

Page 33: ... creation is the first step to proceed with the management of the network To create a site and add devices follow the below steps 1 Log in to the tantraWiFi Mobile App 2 Click the Sites icon on the left corner 3 Click Manage Sites 4 Click Add Site 5 The New Site page appears Enter a unique name for the site 6 Click Next The WiFi Networks page appears 7 Click button ...

Page 34: ...k Save 9 Click CREATE SITE 10 The Devices page appears Click button 11 Enter the serial number location and name of the device Click Save Note The serial number is printed on the product label available at the rear side of the tantra unit 12 Click FINISH A site is created device is added and Wi Fi network is configured ...

Page 35: ...es to the device parameters 1 Log in to the tantraWiFi Mobile App 2 Click on a device to go to the Device Details page 3 Click the edit icon 4 The Device Configure window provides options to modify the different configuration parameters 5 After making the required configuration changes click for the changes to take effect ...

Page 36: ...int Switch Mode Network mode of the access point Valid modes are Gateway Bridge Radio Radio frequency parameters for 2 4 and 5 GHz channels You can set the following parameters using this option Channel Channel Bandwidth Transmit Power WAN WAN Interface protocol Options are DHCP PPPoE Static When Static is selected you will be allowed to configure Static IP Netmask Gateway and DNS Server values Wh...

Page 37: ...l start Guest Guest Network parameters Options are DHCP Static When Static is selected you will be allowed to configure Static IP Netmask Gateway DNS Server values and the following DHCP Server parameters Enable DHCP Server Address pool size Address pool start Adding Additional Devices Additional devices can be added to the network To add a device follow the below steps 1 Log in to the tantraWiFi ...

Page 38: ... displays all the configured WLAN SSIDs and guest network along with the options to add configure share and delete the WLAN SSIDs 3 Click the slide icon to disable the WLAN SSID 4 Click Configure to edit and modify the following WLAN parameters Network name Security Password Guest Advanced Radio After making the changes click for the changes to take effect or click the icon to discard your changes...

Page 39: ...d using the tantraWiFi Mobile App to monitor the network Monitoring the Wi Fi Device s Follow the below steps to monitor the Gateway and AP device s 1 Log in to the tantraWiFi Mobile App 2 Click on a device to go to the Device Details page All the details of the device are visible in this page 3 Click on Quality to view the following quality scores Channel Quality Client Authorization CPU Memory R...

Page 40: ...etails Download speed Upload speed Latency ISP Backhaul Speedtest runs speed test utility from the AP to the nearest available speed test server Click Run Again button to run the test again 5 Click on the box with the Warning icon to view the existing device issues their impact and recommended resolutions ...

Page 41: ... the time period chosen for the histogram chart Interfering Wi Fi Displays the bandwidth used as a percentage for devices clients and APs operating on the same channel defined as an Overlapping Basic Service Set OBSS Client data Displays the bandwidth used in an Independent Basic Service Set IBSS environment The primary differences between the frequencies are the coverage and speed The 2 4 GHz pro...

Page 42: ...ents and the Wi Fi tabs to get a list of connected clients and configured SSIDs Running Speed Test The Tools page allows you to run the speed test Follow the below steps to run the speed test 1 Click the Tools tab Click Speed Test 2 Click START button to start the speed test ...

Page 43: ... mesh nodes and determine if the mesh nodes are in the ideal RSSI ranges to provide good coverage Follow the below steps to verify and move your mesh nodes to be at ideal distance 1 Click the Tools tab Click Mesh Placement 2 The Mesh Placement page provides a graphical representation of the mesh connections 3 Click the status bubble on the connections to view the placement status The suggestions f...

Page 44: ...ontrol Parental control feature allows to set the data usage limit create schedules to restrict the internet access and filter out specific keywords Follow the below steps to configure parental control 1 Log in to the tantraWiFi Mobile App 2 Click the Members icon Member is used to group clients For example member can be a person and all the clients belonging to that person can be added to a membe...

Page 45: ...llowing parental control settings Usage Limit allows to set the data usage limit for the day Filters allows to add keyword filters to restrict access to specific Websites Time Limit allows to create schedules for accessing internet services 7 You can remove the added clients using the Remove option in the Clients page ...

Page 46: ... Daily Limit 2 Enter the Update Daily Limit value This value sets the Megabytes of total traffic allowed per day Note The data limit value is the combined limit for all the clients of the member 3 Click APPLY to set the entered usage limit 4 You can monitor the data usage from Parental Control page ...

Page 47: ...and click Add 4 The keyword gets added to the Keyword Filters table The members will not be allowed to access the Websites with the domain containing this keyword Note If you add book as filter keyword access to domain containing the term book is blocked For example facebook com bookmyshow com and so on 5 You can remove the added filter keyword using the X icon ...

Page 48: ...lick the add icon 3 Enter a name for the schedule Set the Start Time and End Time Select the days of the week from the list for which the schedule has to be applied 4 Click Save The time limit schedule gets added to Schedule table 5 You can delete or edit the created schedule using the dropdown options ...

Page 49: ...mit or 5 GHz Post Association Utilization Limit it automatically moves to the other radio band Enable RSSI Thresholds When the client RSSI is lower than the RSSI Downgrade Threshold the client moves to 2 4 GHz and when the client RSSI is greater than the configured RSSI Upgrade Threshold the client moves to 5 GHz Enable MCS Steer Thresholds When the client MCS is lower than the configured MCS Perc...

Page 50: ... User Guide Private and Confidential 46 Power Optimization Although primarily used as a method of mitigating coverage holes transmit power changes can also be initiated to address low client signal strength issues ...

Page 51: ...ance power off and power on your router mesh and check if there are firmware updates for your tantra AP High memory usage Degraded service performance To improve your router s performance power off and power on your router mesh and check if there are firmware updates for your tantra AP Overheating detected on RG Mesh Poor internet connection Your router mesh is heating up more than usual please pl...

Page 52: ...formance connectivity Power off and power on your Router Mesh Congestion detected on all 2 4 GHz channels Poor device performance connectivity Try connecting your devices on the 5 GHz network Congestion detected on all 5 GHz channels Poor device performance connectivity Move Router Mesh away from interference sources for example another Router Mesh nearby Poor coverage detected on 2 4 GHz Poor dev...

Page 53: ...ignal Strength Poor Wi Fi performance intermittent connectivity There is poor Wi Fi signal to your device try moving closer to the router mesh or installing more mesh nodes for better coverage Poor Wi Fi Coverage detected Poor client performance intermittent connectivity There is poor Wi Fi signal to your device try moving closer to the router mesh or installing more mesh nodes for better coverage...

Reviews: