background image

29

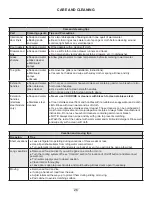
SOLUTIONS TO COMMON PROBLEMS

Opening/Closing of Doors/Drawers

Concern

Potential cause

Common solution

Door(s) will not close.

●Refrigerator is not level. It rocks on 

the floor when moved slightly.

● An object has fallen from the bas

-

kets blocking the door from closing.

● Ensure floor is level and solid, and can adequately support the refrigerator. 

Contact a carpenter to correct a sagging or sloping floor.

● Check for ice or food items blocking drawer.

Drawers are difficult to 

move.

●Food is touching shelf on top of 

drawer.

●Drawer is overloaded.

●Keep less food in drawer.

●Remove or redistribute food.

Refrigerator Operations

Concern

Potential cause

Common solution

Compressor does not run

●Cooling system is turned off.

● Refrigerator is in defrost cycle.

● Plug at wall outlet is disconnected.

● House fuse is blown or a tripped 

circuit breaker.

●Power outage

● Electronic control system keeps the

refrigerator at a constant temperature.

● Turn cooling system On. See Controls Section for location of cooling system 

On/Off button.

● This is normal for a fully automatic defrost refrigerator. The defrost cycle occurs 

periodically, lasting about 30 minutes.

● Ensure plug is tightly pushed into outlet.

● Check/replace fuse with a 15 amp time-delay fuse. Reset circuit breaker.

● Check house lights. Call local Electric Company.

● This is normal. Refrigerator goes on and off to keep temperature constant.

Refrigerator runs to much 

or to long.

●Room or outside weather is hot.

●Refrigerator has recently been dis

-

connected for a period of time.

●Automatic ice maker is operating.

●Doors are opened too frequently or 

too long.

●Refrigerator/freezer door may be 

slightly open.

●Freezer control is set too cold (con

-

trol found on side of left hand door).

●Fresh food/freezer gasket is dirty, 

worn, cracked, or poorly fitted.

●This model is provided with a high-ef

-

ficiency, variable-speed compressor.

●It’s normal for the refrigerator to work longer under these conditions.

●It takes 8-12 hours for the refrigerator to cool down completely.

●Ice maker operation causes refrigerator to run slightly more.

●Warm air entering the refrigerator causes it to run more. Open doors less often.

●Ensure refrigerator is level. Keep food and containers from blocking door. See 

Concern section, Opening/Closing of Doors/ Drawers.

●Set freezer control to warmer setting until refrigerator temperature is satisfacto

-

ry. Allow 24 hours for temperature to stabilize.

●Clean or change gasket. Leaks in door seal will cause refrigerator to run longer 

in order to maintain desired temperatures.

●It is normal for the compressor to run for long periods of time, instead of starting 

and stopping frequently.

Digital temperature dis-

plays are flashing.

●Electronic control system has detect

-

ed a performance problem.

● Call your service representative, who can interpret any messages or number 

codes flashing on the digital displays.

Temperatures are to Cold

Concern

Potential cause

Common solution

Freezer temperature too 

cold. Refrigerator tem-

perature is satisfactory.

●Fast Freeze function is activated.

●Freezer control is set too cold.

●Ice maker is on.

●Fast Ice function is activated.

●Deactivate Fast Freeze function.

●Set freezer control to a warmer setting. Allow 24 hours for temperature to 

stabilize.

●It is normal for the freezer compartment to over cool while automatic ice maker 

is on.

●Deactivate Fast Ice function.

Refrigerator temperature

too cold. Freezer tem-

perature is satisfactory.

●Refrigerator control is set too cold.

●Set refrigerator control to a warmer setting. Allow 24 hours for temperature to 

stabilize.

Food stored in drawers

freezes.

●Refrigerator control is set too cold.

●See solution above.

Food stored in Cool Zone

freezes

●Cool Zone temperature control is set 

too cold.

●Adjust Cool Zone temperature control to a warmer setting. Meat should be 

stored at a temperature just below the freezing point for maximum fresh storage 

time. It is normal for ice crystals to form due to the moisture content of meat.

Summary of Contents for Mercury MMCFDR23

Page 1: ... product If you should experience a problem not covered in TROUBLESHOOTING please visit our website at www agamarvel com for additional information If you still need assistance call us at 1 800 223 3900 You will need your model and serial number located on the inside wall of the refrigerator compart ment Mercury Model MMCFDR23 Refrigerator User Instructions ...

Page 2: ...rranty 31 FINDING INFORMATION AND SAFETY CFC HCFC DISPOSAL Your old refrigerator may have a cooling system that used CFCs or HCFCs chlorofluorocarbons or hydrochlorofluo rocarbons CFCs and HCFCs are believed to harm strato spheric ozone if released to the atmosphere Other refriger ants may also cause harm to the environment if released to the atmosphere If you are throwing away your old refrigerat...

Page 3: ...on for any period of time allow the ap pliance to sit upright for a period of at least 24 hours before plugging in This will assure oil returns to the compressor Plugging the appliance in immediately may cause damage to internal parts Warranty Registration It is important you send in your warranty registration card immediately after taking delivery of your appliance or you can register online at w...

Page 4: ...d Always grip the plug firmly and pull straight out from the receptacle to prevent damaging the power cord To avoid electrical shock unplug the refrigerator before cleaning and before replacing a light bulb or LED light Performance may be affected if the voltage varies by 10 or more Operating the refrigerator with insufficient power can damage the compressor Such damage is not covered under your w...

Page 5: ...e Wire tilt out shelf inside freezer drawer FEATURE OVERVIEW Understanding features and terms Your refrigerator is designed for optimal convenience and storage flexibility The illustration below is provided to assist you with familiarizing yourself with product features and terminology Model is shown without freezer door cover Select temperature drawer Door hinges Figure 5 Specialty items rack ins...

Page 6: ...binet depth 41 1 4 105 cm w door open 90 4 10 2 cm gap for door swing 25 63 5 cm counter depth 36 1 2 92 7 cm 4 1 0 7 m c 4 8 7 1 Dimensions Body Width 35 5 8 90 5 cm Hinge 3 8 front leg adjusters front stabilizers with freezer drawer open 26 7 8 68 3 cm 23 5 8 60 0 cm 44 1 2 113 0 cm 68 3 16 173 2 cm 25 63 5 cm 70 177 8 cm ...

Page 7: ...p below 55 F 13 C or rise above 110 F 43 C The compressor will not be able to maintain proper tempera tures inside the refrigerator DO NOT block the toe grille on the lower front of your re frigerator Sufficient air circulation is essential for the proper operation of your refrigerator Installation Allow the following clearances for ease of installation proper air circulation and plumbing and elec...

Page 8: ...f the cabinet must rest firmly on the floor The sides should tilt inch 6 mm from front to back to ensure that doors close and seal properly Doors should align with each other and be level Most of these conditions can be met by raising or low ering the adjustable front rollers To level the cabinet using the front rollers 1 Slightly open freezer drawer 2 Remove the toe grille See Figure 13 Figure 13...

Page 9: ...ss to screw 2 Loosen screw 3 Adjust door to desired location 4 Rotate door stop until it makes contact with the lower hinge 5 Re tighten screw 6 Ensure door stops in desired location before resuming normal use Lower hinge Door stop Screw Adjustable door stop Adjusting door Rotate door to desired location Rotate door stop Re tighten screw Re tighten screw Figure 14 Figure 15 Figure 16 ...

Page 10: ...w Flipper mullion hinge To adjust the flipper mullion 1 Loosen the screw located on the flipper mullion hinge 2 Adjust flipper mullion height For proper connection with the flipper mullion guide there should be a separation about the thickness of a coin 0 060 inches or 1 5 mm between the guide and flipper mullion 3 Re tighten screw Figure 17 Figure 18 ...

Page 11: ...oor s top hinges with a pencil This makes reinstallation easier 2 Disconnect the harness by grasping both sides of the connector firmly depress the latch and pull apart Re move the two screws from the top hinge Lift the door off of the bottom hinge and set it aside 3 Unscrew the three lower hinge screws and hinge if necessary To reinstall the right door reverse the above steps lower hinge removal ...

Page 12: ...rawer 4 If gasket is not sealed open drawer and slightly loosen four drawer screws two on each side to allow drawer to rotate 5 Close drawer and recheck the seal on the gasket A Open the drawer grabbing by the sides in the center B Be careful not to rotate the drawer 6 Tighten four drawer screws 7 Recheck gasket seal 8 Install the toe grille by fitting into place A B Assembly Pin Fully extend draw...

Page 13: ...already assembled on the tubing Slide compression nut onto valve inlet and finger tighten compression nut onto valve Tighten another half turn with a wrench DO NOT over tighten See Figure 28 5 With steel clamp and screw secure water supply line copper tubing only to rear panel of refrigerator as shown 6 Coil excess water supply line copper tubing only about 2 turns behind refrigerator as shown and...

Page 14: ... temperatures Press the or indicator to adjust the temperature to the desired setting The temperature display will begin to blink with the first touch The display will time out after 10 seconds and return to the basic display Alarms Door Ajar If the door has been left open for an extended period of time an alarm will sound and the door ajar indicator will display on the bottom display of the contr...

Page 15: ...Sabbath Mode neither the lights nor the control panel will work until Sabbath Mode is deactivated Refrig erator stays in Sabbath Mode after power failure recovery It must be deactivated with the buttons on the control panel During Sabbath Mode the ice maker is turned off by main control board Sabbath Mode and the Select Temp Drawer The Select Temp Drawer should be turned off for the Sabbath Holida...

Page 16: ...er supply is turned off turn off the ice maker by lifting wire signal arm Ice cubes stored too long may develop an odd flavor Empty the ice bin as explained below The following sounds are normal when the ice maker is operating Motor running Ice dropping into ice bin Water valve opening or closing Running water Fast Ice Function Your refrigerator is equipped with a Fast Ice Function that will if ac...

Page 17: ...support slots 4 Lower the shelf and lock into position Shelf features Drawers Your refrigerator includes a variety of storage drawers These drawers are located in fixed positions at the bottom of the fresh food compartment Crispers Crisper drawers are designed for storing fruits vegetables and other fresh produce Crisper humidity control Crisper drawers include a sliding control for adjusting the ...

Page 18: ...tions The tem perature is adjusted up by pressing the or buttons The drawer will store the selected temperature setting until it is changed 7 7 The control buttons can be locked to prevent acciden tal changes by pressing the control lock button for three seconds Deactivate by pressing for three seconds again To remove the crisper drawer for cleaning 1 Pull the drawer out until it stops 2 Lift the ...

Page 19: ...ge bins The doors to your fresh food compartment use a system of modular storage bins All of these bins are removable for easy cleaning Some of them have fixed positions while others can be adjusted to your needs Door bins are ideal for storing jars bottles cans and large drink containers They also enable quick selection of fre quently used items Covered door bin Lock Tilt can bin Covered Door Bin...

Page 20: ...asket Basket retainer To Remove Lower Basket 1 Remove all items from basket 2 Remove the basket by tilting it forward and lifting it from the retainer clips Spill Guard Tray should be hand washed in warm water Lower basket divider and spill guard tray Lower basket divider Spill guard tray Lift up on the rear of the lower divider and pull out Upper basket divider Middle basket divider Retainers Sta...

Page 21: ...eturn you can ensure your newly purchased food designated for the freezer will be preserved as quickly as possible Activating fast freeze also will help your freezer more efficiently maintain the selected temperature after plac ing new purchases with pre existing frozen foods Avoid adding too much warm food to the freezer at one time This overloads the freezer slows the rate of freez ing and can r...

Page 22: ...ic control automatic defrost control These parts can produce a snapping or clicking sound when turn ing the cooling system on and off F Condenser fan You may hear air being forced through the condenser G Compressor Modern high efficiency compressors run much faster than older models The compressor may have a high pitched hum or pulsating sound H Water valve Makes a buzzing sound each time it opens...

Page 23: ...r filter The water filter is located at the lower left side of the fresh food compartment Replacing your water filter In general you should change the water filter every six months to ensure the highest possible water quality The Water Filter Status light on the Touch Panel prompts you to replace the filter after the six month time period has elapsed The water filter status light on this model is ...

Page 24: ... filters by calling 800 223 3900 online at or through the dealer where you bought your refrigerator You may want to consider ordering extra filters when you first install your refrigerator Air filter The air filter is located under the utility bin Replacing your air filter To ensure optimal filtering of refrigerator odors you should change the air filter every six months the filter status light on...

Page 25: ... cooling pow er to lights and other electrical components will continue until you unplug the power cord from the wall outlet Remove adhesive labels by hand Do not use razor blades or other sharp instruments which can scratch the appliance surface Do not remove the serial plate Removal of your serial plate voids your warranty Before moving your refrigerator raise the anti tip brack ets so the rolle...

Page 26: ... CHLORIDE or cleaners with bleach to clean stainless steel Clean stainless steel front and handles with non abrasive soapy water and a dish cloth Rinse with clean water and a soft cloth Use a non abrasive stainless steel cleaner These cleaners can be purchased at most home improvement or major department stores Always follow manufacturer s instruction Do not use household cleaners containing ammon...

Page 27: ...the other hand while pressing the connector latch 4 Replace LED light and snap in place assuring the light is facing in toward the unit inside fresh food and freez er or facing outward on bottom of fresh food doors LED light removal LED light harness removal NOTE LED lights are in series so if one is bad or unplugged sev eral lights may not light up Ordering Replacement LED Lights Order new LEDs b...

Page 28: ...l each produce approximately 2 5 pounds of ice every 24 hours depending on usage conditions If water dispenses slower than normal or if the filter is six months old or older it should be replaced Ensure that the supply line does not kink when the refrigerator is pushed into place against the wall Turn off household water line valve Remove valve Ensure that valve is not a self piercing saddle valve...

Page 29: ... the refrigerator to work longer under these conditions It takes 8 12 hours for the refrigerator to cool down completely Ice maker operation causes refrigerator to run slightly more Warm air entering the refrigerator causes it to run more Open doors less often Ensure refrigerator is level Keep food and containers from blocking door See Concern section Opening Closing of Doors Drawers Set freezer c...

Page 30: ...ollects on inside of refrigerator walls Weather is hot and humid Door is slightly open Door is opened too often or too long Open containers The rate of frost buildup and internal sweating increases See Concern section Opening Closing of Doors Drawers Open door less often to allow internal temperature to stabilize Keep containers covered Water collects on bottom side of drawer cover Vegetables cont...

Page 31: ... 6 Improper installation misuse abuse accident or alteration use on wiring not conforming to electrical codes low voltage failure to provide necessary main tenance or other unreasonable use 7 Parts of service not supplied or designated by the factory 8 Accident fire flood acts of God 9 Alteration or the removal or defacing of the serial plate 10 The original Bill of Sale delivery date or serial nu...

Page 32: ...pecifications and product designs subject to change without notice Such revisions do not entitle the buyer to corresponding changes improvements additions replacements or compensation for previously purchased products www agamarvel com ...

Reviews: