background image


14

Montage

DE

FT / FTF


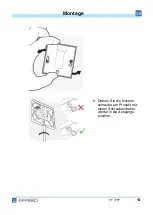
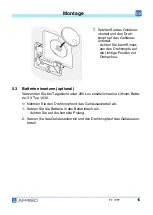
6. Drehen Sie die Nocken-

schraube am Produkt mit 
einem Schraubendreher 
wieder in die Ausgangs-
position.

Summary of Contents for 78111

Page 1: ...74363 Güglingen Telefon 49 7135 102 0 Service 49 7135 102 211 Telefax 49 7135 102 147 info afriso com www afriso com Copyright 2020 AFRISO EURO INDEX GmbH Alle Rechte vorbehalten Betriebsanleitung Raumfühler Funk Produktfamilie CosiTherm Typ FT Typ FTF ...

Page 2: ...itung und alle zum Produkt gehörenden Unterlagen an alle Benutzer des Produkts weiter Wenn Sie der Meinung sind dass die Betriebsanleitung Fehler Wider sprüche oder Unklarheiten enthält wenden Sie sich vor Benutzung des Produkts an den Hersteller Diese Betriebsanleitung ist urheberrechtlich geschützt und darf ausschließ lich im rechtlich zulässigen Rahmen verwendet werden Änderungen vorbe halten F...

Page 3: ...rmen und Sicherheitsvorschriften beachten Stellen Sie vor Verwendung des Produktes sicher dass Ihnen alle Bestim mungen Normen und Sicherheitsvorschriften bekannt sind und dass sie befolgt werden Warnhinweise sind in dieser Betriebsanleitung mit Warnsymbolen und Sig nalwörtern gekennzeichnet Abhängig von der Schwere einer Gefährdungs situation werden Warnhinweise in unterschiedliche Gefahrenklasse...

Page 4: ...en Sie darüber hinaus eine Risikobeurteilung in Bezug auf die konkrete von Ihnen vorgesehene Anwendung nach einem anerkannten Verfahren durch und treffen Sie entsprechende dem Ergebnis alle erforderlichen Sicherheitsmaßnahmen Berücksichtigen Sie dabei auch die möglichen Fol gen eines Einbaus oder einer Integration des Produkts in ein System oder in eine Anlage Führen Sie bei der Verwendung des Pro...

Page 5: ...Schutzausrüstung Verwenden Sie immer die erforderliche persönliche Schutzausrüstung Berücksichtigen Sie bei Arbeiten an und mit dem Produkt auch dass am Ein satzort Gefährdungen auftreten können die nicht direkt vom Produkt ausge hen 2 6 Veränderungen am Produkt Führen Sie ausschließlich solche Arbeiten an und mit dem Produkt durch die in dieser Betriebsanleitung beschrieben sind Nehmen Sie keine ...

Page 6: ...ie sicher dass während des Transports und der Lagerung des Pro dukts die spezifizierten Umgebungsbedingungen eingehalten werden Benutzen Sie für den Transport die Originalverpackung Lagern Sie das Produkt nur in trockener sauberer Umgebung Stellen Sie sicher dass das Produkt bei Transport und Lagerung stoßge schützt ist Nichtbeachtung dieser Anweisungen kann zu Sachschäden führen ...

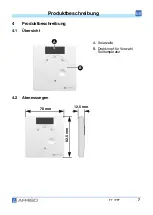
Page 7: ...7 Produktbeschreibung DE FT FTF 4 Produktbeschreibung 4 1 Übersicht 4 2 Abmessungen A Solarzelle B Drehknopf für Vorwahl Solltemperatur A B 82 5 mm 78 mm 12 5 mm ...

Page 8: ...werte über EnOcean Funktelegramme an das AFRISOhome Gateway Das Produkt zeigt Heiz und Kühlvorgang nicht per LED an Das Produkt hat eine Solarzelle zur Energieversorgung Wenn das Produkt in dunklen Umgebungen eingesetzt wird verwenden Sie eine Lithium Batte rie Typ 1632 Jedes Produkt besitzt eine eindeutige Kennung Beim Einsatz mehrerer Produkte kann der Empfänger die einzelnen Produkte unterschei...

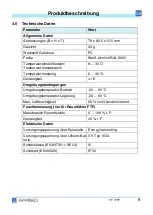
Page 9: ...eraturmessung 0 40 C Genauigkeit 1 K Umgebungsbedingungen Umgebungstemperatur Betrieb 20 60 C Umgebungstemperatur Lagerung 20 60 C Max Luftfeuchtigkeit 90 nicht kondensierend Feuchtemessung nur für Raumfühler FTF Messbereich Raumfeuchte 0 100 r F Genauigkeit 5 r F Elektrische Daten Versorgungsspannung über Solarzelle Energy harvesting Versorgungsspannung über Lithium Bat terie 3 V Typ 1632 Schutzk...

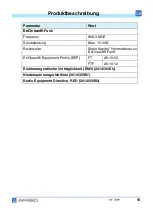
Page 10: ...868 3 MHZ Sendeleistung Max 10 mW Reichweite Siehe Kapitel Informationen zu EnOcean Funk EnOcean Equipment Profile EEP FT A5 10 03 FTF A5 10 12 Elektromagnetische Verträglichkeit EMV 2014 30 EU Niederspannungsrichtlinie 2014 35 EU Radio Equipment Directive RED 2014 53 EU ...

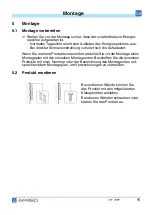
Page 11: ...ch die Aufladezeit Wenn Sie mehrere Produkte verwenden erstellen Sie vor der Montage einen Montageplan mit den einzelnen Montageorten Beschriften Sie die einzelnen Produkte mit einer Nummer oder der Bezeichnung des Montageortes ent sprechend dem Montageplan um Verwechslungen zu vermeiden 5 2 Produkt montieren Bei unebenen Wände können Sie das Produkt mit den mitgelieferten Klebepunkten ankleben Be...

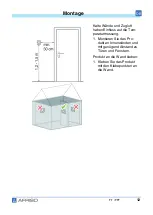
Page 12: ...de und Zugluft haben Einfluss auf die Tem peraturmessung 1 Montieren Sie das Pro dukt an Innenwänden und mit genügend Abstand zu Türen und Fenstern Produkt an die Wand kleben 1 Kleben Sie das Produkt mit den Klebepunkten an die Wand ...

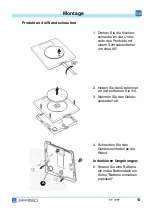
Page 13: ... des Produkts mit einem Schraubendreher um circa 90 2 Heben Sie den Drehknopf an und entfernen Sie ihn 3 Nehmen Sie das Gehäu seoberteil ab 4 Schrauben Sie das Gehäuseunterteil an die Wand In dunkleren Umgebungen 5 Setzen Sie eine Batterie ein in das Batteriefach ein Siehe Batterie einsetzen optional A ...

Page 14: ...14 Montage DE FT FTF 6 Drehen Sie die Nocken schraube am Produkt mit einem Schraubendreher wieder in die Ausgangs position ...

Page 15: ...Drehknopf und das Gehäuseoberteil ab 1 Setzen Sie die Batterie in das Batteriefach ein Achten Sie auf die korrekte Polung 2 Setzen Sie das Gehäuseoberteil und den Drehknopf auf das Gehäuseun terteil 7 Setzten Sie das Gehäuse oberteil und den Dreh knopf auf das Gehäuse unterteil Achten Sie beim Einset zen des Drehknopfs auf die richtige Position zur Drehachse ...

Page 16: ...e das zu prüfenden Produkt auf Frostschutz ein 2 Stellen Sie das zu prüfenden Produkt auf 30 C Die gelbe LED leuchtet nach maximal einer Minute an demjenigen Reg lermodul auf mit dem das Produkt verbunden ist 3 Stellen Sie sicher dass das zu prüfende Produkt mit dem korrekten Regelkreis verbunden ist 4 Wiederholen Sie diese Schritte für alle anderen Produkte 1 Drücken Sie mit Hilfe einer aufgeboge...

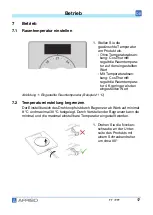
Page 17: ...die maximal einstellbare Temperatur eingestellt werden 1 Stellen Sie die gewünschte Temperatur am Produkt ein Ohne Temperaturabsen kung CosiTherm regelt die Raumtempera tur auf den eingestellten Wert Mit Temperaturabsen kung CosiTherm regelt die Raumtempera tur 4 K geringer als den eingestellten Wert Abbildung 1 Eingestellte Raumtemperatur Beispiel 21 C 1 Drehen Sie die Nocken schraube an der Unte...

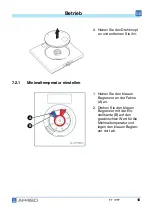
Page 18: ... 2 Heben Sie den Drehknopf an und entfernen Sie ihn 1 Heben Sie den blauen Begrenzer an der Fahne A an 2 Drehen Sie den blauen Begrenzer mit der Ein stellkante B auf den gewünschten Wert für die Minimaltemperatur und legen den blauen Begren zer dort ab A B ...

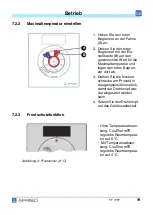
Page 19: ...rt für die Maximaltemperatur und legen den roten Begren zer dort ab 3 Drehen Sie die Nocken schraube am Produkt in Ausgangsposition zurück damit der Drehknopf wie der eingesetzt werden kann 4 Setzen Sie den Drehknopf auf das Gehäuseoberteil Ohne Temperaturabsen kung CosiTherm regelt die Raumtempera tur auf 8 C Mit Temperaturabsen kung CosiTherm regelt die Raumtempera tur auf 4 C Abbildung 2 Frosts...

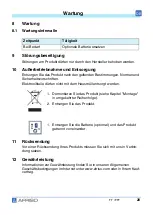
Page 20: ...entsorgt werden 11 Rücksendung Vor einer Rücksendung Ihres Produkts müssen Sie sich mit uns in Verbin dung setzen 12 Gewährleistung Informationen zur Gewährleistung finden Sie in unseren Allgemeinen Geschäftsbedingungen im Internet unter www afriso com oder in Ihrem Kauf vertrag Zeitpunkt Tätigkeit Bei Bedarf Optionale Batterie ersetzen 1 Demontieren Sie das Produkt siehe Kapitel Montage in umgeke...

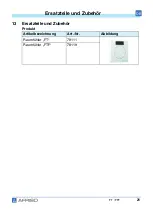
Page 21: ...21 Ersatzteile und Zubehör DE FT FTF 13 Ersatzteile und Zubehör Produkt Artikelbezeichnung Art Nr Abbildung Raumfühler FT 78111 Raumfühler FTF 78119 ...

Page 22: ...ende Informationen zu EnOcean Funksystemen Weiterführende Informationen zu Planung Installation und Betrieb von EnOcean Funksystemen finden Sie auf www enocean com Funkstandard Funktechnologie AN001 AN102 AN103 AN201 14 3 Möglichkeiten der EnOcean Technologie Unterlagen über EnOcean Technologien finden Sie im Internet unter www afrisohome de Auf unserem YouTube Channel finden Sie eine Reihe von Vi...

Page 23: ...23 Anhang DE FT FTF 15 Anhang 15 1 EU Konformitätserklärung ...

Page 24: ...ngen Telephone 49 7135 102 0 Service 49 7135 102 211 Telefax 49 7135 102 147 info afriso com www afriso com Copyright 2020 AFRISO EURO INDEX GmbH All rights reserved Operating instructions Room temperature sensor wireless Product family CosiTherm Type FT Type FTF ...

Page 25: ...ll as all other product related doc uments on to all owners of the product If you feel that these operating instructions contain errors inconsisten cies ambiguities or other issues contact the manufacturer prior to using the product These operating instructions are protected by copyright and may only be used as provided for by the corresponding copyright legislation We reserve the right to modific...

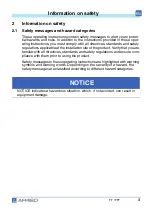
Page 26: ...afety regulations applicable at the installation site of the product Verify that you are familiar with all directives standards and safety regulations and ensure com pliance with them prior to using the product Safety messages in these operating instructions are highlighted with warning symbols and warning words Depending on the severity of a hazard the safety messages are classified according to ...

Page 27: ...specified for the product The conditions of the planned application In addition perform a risk assessment in view of the planned application according to an approved risk assessment method and implement the appropriate safety measures based on the results of the risk assessment Take into account the consequences of installing or integrating the product into a system or a plant When using the produ...

Page 28: ...ive equipment Always wear the required personal protective equipment When performing work on and with the product take into account that hazards may be present at the installation site which do not directly result from the product itself 2 6 Modifications to the product Only perform work on and with the product which is explicitly described in these operating instructions Do not make any modificat...

Page 29: ...fy compliance with the specified ambient conditions during transport or storage of the product Use the original packaging when transporting the product Store the product in a clean and dry environment Verify that the product is protected against shocks and impact during trans port and storage Failure to follow these instructions can result in equipment damage ...

Page 30: ...7 Product description EN FT FTF 4 Product description 4 1 Overview 4 2 Dimensions A Solar cell B Rotary knob for adjusting the reference temperature A B 82 5 mm 78 mm 12 5 mm ...

Page 31: ...and sends the measured values to an AFRISOhome gateway via EnOcean wireless telegrams The product does not indicate heating and cooling via LEDs The product is equipped with a solar cell for power supply The product is equipped with a solar cell for power supply If the product is used in dark environments use a lithium battery type 1632 Each product has a unique ID If several room products are use...

Page 32: ...C Temperature measurement 0 40 C Accuracy 1 K Ambient conditions Ambient temperature operation 20 60 C Ambient temperature storage 20 60 C Max humidity 90 non condensing Humidity measurement room temperature sensor FTF only Measuring range humidity 0 100 r h Accuracy 5 r h Electrical data Supply voltage via solar cell Energy harvesting Supply voltage via lithium battery 3 V type 1632 Protection cl...

Page 33: ...equency 868 3 MHZ Transmission power Max 10 mW Range See chapter Information on EnOcean wireless EnOcean Equipment Profile EEP FT A5 10 03 FTF A5 10 12 Electromagnetic compatibility EMC 2014 30 EU Low Voltage Directive 2014 35 EU Radio Equipment Directive RED 2014 53 EU ...

Page 34: ...s the charging time If you want to install several products create an installation plan with the indi vidual installation sites Label the individual products according to the instal lation plan with a number or the designation of the installation site in order to reduce the possibility of confusion 5 2 Mounting the product If the wall is uneven stick the product to the wall using the adhesive dots...

Page 35: ... walls and draughts affect temperature measure ment 1 Mount the product to an indoor wall and at an ade quate distance from doors and windows Sticking the product to a wall 1 Stick the product to the wall using the adhesive dots ...

Page 36: ...of the product approximately 90 using a screwdriver 2 Lift the rotary knob and remove it 3 Remove the upper part of the housing 4 Screw the bottom part of the housing to the even wall In darker environments 5 Insert a battery into the battery compartment See Inserting a battery optional A ...

Page 37: ...14 Mounting EN FT FTF 6 Turn the cam screw at the product back to the initial position using a screw driver ...

Page 38: ...d the upper part of the housing 1 Insert the battery into the battery compartment Verify correct polarity 2 Fit the upper part of the housing and the rotary knob to the bottom part of the housing 7 Fit the upper part of the housing and the rotary knob to the bottom part of the housing Verify correct position with reference to the axis of rotation when insert ing the rotary knob ...

Page 39: ...ature is between 15 C and 25 C 1 Set the product to be tested to frost protection 2 Set the product to be tested to 30 C After no more than one minute the yellow LED lights up at the controller module to which the product is connected 3 Verify that the product to be tested is connected to the correct control cir cuit 4 Repeat this procedure for all other products 1 Press the LRN key of the product...

Page 40: ...ictors can be adjusted to set the minimum and the maximum adjustable temperature 1 Adjust the desired tem perature at the product Without temperature reduction CosiTherm sets the room tempera ture to the adjusted value With temperature reduc tion CosiTherm sets the room temperature to a value 4 K below the adjusted value Fig 1 Adjusted room temperature example 21 C 1 Turn the cam screw at the prod...

Page 41: ...g the minimum temperature 2 Lift the rotary knob and remove it 1 Lift the blue restrictor at the flag A 2 Turn the blue restrictor with the restrictor adjust ment edge B to the desired value for the mini mum temperature and refit it A B ...

Page 42: ... the desired value for the maximum temperature and refit it 3 Turn the cam screw at the product back to the initial position so that you can refit the rotary knob 4 Fit the rotary knob to the upper part of the housing Without temperature reduction CosiTherm adjusts the room temper ature to 8 C With temperature reduc tion CosiTherm adjusts the room temper ature to 4 C Fig 2 Frost protection 8 C A B...

Page 43: ...tronic components must not be disposed of together with the normal household waste 11 Returning the device Get in touch with us before returning your product 12 Warranty See our terms and conditions at www afriso com or your purchase contract for information on warranty When Activity If required Replacing the optional battery 1 Dismount the product see chapter Mounting reverse sequence of steps 2 ...

Page 44: ...21 Spare parts and accessories EN FT FTF 13 Spare parts and accessories Product Product designation Part no Figure Room temperature sensor FT 78111 Room temperature sensor FTF 78119 ...

Page 45: ...ormation on EnOcean wireless systems Additional information on planning installation and operation of EnOcean wireless systems can be found at www enocean com Wireless standard Wireless technology AN001 AN102 AN103 AN201 14 3 Features of the EnOcean technology Visit www afrisohome de for documents on EnOcean technologies A variety of videos on AFRISO products can also be found on the AFRISO YouTub...

Page 46: ...23 Appendix EN FT FTF 15 Appendix 15 1 EU Declaration of Conformity ...

Reviews: