background image

Thank you for choosing AFL Hyperscale

AFLHS2RUFAVPAN240620

www.aflhyperscale.com

AFL Hyperscale reserves the right to make changes in this Installation Guide at any time without notice

Summary of Contents for U Series

Page 1: ...Installation Guide 2RU Front Access V Panel FVP Series ...

Page 2: ...or an eye examination immediately General Precautions Personnel must be thoroughly familiarized with all applicable Occupational Health and Safety OH S regulations local regulations and your company safety practices and policies Warning To reduce the chance of accidental injury Before work begins all personnel must be thoroughly familiar with the operation of all equipment and procedures to be use...

Page 3: ...U Series 2RU Front Access V Panel FVP 3 AFL Hyperscale All rights reserved Series Component Overview 02 04 04 06 01 03 ...

Page 4: ...Web Ribbon SWR LC Pigtail Pre Installed Item Number Item Qty 01 Front Access V Panel FVP 1 02 288f Modular Drawer 1 03 Front Door 1 04 24f LC Dust Seal Shuttered Adapter Module 12 05 Cable Breakout Box Cover with Brush Strip Screws 1 06 144f Ribbon Mass Splice Tray 2 07 M6 Cage Nuts Screws 2 08 12f Ribbon Splice Protector 2 09 24f 200μm SpiderWeb Ribbon SWR LC Pigtail Pre Installed 12 10 Nylon Bra...

Page 5: ...ut drawer and de latch rail 1 Activate black lever to detach slide rail 2RU 1RU 1RU Insert cage nuts in positions shown on both left and right hand side of rack 2 Partially tighten cage nut screws in positions shown using screwdriver 3 Insert 2RU panel into 19 rack insert and tighten all cage nut screws 4 ...

Page 6: ...6 AFL Hyperscale All rights reserved Series Panel Mounting Remove rear door 5 ...

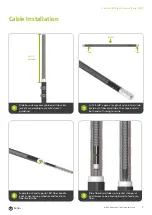
Page 7: ... Cut 2 5m 8 approx length of nylon braid slide braid onto fiber braid tube then tape braid at both ends of tubing to secure 7 Separate out and tape up 144f fiber bundle ends as per splicing schedule and feed into fiber braid tube 8 Slide fiber braid tube up to jacket strip point and remove tape allowing braid to feed onto fiber 9 4m 13 approx Braid Tube Tape Cable Installation ...

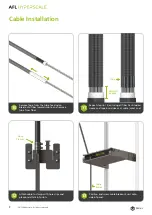
Page 8: ...wards cable and remove tube from fiber 10 Attach cable to clamp with hose clips and place braid tails into slots 12 Position and screw cable breakout unit onto side of panel 13 Repeat steps 6 10 ensuring all fiber has braided sleeve and tape braid sleeve at cable jacket end 11 Tape 25mm 1 approx Hose Clamps Cable Braids ...

Page 9: ...ets halfway through Route cable braid tails though grommet in 2 x 144f bundles and slot grommets into panel do not pull tight leave natural slack curve 14 Feed all cable braid tails through to front of panel and cable tie braids to T slots do not over tighten 15 Fit cable cover 16 Fit rear door 17 Screw Positions Cable Tie Cable Cover ...

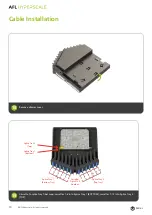
Page 10: ...ation Remove drawer cover 18 Cassette to splice tray fiber map cassettes 1 6 into Splice Tray 1 BOTTOM cassettes 7 12 into Splice Tray 2 TOP 19 Splice Tray 2 Top Splice Tray 1 Bottom Cassette Pigtail Tail Number Splice Tray 2 Top Tray Splice Tray 1 Bottom Tray ...

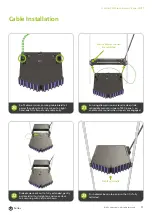
Page 11: ...lternate side cable entry 20 Ensuring drawer runners are retracted slide spliced drawer into runner of 2RU panel an audible click sounds when runners are engaged 21 Push drawer back into panel so that it is fully retracted 23 Ensure drawer runners are retracted Push Pull Handle Slide drawer back out to fully extended gently pull braid tail to straighten and make slack coil securing with Velcro as ...

Page 12: ...arting with internal pigtail 1 RED splice to cable fiber GREEN place splice protector into YELLOW holder Coil fiber in suggested route shown 24 Internal SWR Pigtail Fiber Slack Loop Pre Installed Internal SWR Pigtail Fiber Slack Loop Pre Installed Tail Identification Labels Cable Fiber Slack Loop Splice Tray 1 Bottom Tray Splice Tray 2 Top Tray Cable Braid Cable Tie Off Point Cassette Identificati...

Page 13: ... reserved Series Cable Installation Slide door mount bracket behind screw heads and tighten Repeat for other side 26 Attach front door to mounts with spring plungers Door pivots and latches closed with swell latches Stick relevant port label to rear of door 27 Labels ...

Page 14: ... Tie Point Cable Braid Screw Positions Braid Tails Panel Dimensions Braided tail routing for splicing cable conduit between three panels Braided tail routing example for bottom feed cable routing fit cable cover as shown Cable Braid Additional Steps Braid can route through aperture cover Braid can route through aperture cover ...

Page 15: ...U Series 2RU Front Access V Panel FVP 15 AFL Hyperscale All rights reserved Series Notes ...

Page 16: ...Thank you for choosing AFL Hyperscale AFLHS2RUFAVPAN240620 www aflhyperscale com AFL Hyperscale reserves the right to make changes in this Installation Guide at any time without notice ...

Reviews: