background image


3/7 


FLY629_A 

Aereco S.A. 


2.


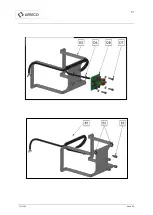
PRODUCT EXPLODED VIEW 


C 7-9 

D & E 

sections 

Summary of Contents for DXR

Page 1: ...actual document Aereco reserve the right to make changes to the construction and to the technical data of the fan Disassembly Instructions DXR Identification of plastic parts and electronics parts FLY629_A ENGLISH ...

Page 2: ...owing elementary rules Do not touch the appliance even if it is earthed if your body is moist or wet hands feet etc This system is not designed to be disassembled by persons whose intellectual and or mental faculties are impaired or who lack experience and knowledge including children unless they have been trained and are supervised by a person responsible for their safety during disassembling To ...

Page 3: ...3 7 FLY629_A Aereco S A 2 PRODUCT EXPLODED VIEW C 7 9 D E sections ...

Page 4: ...4 7 FLY629_A Aereco S A ...

Page 5: ...5 7 FLY629_A Aereco S A ...

Page 6: ...f the gate with its drain pan Beware of spacers B Drain pan A5246 1 Put off the 9 blind rivets of the condensate tray fastening 2 Pull out the condensate tray from the door Caution this operation will damage the foam of the door 3 Remove the condensate tray 4 Remove the 2 screw connections of the condensate flow 5 Remove the condensate tray foam C Supply card CE4930 1 Remove the 2 screws and fixin...

Page 7: ...m socket pressure pipes 4 Remove the 4 screws washers and brake nuts from the fan assembly 5 Remove the box fan Pay attention to outlet pressure pipes of the suction ring 6 Remove the 4 colored connector wires of the fan card CE4939 Leave the connector in place 7 Remove the 4 screws and fixing washers from the card fan CE4939 8 Remove the card fan CE4939 Aereco S A 62 rue de Lamirault Collégien 77...

Reviews: