background image


Aercus Instruments™

 - WeatherRanger®                                                                                 

42 | 

P a g e


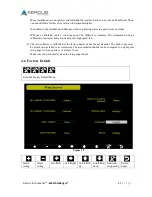
1.


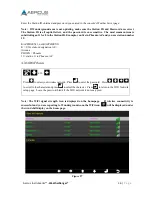
Re-register Indoor Transmitter

.  Re-synchronises the wireless signal from the  indoor thermo-

hygrometer-barometer.  Press  

 to highlight this field. 

Press  

 or  

 key to select Re-register Transmitter Indoor.  Press 

 or  

 key to bring up 

the 

message  box 

“Are  you  sure  you  want  to  register  the  new  indoor  transmitter?” 


Press 

 or 

 to select Yes or No.  Press the 

 key or 

  key to confirm the selection.


2.


Re-register  Outdoor Transmitter.

 Re-synchronises the wireless signal from the  outdoor  sensor 

array.  Press  

 to highlight this field. 

Press  

 or  

 key to select Re-register Transmitter Outdoor.  Press  

 or  

 key    to bring 

up  the 

message  box “

Are  you  sure  you  want  to  register  the  new  outdoor  transmitter?” 

Press 

 or 

 to select Yes or No.  Pres the 

 key or 

  key to confirm the selection. 

3.


Clear History.

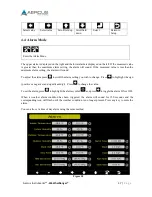
 Clears all of the historical data in the archive memory. Press  

 to highlight  this 

field. 


Press  

 or  

 key to select Clear History.  Press  

  or  

 key  to bring up the 

message box 

“Are you sure you want to clear history?”  
 

Press 

 or 

 to select Yes or No. Press the  

 key or  

 key to confirm the selection. 

4.


Clear Max/Min.

 Clears all of the minimum and maximum values in stored memory.    Press 

 to 

highlight this field. 

Press  

 or  

 key to select Clear Max/Min.  Press  

 or  

 key to bring up the 

message box 

“Are you sure you want to clear the max/min?”  

Press 

 or 

 to select Yes or No. Press the  

 key or 

 key to confirm the selection. 


5.


Reset  to  Factory  Default.

  Clears  all  stored  memory,  calibrations  and  other  variables  to  factory 

default.     

Press  

 or  

 key to select Restore To Factory Default.  Press  

 or  

 key  to bring up the 

message box 

“Are you sure you want to reset to factory default?”  

Press  

 or 

 to select Yes or No. Press the  

 key or 

 key to confirm the selection. 


6.


Backup Data.

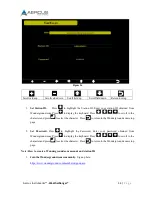
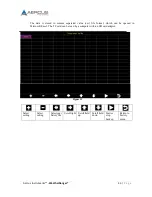
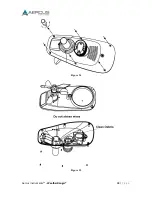
 Backup data to micro SD / TF card.  Insert a micro SD / TF card into the slot, as 

shown in Figure 14. 


Press  

 to highlight this field. Press 

 to enter the backup mode. Press  

 or  

 to select 

the  history  year  file.  Press 

 to  confirm  the  selection  and  the  year  field  will  turn from  green 

to  purple.  Press 

 to  start  the  backup,  press 

 key  again  to  cancel  the backup. 

Summary of Contents for WeatherRanger

Page 1: ...WeatherRanger PROFESSIONAL WIRELESS WEATHER STATION WITH WIFI AND REAL TIME INTERNET PUBLISHING ...

Page 2: ... EU As many issues can be a result of incorrect setup please contact our local distributor Greenfrog Scientific www greenfrogscientific co uk and their team will be happy to help Genuine faults can typically be diagnosed without requiring the unit to be returned and replacement parts sent quickly if needed Purchased in AUSTRALIA As many issues can be a result of incorrect setup please contact our ...

Page 3: ...2 Set Time Format 27 4 3 3 Temperature Units of Measurement 27 4 3 4 Barometer Units of Measurement 28 4 3 5 Wind Speed Units of Measurement 28 4 3 6 Rainfall Units of Measurement 28 4 3 7 Solar Radiation Units of Measurement 28 4 3 8 Solar Display Increments 28 4 3 9 Graph Time 29 4 3 10 Backlight Display 29 4 3 11 Barometer Display 30 4 3 12 Longitude and Latitude 30 4 3 13 Weather Threshold 32 ...

Page 4: ...every few months and change the batteries every 12 months or so Provide easy access to the weather station 2 Avoid radiant heat transfer from buildings and structures In general install the sensor array at least 1 5m from any building structure ground or rooftop 3 Avoid wind and rain obstructions The rule of thumb is to install the sensor array at least four times the distance of the height of the...

Page 5: ...er an all in one sensor array and wirelessthermo hygrometer barometer 3 1 Parts List Qty Item Image 1 Display Console Frame dimensions LxWxH 19 7 x 14 6 x 1 9 cm LCD dimensions LxW 15 9 x 8 9 cm 1 Thermo hygrometer barometer transmitter 1 Thermo hygrometer barometer mounting bracket plus 3 mounting screws 1 Sensor Array 1 Wind Vane ...

Page 6: ...ting Pole 2 Pole mounting U bolt 4 Pole mounting clamps 4 Pole mounting U bolt nuts 1 Allen key 1 User manual 3 2 Recommended Tools Precision screwdriver for small Phillips screw on battery cover door Adjustable wrench for mounting pole Compass or GPS for wind direction calibration ...

Page 7: ...wind direction 7 Thermo hygro Sensor measures temperature and humidity 2 Wind Speed Sensor measures wind speed 8 UV Sensor 3 Solar Panel 9 Light Sensor 4 Battery Compartment 10 Rain Collector self emptying 5 LED Transmission Indicator turns on for 4 seconds on power up flashes once per 16 seconds 11 Bubble Level 6 Reset Button ...

Page 8: ...e and align the flat key on the wind vane shaft to the flat key on the wind vane and push the vane on to the shaft b Tighten the set screw with the Allen key included Figure 2 3 3 2 Install Mounting Pole Reference Figure 3 Remove the mounting pole collar by rotating anti clockwise Figure 3 a b ...

Page 9: ...Aercus Instruments WeatherRanger 9 P a g e Reference Figure 4 Locate and align the groove on the sensor array and mounting pole Figure 4 ...

Page 10: ... Reference Figure 6 Locate the battery door on the bottom of the sensor array Turn the set screw anti clockwise to open the battery compartment Insert 3xAA batteries not included The LED indicator on the bottom of the sensor array will turn on for four seconds and normally flash once per 16 seconds the transmission update period Close the battery door and tighten the screw ...

Page 11: ...Aercus Instruments WeatherRanger 11 P a g e Figure 6 ...

Page 12: ...mounting pole is as far away from the temperature sensor as possible as shown in Figure 7 Figure 7 If you do not have a suitable pole or fence to attach the sensor array to or you wish to mount the sensor array to a flat surface you may need to purchase an additional mount such as a Hockey Stick Mount for mounting to a flat vertical surface or a Tripod Mount for ground or roof mounting see Figures...

Page 13: ...hern hemisphere wind recalibration instructions in Appendix 1 not the instructions directly below otherwise your wind direction readings will be incorrect Northern Hemisphere Locations Only Reference Figure 9 Locate the four wind vane compass rose indicators of N E S W representing North East South and West Align the compass rose direction upon final installation with a compass or GPS Figure 9 ...

Page 14: ... reset the sensor array To do this with an open ended paperclip press and hold the RESET BUTTON for three seconds to completely discharge the voltage Take out the batteries and wait one minute while covering the solar panel to drain thevoltage Put the batteries back in and resynchronise with the console by powering the console down by removing the AC adaptor waiting 10 seconds and then reinserting...

Page 15: ...cility will correspond closely to the actual barometric pressure outside Note The thermo hygrometer transmitter transmits directly to the display console For best results place between 1 5m to 6m from the display console Note To avoid permanent damage please take note of the battery polarity before inserting the batteries Remove the battery door on the back of the sensor with a Philips screwdriver...

Page 16: ... 100m line of sight no interference barriers or walls but typically you will get 20 40m maximum under most real world installations which include passing through barriers or walls 4 Metal Barriers Radio frequency will not pass through metal barriers such as aluminium siding If you have metal siding align the sensor array and console through a window to get a clear line of sight The following is a ...

Page 17: ...ange depending on which screen mode you are in For ease of use this manual also includes quick menu boxes such as the one directly below signifying how to access a setting from the home screen For example to access Recall and delete annual archive memory from the home screen press the History Key twice and the Recall Page key once Menu box example From the home screen press the History Key twice a...

Page 18: ...dicators 12 Dew Point 3 Forecast or Graph barometer temp or humidity 13 Outdoor Temperature Humidity 4 UV Index 14 Indoor Temperature Humidity 5 Solar Radiation Light 15 Internet Connectivity 6 Barometric Pressure 16 WiFi Connectivity 7 Sunrise Sunset 17 Wind Chill 8 Moon Phase 18 Wind Gust 9 Date and Time 19 Wind Speed 10 Rainfall ...

Page 19: ...he display Graph display key Press this key to choose between weather forecast barometric pressure indoor outdoor temperature and indoor outdoor humidity Pressure display key Press this key to choose between Absolute pressure and Relative pressure Rain key Press this key to shift the display between Rain Rate RainDay Rain Week Rain Month and Rain Year History key Press this key to enter History Mo...

Page 20: ...minimum and maximums Figure 16 Check parameter to clear Uncheck parameter to clear Clear selected parameter 1 Scroll up Scroll down View archive memory Return home 1 The popup message Are you sure you want to clear the max min will appear Select to highlight Yes and to confirm ...

Page 21: ...erRanger 21 P a g e 4 2 1 Archive Memory Mode View archive memory for all parameter based on the date and time Figure 17 Recall annual records Recall page Scroll left Scroll right Scroll up Scroll down View graphs Return home ...

Page 22: ...nts WeatherRanger 22 P a g e 4 2 2 Recall Delete Annual Archive Memory Recall and delete annual archive memory Figure 18 Delete annual record Scroll left Scroll right Recall annual record Return to archive memory mode ...

Page 23: ...While viewing the annual archive memory press the key to view a specific page of memory Figure 19 Increase page number Decrease page number Scroll digit to left Scroll digit to right Toggle OK or cancel then press to confirm Toggle OK or cancel then press to confirm ...

Page 24: ...24 P a g e 4 2 4 Historical Graphs Display historical graph data Figure 20 Zoom in Y axis Zoom out Y axis Scroll X axis time left Scroll X axis time right Recall annual archive data Scroll parameter pages Return to Max Min Return home ...

Page 25: ...5 P a g e 4 3 Setup Mode Enter the Setup Mode Figure 21 Select units of measure or scroll value up Select units of measure or scroll value down Select value Select value Scroll field up Scroll field down Enter sub setup mode Return home ...

Page 26: ...r year Press or to increase or decrease the value 3 Set Time Zone Press to set the time zone Press to increase the time zone and to decrease the time zone With time zone highlighted press to set Daylight Savings Time DST Press to toggle ON or OFF Note the DST should be always checked to automatically update the time when DST changes 4 Set Time Server The default time server is time nist gov Press ...

Page 27: ...own Select value Select value Scroll field up Scroll field down Return to setup 4 3 2 Set Time Format x2 Press to change the time format between h mm ss AM h mm ss and h mm ss AM 4 3 3 Temperature Units of Measurement x3 Press to change the temperature units of measure between F and C ...

Page 28: ...asure between mph bft beufort scale ft s m s km h and knot 4 3 6 Rainfall Units of Measurement x6 Press to change the rainfall units of measure between mm and inches 4 3 7 Solar Radiation Units of Measurement x7 Press to change the solar radiation units of measure between W m 2 lux and fc 4 3 8 Solar Display Increments x8 Press to change the rainfall display increments between Daily Rain Weekly Ra...

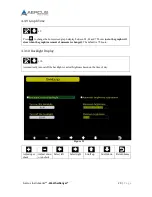
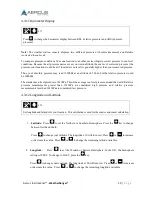
Page 29: ...2 hours note the graph will clear when the graph increment of measure is changed The default is 72 hours 4 3 10 Backlight Display x10 Automatically turn on off the backlight or adjust brightness based on the time of day Figure 23 Adjust up or check Adjust down or uncheck Select left Select right Scroll up Scroll down Return home ...

Page 30: ...l pressure is 1013hPa This is the average sea levelpressure around the world Relative pressure measurements greater than 1013hPa are considered high pressure and relative pressure measurements less than 1013hPa are considered low pressure 4 3 12 Longitude and Latitude x12 Set longitude and latitude for your location This calculation is used for the sunrise and sunset calculation 1 Latitude Press t...

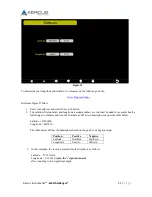
Page 31: ... London for example has the following co ordinates and is in the Northern and Western hemispheres as per the table below Latitude 51 506420 Longitude 0 127210 The table below defines the hemisphere based on the positive or negative sign Position Positive Negative Latitude Northern Southern Longitude Eastern Western 3 In this example the location entered into the display is as follows Latitude 51 5...

Page 32: ...er setting compared to areas where the air pressure is stagnant For example if 4hPa is selected then there must be a fall or rise in air pressure of at least 4hPa before the weather station will register this as a change in weather The forecast icons are as follows Sunny Partly Cloudy Cloudy Rainy Storm 4 3 14 Storm Threshold The storm threshold can be set to suit the user s requirements for storm...

Page 33: ...elect 4 3 16 Archive Interval x14 Changes the archive interval for historical data and graphing Press to change the 100 x minute field Press to highlight the 10 x minute field Press to change the 10 x minute field Press to highlight the minute field Press to change the minute field The range is 1 240 minutes 4 3 17 Weather Server x15 The console is configured to send real time data to Wunderground...

Page 34: ...character and press to select the character Press to return to the Wunderground com setup page 2 Set Password Press to highlight the Password Enter your password obtained from Wunderground com Press to display the keyboard Press to scroll to the character and press to select the character Press to return to the Wunderground com setup page Note How to create a Wunderground com account and stationID...

Page 35: ... Instruments WeatherRanger 35 P a g e 2 Join the Personal Weather Station PWS network Visit http www wunderground com weatherstation overview asp and add your weather station and you will receive a Station ID ...

Page 36: ...tion number 11 KAZPHOEN11 notKAZPH0EN11 K USA station designation AZ Arizona PHOEN Phoenix 11 station 11 in Phoenix AZ 4 3 18 WiFi Scan x16 Press to select your wireless network Press to enter the password Press to scroll to the character and press to select the character Press to return to the WiFi Network setup page Leave the password blank if the WiFi network is not encrypted Note The WiFi sign...

Page 37: ...nimum alarm setting the alarm will sound To adjust the alarm press to scroll the alarm setting you wish to change Press to highlight the sign positive or negative and significant digit Press to change the value To set the alarm press to highlight the alarm symbol and press to toggle the alarm ON or OFF When a weather alarm condition has been triggered the alarm will sound for 120 seconds and the c...

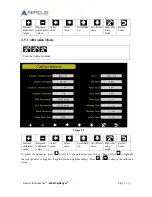
Page 38: ...Calibration Mode Enter the Calibration Mode Figure 29 Increase calibrated value Decrease calibrated value Select value Select value Scroll field up Scroll field down Enter sub setup mode Return home Toadjust the parameter press to scroll to the parameter you wish to change Press to highlight the sign positive or negative if applicable and significant digit Press or to change the calibrated value ...

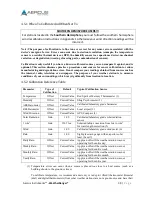
Page 39: ...libration Default Typical Calibration Source Temperature Offset Current Value Red Spirit or Mercury Thermometer 1 Humidity Offset Current Value Sling Psychrometer 2 ABS Barometer Offset Current Value Calibrated laboratory grade barometer REL Barometer Offset Current Value Local airport 3 Wind Direction Offset Current Value GPS Compass 4 Solar Radiation Gain 1 00 Calibrated laboratory grade solar r...

Page 40: ...ay read 1030hPa at an altitude of 200m but the relative pressure is 1006hPa The standard sea level pressure is 1013hPa This is the average sea level pressure around the world Relative pressure measurements greater than 1013hPa are considered high pressure and relative pressure measurements less than 1013hPa are considered low pressure To determine the relative pressure for your location locate an ...

Page 41: ...e We recommend using a calibrated wind meter and a constant speed high speed fan 7 The rain collector is calibrated at the factory based on the funnel diameter The bucket tips every 0 3mm of rain referred to as resolution The accumulated rainfall can be compared to a sight glass rain gauge with an aperture of at least 10cm Make sure you periodically clean the rain gauge funnel 4 6 Factory Default ...

Page 42: ...or key to bring up the message box Are you sure you want to clear history Press or to select Yes or No Press the key or key to confirm the selection 4 Clear Max Min Clears all of the minimum and maximum values in stored memory Press to highlight this field Press or key to select Clear Max Min Press or key to bring up the message box Are you sure you want to clear the max min Press or to select Yes...

Page 43: ...ed value csv file format which can be opened in Microsoft Excel The TF card can be read by a computer with an SD card adaptor Figure 31 Select setting Select setting Select year history file Scroll right Scroll field up Scroll field down Start or stop backup Return to Factory menu ...

Page 44: ...following headers Column Parameter 1 No data point number 2 Time 3 Indoor Temperature F 4 Indoor Humidity 5 Outdoor Temperature F 6 Outdoor Humidity 7 Dew Point F 8 Wind Chill F 9 Wind mph 10 Gust mph 11 Wind Direction 12 ABS Barometer inHg 13 REL Barometer inHg 14 Rain Rate in h 15 Daily Rain in 16 Weekly Rain in 17 Monthly Rain in 18 Yearly Rain in 19 Solar Rad lux 20 Heat Index F 21 UV uW cm 2 ...

Page 45: ...a g e 7 Language Supports English Chinese Danish Dutch French German Italian and Spanish Press to highlight this field Press to select the language and to accept the changes 8 About Provides detailed information for troubleshooting purposes ...

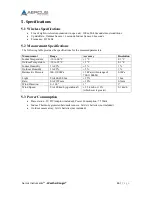
Page 46: ...solution IndoorTemperature 10 to 60 C 1 C 0 1 C OutdoorTemperature 30 to 65 C 1 C 0 1 C Indoor Humidity 1 to 99 5 1 Outdoor Humidity 1 to 99 5 1 Barometric Pressure 300 1100hPa 3hPa within range of 700 1100hPa 0 1hPa Light 0 to 400 000 Lux 15 1 Lux Rain 0 to 9999mm 10 0 3mm Wind Direction 0 360 º 1º 1º Wind Speed 0 to 100 km h operational 3 5 km h or 10 whichever is greater 0 1 km h 5 3 Power Cons...

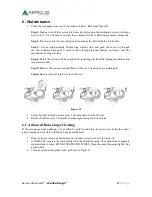
Page 47: ...g dirt from the tipping mechanism and rain collector hole Step 5 Remove the cotton swab and flush with water to remove any remaining dirt Step 6 Re enter the rain totals recorded in Step 1 Figure 33 2 Clean the solar radiation sensor every 3 months with water and towel 3 Replace batteries every 12 months or when signal reception deteriorates 6 1 Advanced Rain Gauge Cleaning If the rain gauge stops...

Page 48: ...Aercus Instruments WeatherRanger 48 P a g e Figure 34 Figure 35 ...

Page 49: ...nce cordless phones baby monitors PC monitors etc If this is an issue the console and or sensor array will need to be relocated 3 Metal Barriers Radio frequency will not pass through metal barriers such as aluminium siding If you have metal siding align the remote and console through a window to get a clear line of sight To check that the outdoor sensor is not encountering interference move the se...

Page 50: ...ation is susceptible to interference distance walls and metal barriers We recommend the following best practices for trouble free wireless communication 1 Electro Magnetic Interference EMI Keep the console at least 1 5m away from computer monitors and TVs 2 Radio Frequency Interference RFI Check for sources of interference cordless phones baby monitors PC monitors etc If this is an issue the conso...

Page 51: ...eporting to Wunderground com Confirm your password is correct It is the password you registered on Wunderground com Your Wunderground com password cannot begin with a non alphanumeric character a limitation of Wundeground com not the station Example oewkrf is not a valid password but oewkrf is valid Confirm your station ID is correct The station ID is all caps and the most common issue is substitu...

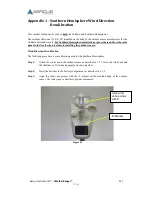
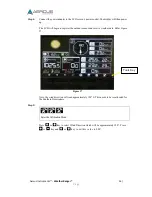
Page 52: ... the North when it comes to installing the outdoor sensor Wind Direction Recalibration The following procedure is a recalibration guide for the Southern Hemisphere Step 1 Attach the wind vane to the outdoor sensor as described in 3 3 1 Note the wind vane and the shaft have a flat side and must be lined up together Step 2 Insert the batteries in the battery compartment as described in 3 3 3 Step 3 ...

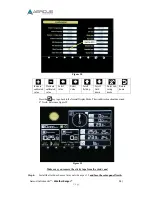
Page 53: ... to register the outdoor sensor and receive weather data Refer Figure 37 Figure 37 Note the wind direction will read approximately 180º S This needs to be recalibrated for the Southern Hemisphere Step 5 Enter the Calibration Mode Press or key to select Wind Direction which will be approximately 180º Press or key and or key to set this value to 000º Tools Key ...

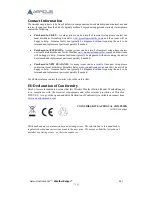
Page 54: ...alue Scroll field up Scroll field down Enter sub setup mode Return home Pressthe keytogobacktotheNormalDisplayMode Thewinddirectionshouldnowread 0º North Reference Figure 39 Figure 39 Make sure you remove the sticky tape from the wind vane Step 6 Install the Outdoor Sensor Array outside as per 3 3 and face the solar panel North ...

Page 55: ... unit to be returned and replacement parts sent quickly if needed Purchased in NEW ZEALAND As many issues can be a result of incorrect setup please contact our local distributor Scientific Sales www scientificsales co nz and their team will be happy to help Genuine faults can typically be diagnosed without requiring the unit to be returned and replacement parts sent quickly if needed For all other...

Reviews: