background image

12

3. Controls and Connections


master

1 – 4

effect

clip

attn.

colour

mute

line/mic

mute

input

input

input

gain

gain

bass

middle

treble

eff. send

clip

line/mic

colour

mute

gain

bass

middle

treble

eff. send

clip

attn.

colour

mute

48V

stereo sim.

power

input

gain

bass

middle

treble

eff. send

select

return

aux

return

effect 2

return

pre

master

master

channel 

one

channel 

three + four

channel 

two

effect

master

Domino

2.

A

1

2

3

4

5

6

7

8

9

10

11

12

13

14

15

16

20120705

1

1

2

2

2

3

3

4

4

5

5

5

6

6

6

7

7

7

8

8

8

9

9

9

10

10

10

11

12

13

14

15

16

17

18

19

20

21

2

11

4

12

5

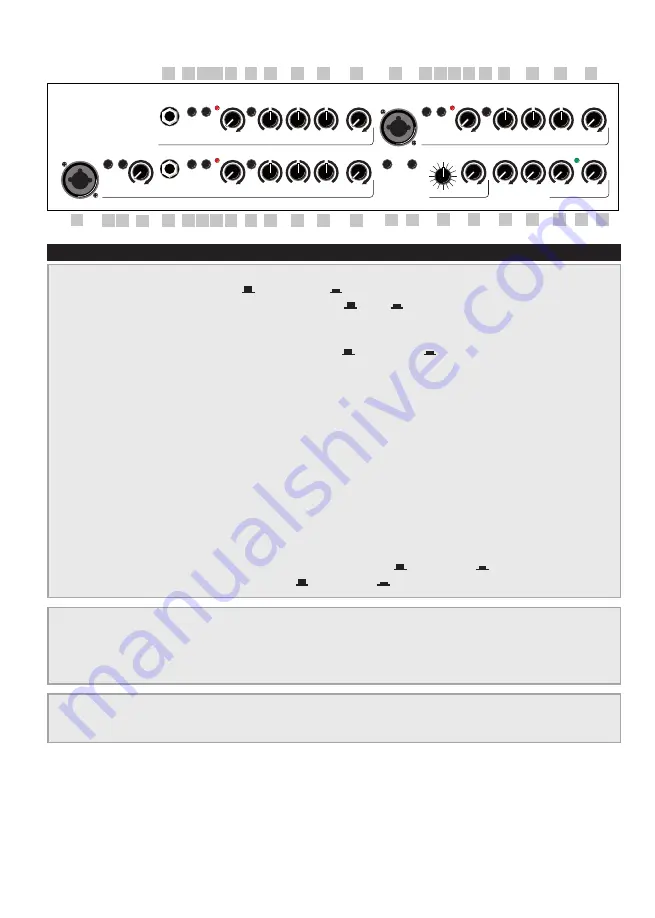
3.1 Front Side

 1)  input


input channel 1, 1/4“ (6,35 mm) jack socket, instrument or line input


 2)  mute

 channel-mute:    = not acvtive,    = active

 3)  attn.


input sensitivity switch - Attenuator   = off ,   = on

 4)  clip


overload indicator

 5)  gain


input level-control

 6)  colour


tone colour filter activation switch:    = not active,     = active

 7)  bass


bass frequency control

 8)  middle


mid frequency control

 9)


treble


treble frequency control

  10)  eff. send


effect level control

 11)  input


input, channel 2, combo socket for ¼“ (6.35 mm) jack or XLR, with 


following connection options:  


• XLR connector: microphone,  balanced, with 48 V phantom power 


• stereo jack connector: microphone, balanced, without phantom power 


• mono jack connector: instrument, line, or microphone, unbalanced, 


without phantom power.

 12)  line/mic


signal source selector switch: 

line

 (only via jackplug) 


for instruments (pickup) and other line level sources, 


mic for microphones.


 13) 48V


48V-phantompower-switch for microphone:      = not active ,    = active

  14)  stereo sim.


stereo simulation switch:     = not active,     = active

 
 15)  select


effect level control

 16) return


effect return control (internal effect)

 17)  aux return

 aux-return-level

 18)  effect 2 return

  effect return control (external effect)

 19)  pre master


level control pre master for 

L-out

R-out

 and 

rec out

 20)  power 

on/off status indicator


21) master 

master level control (volume)

Summary of Contents for Domino 2A

Page 1: ...1 Domino 2A Bedienungsanleitung UserManual 02 2022 ...

Page 2: ...g Willkommen bei AER Wir freuen uns dass Sie sich für den Domino 2A entschieden haben Sie haben damit einen professionellen kompakten und leistungsfähigen 100 Watt Verstärker erworben Zwei parallele Endstufen steuern je einen 8 Breit band Lautsprecher an ein 1 Hochtöner sorgt für zusätzliche Luft nach oben Der Domino 2A verfügt über 4 Eingänge Eingänge 3 und 4 mit gemeinsamer Klangregelung Kanal M...

Page 3: ...bgleich und Reparatur qualifziertem Fachpersonal Im Fall eines Fremdeingriffs erlischt die 2 jährige Garantie 13 Für die Einhaltung der EMV Forderung müssen geschirmte Kabel mit korrekt angeschlossenen Steckverbindern für alle Signalanschlüsse verwendet werden 14 Verwenden Sie immer einen geerdeten Netzan schluß mit der richtigen Netzspannung Falls Sie Zweifel haben ob der Anschluß geerdet ist las...

Page 4: ...ter der Kombibuchse line nur über Klinkenstecker für Instrumente Tonabnehmer und andere line Quellen mic für Mikrofone 13 48V 48V Phantompower Schalter für Mikrophon nicht aktiv aktiv 14 stereo sim Stereosimulations Schalter nicht aktiv aktiv 15 select Effektauswahl Regler 16 return Effekt Return Regler interner Effekt 17 aux return Aux Return Regler 18 effect 2 return Effekt Return Regler externe...

Page 5: ... siehe 5 2 in Verbindung mit return Eingang des externen parallelen Effektwegs Auch allein als Zusatzeingang verwendbar 12 footswitch effect on off Anschlußbuchse für einen Doppel Fußschal ter zum Ein und Ausschalten des eingebau ten bzw externen Effekts Stereo Klinkenbuchse Belegung Tip Schalter für den eingebauten Effekt Ring Schalter für den externen Effekt send return 13 14 footswitch mute cha...

Page 6: ...vor rechtzeitig gewarnt Wenn das Instrument einen Lautstärke Regler besitzt stellen Sie diesen zum Aussteuern anfangs auf höchste Lautstärke Nehmen Sie ihn aber zu rück falls die clip Anzeige schon früh aufleuchtet und das Aussteuern schwierig ist Stellen Sie immer sicher daß Sie volle Batterien in Ihrem aktiven Pickup System verwenden Brum men und Verzerrungen können auch die Folge einer leeren B...

Page 7: ...erb Anteil kurz 14 reverb mit delay Anteil 410ms lang 15 chorus mit reverb Anteil 16 reverb mit chorus Anteil Externe Effekte Darüber hinaus kann ein zusätzliches Effektgerät externer Effekt an den Verstärker angeschlossen werden Benutzen Sie dazu bitte die auf der Rücksei te befindlichen Buchsen send und return send geht zum Eingang return kommt vom Ausgang des externen Geräts Die Intensität des ...

Page 8: ...48 V Phantomspeisung ist im Auslieferungszu stand aktiviert kann aber durch eine interne Steck brücke deaktiviert werden siehe Hinweis Bei Anschluß über Klinkenstecker ist die 48 V Phan tomspeisung nicht wirksam Verwenden Sie den Klinkenanschluß für Mikrofone die nicht an Phantom speisung angeschlossen werden dürfen Lesen Sie dazu bitte auch die allgemeinen Hinweise zur Phantomspeisung Bitte beach...

Page 9: ...out R out insert line out rec out aux in input bass middle treble eff send clip line mic colour mute gain bass middle treble eff send 48V stereo sim power bass middle treble eff send select return aux return effect 2 return pre master master channel one channel three four channel two effect master 1 2 3 4 5 6 7 8 9 10 11 12 13 14 15 16 5 8 Beispiel für das Verlinken von AER Amps über den insert Ei...

Page 10: ...5 8 Linking of AER amps 17 6 Technical data 18 19 1 Introduction Welcome to AER We are very happy that you have chosen the Domi no 3 You are now the owner of a professional com pact and powerful 2x100 watts stereo amplifier The Domino2 A is of course dynamically controlled and equipped with two parallel power amplifiers two 8 twin cone loudspeakers 1 neodym tweeter for additional headroom 4 inputs...

Page 11: ...3 In keeping with the EMV regulations screened cables with correctly fitted connectors must be used for all signal connections 14 Always use an earthed power supply with the correct mains voltage If you are in doubt about the power outlet ground have it checked by a qualified technici an 15 Cable up your amp only when it is powered off 16 This device should be installed near the socket outlet and ...

Page 12: ...ation switch not active active 7 bass bass frequency control 8 middle mid frequency control 9 treble treble frequency control 10 eff send effect level control 11 input input channel 2 combo socket for 6 35 mm jack or XLR with following connection options XLR connector microphone balanced with 48 V phantom power stereo jack connector microphone balanced without phantom power mono jack connector ins...

Page 13: ...return loop point with mono jackplugs for an ex ternal effect device or other signal sources return and send together form an effect loop path The effect can be switched on or off by a standard footswitch 12 footswitch effect on off Stereo connector socket for a double footswitch on offswitch tip internal effect ring external effect on off 13 14 footswitch mute channel 1 2 3 4 Stereo connector soc...

Page 14: ... volume control start off with full volume but reduce it if the clip indicator lights up early and the level adjustment is difficult Please ensure there is always enough battery power in your active pick up system Humming and sizzling may be caused by an empty battery If several inputs are used simultaneously you also determine the mixing ratio by the individual gain settings The gain controls of ...

Page 15: ...f the effect is determined by the exter nal effects unit The external effect loop works in parallel mode A parallel loop is intended to add the effect compo nent for example reverb to the original signal Avoid distorted effects Clipping in the internal or external effect unit may not be indicated by the clip light If distortion is audible in in the effect reduce the gain controls until the dis tor...

Page 16: ...he same output signal You can use these sockets to connect additional active AER fullrangesys tems e g AG 8 3 AS 281 whose levels are adjusted by the pre master control independent of the overall volume master of your Domino2 A By activating the stereo simulation stereo sim switch pressed a stereo like wider sound impression is generated On stage Domino2 A as monitor the sound remains unchanged 5 ...

Page 17: ...send and aux in sockets 1 2 3 DI o headphones tuner L out R out insert line out rec out aux in input bass middle treble eff send clip line mic colour mute gain bass middle treble eff send 48V stereo sim power bass middle treble eff send select return aux return effect 2 return pre master master channel one channel three four channel two effect master 1 2 3 4 5 6 7 8 9 10 11 12 13 14 15 16 PA Syste...

Page 18: ...indicator Headroom approx 6 dB return Input for external parallel effect loop send return or supplementary input Mono jack socket 6 35 mm Nom input voltage 320 mV 10 dBV Max input voltage 5 V 14 dBV Input impedance 20 kΩ aux in Auxiliary input e g for CD Stereo jack socket 3 5 mm Nom input voltage 500 mV 6 dBV Min input voltage stereo 100 mV 20 dBV mono 200 mV 14 dBV Max input voltage 4 V 12 dBV I...

Page 19: ...ter finish Dimensions and weight Dimensions Height 360 mm 14 20 Width 415 mm 16 3 Depth 290 mm 11 4 Weight 12 8 kg 28 2 lbs NOTES Options configurable by internal jumpers refer modification to qualified personnel Low gain option more headroom for mic input Deactivation of 48 V phantom power for mic input DEFINITIONS Rated conditions Nominal input voltage at input under test master fully clockwise ...

Page 20: ...rica America Asia Oceania aer music gmbh Haberstrasse 46 D 42551Velbert info aer music de aer amplifier gmbh Haberstrasse 46 D 42551Velbert info aer amplifier com Sales Europe www aer music de Version 01000122 ...

Reviews: