Aegis Tatung TME32A User Manual Download Page 8


3. Controls and indicators 
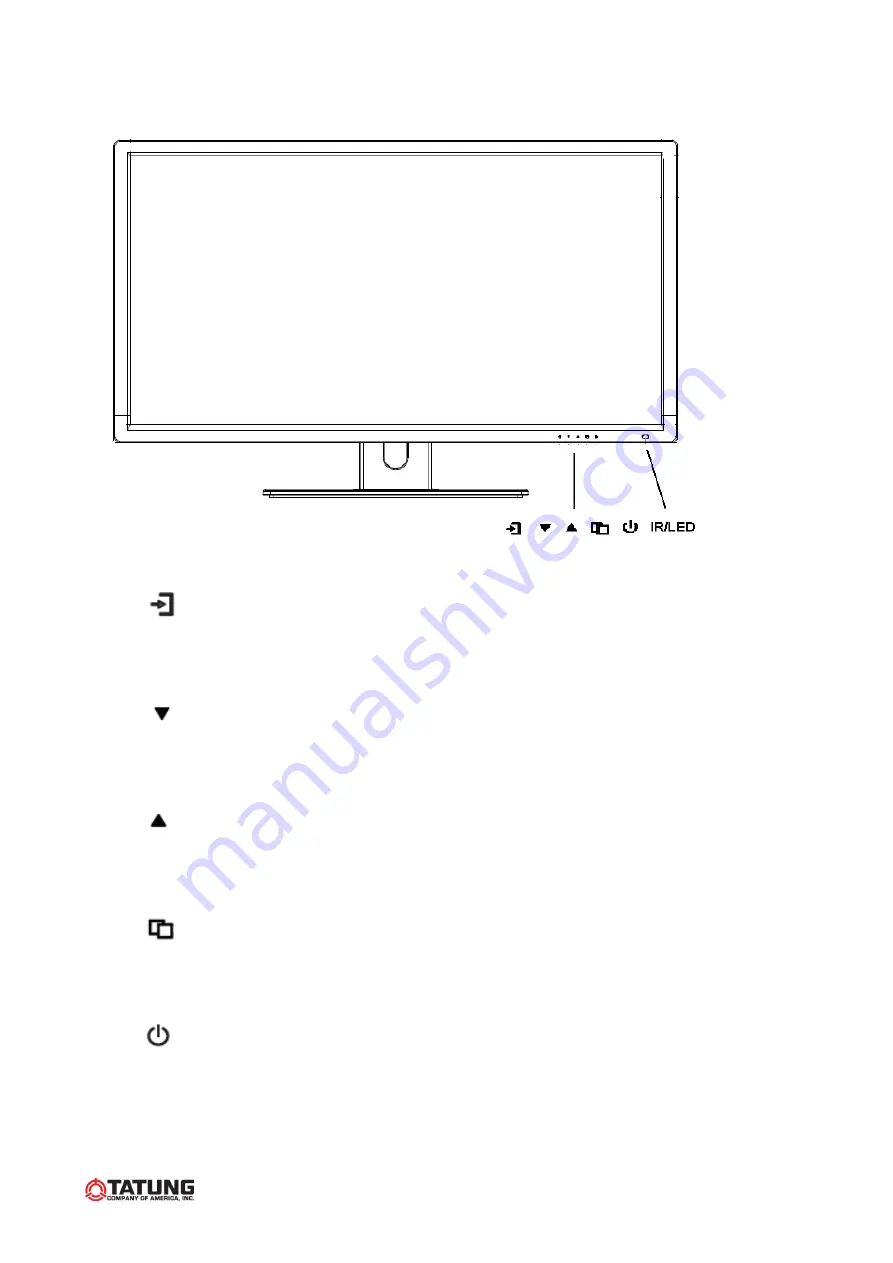


                                                                                              A    B    C    D    E    F


      A. “

”Source button 

  Press the button to show source menu. Select HDMI, S-Video, VGA and VIDEO 

input signal 

      B. “

”Down buttons 

  Press the buttons to scrolling the cursor to desired function. 

  Press the buttons to decrease the value of selected function in sub OSD menu. 

C. “

”Up button 

  Press the buttons to scrolling the cursor to desired function. 

  Press the buttons to increase the value of selected function in sub OSD menu. 

D. “

”Menu button 

 Press the button to show the OSD main menu. 

 As a confirmation key during the OSD operation. 

      E. “

” Power button 


Press the button to turn ON or turn OFF the monitor   

      F. POWER LED Indication 

 Green - Power on 


LED light off    - Power off / Sleep mode (PC mode only)


Aegis Electronic Group, Inc.

For more information please contact Aegis Electronic Group, Inc. *(888)687-6877 *[email protected] *http://www.aegiselect.com

Summary of Contents for Tatung TME32A

Page 1: ...MONITOR MODEL TME32A www tatungusa com A e g i s E l e c t r o n i c G r o u p I n c For more information please contact Aegis Electronic Group Inc 888 687 6877 aegis g2 aegiselect com http www aegise...

Page 2: ...tional specification 3 3 Controls and indicators 6 4 OSD Menu 8 5 Regulatory Agency 21 6 Mechanical 22 7 Troubleshoot 24 A e g i s E l e c t r o n i c G r o u p I n c For more information please conta...

Page 3: ...ny must be used in order to comply with emission limits Changes or modifications not expressly approved by the party responsible for compliance could void the user s authority to operate the equipment...

Page 4: ...and notify the service technician A If liquid has been spilled into the display or the display has been exposed to rain or water B If the unit has been dropped or the cabinet damaged C If fuses contin...

Page 5: ...3Hz 2 Amps max Power consumption 90 W max Power efficiency 80 typical at normal line input and full load 2 2 Video Characteristics Composite Video CVBS 1 0 Vp p 0 5 1 5Vpp Automatic switching from 75...

Page 6: ...Operating 10 to 85 non condensing Storage 10 to 95 non condensing 2 6 EDID This series of displays support EDID but does not support DDC2B function A e g i s E l e c t r o n i c G r o u p I n c For m...

Page 7: ...wer Plug IEC 320 C14 AC Socket LDH 132W2 I Power Switch Power Switch Press the Switch to turn ON or turn OFF the monitor Power Set up sequence 1 Make sure the power of PC and or Video source were turn...

Page 8: ...the cursor to desired function Press the buttons to increase the value of selected function in sub OSD menu D Menu button Press the button to show the OSD main menu As a confirmation key during the O...

Page 9: ...or volume control Auto VGA mode picture Adjust VIDEO Select CVBS source S VIDEO Select S Video source Info Display Monitor source information HDMI Select HDMI source VGA Select VGA source SDI Reserve...

Page 10: ...enu KEY LOCK Push MENU key for 6 sec to enable this function KEY UN LOCK Push MENU key for 6 sec to disable this function RUNNING HOURS Remove AC power Push key and Plug in AC power Display Running Ho...

Page 11: ...on VGA HDMI mode Press the Menu button to bring up the MAIN MENU Page The following page will appear Press UP Down buttons to select an icon then Press MENU button to change the values in the sub menu...

Page 12: ...ress MENU button to select item 3 Press Down UP buttons to adjust the value 4 Press MENU button to return A e g i s E l e c t r o n i c G r o u p I n c For more information please contact Aegis Electr...

Page 13: ...o the main menu COLOR ADJUST Set the color temperature of the LCD monitor for the CIE coordinate 9300 k or 6500 k or USERMODE 1 Press Down UP buttons to select an icon 2 Press MENU button to select ad...

Page 14: ...o select adjust item 3 Press Down UP buttons to adjust the value 4 Press MENU button to return AUTO ADJUST Press MENU buttons to auto adjust the H Position V Position Phase Clock H POSITION Adjust the...

Page 15: ...information LANGUAGE Press MENU button to enter the sub menu 1 Press Down UP buttons to select language 2 Press MENU button to enter A e g i s E l e c t r o n i c G r o u p I n c For more information...

Page 16: ...will reduce back light to 80 within 5 min to 10 min Screen will back to normal when any button is being touched AUTO SHIFT Adjust AUTO SHIFT ON OFF OFF No Function ON Every one hour there will one sc...

Page 17: ...o mode Press the Menu button to bring up the MAIN MENU Page The following page will appear Press Down UP buttons to select an icon then Press MENU button to change the values in the sub menu A e g i s...

Page 18: ...PHOTO 2 MOVIE 3 GAME BRIGHTNESS Adjust the brightness value CONTRAST Adjust the contrast value SHARPNESS Adjust Image sharp SATURATION Adjust Image saturation TINT adjust Image tint NTSC only BACKLIG...

Page 19: ...ess Down UP buttons to adjust the value 4 Press MENU button to return USER COLOR Adjust the color temperature RED Adjust the RED value for user mode GREEN Adjust the GREEN value for user mode BLUE Adj...

Page 20: ...select Scan Setting state 3 Press MENU button to return INFORMATION Press MENU button to get the timing information A e g i s E l e c t r o n i c G r o u p I n c For more information please contact Ae...

Page 21: ...icon 2 Press MENU button to select adjust item 3 Press Down UP buttons to adjust the value 4 Press MENU button to return OSD TIMEOUT Adjust the OSD Show time 5 120 sec GREEN MODE Off or On 5 min 10 mi...

Page 22: ...ottom Every 1 second down one scan line to prevent panel sticking EXIT Press MENU button to return to the main menu RECALL Brightness Contrast Sharpness Saturation Tint Volume Vivid Mode User Color OS...

Page 23: ...mission Approvals This series design shall meet following EMI EMS specifications FCC Compliance FCC Rules and Regulations Part 15 subpart B Class B CE COMPLIANCE EN55032 class B EN55024 EN50130 4 A e...

Page 24: ...Packing Size Weight Model kgs lbs TME32A 8 17 6 Model Unit W D H mm 838 168 630 TME32A Inch 32 59 6 22 24 4 Model kgs lbs TME32A 10 5 23 1 A e g i s E l e c t r o n i c G r o u p I n c For more infor...

Page 25: ...Assembly Installation Assembly Installation Assembling Base and Neck Screw TYPE 4 12 mm x 4 PCS A e g i s E l e c t r o n i c G r o u p I n c For more information please contact Aegis Electronic Grou...

Page 26: ...k if the audio cable plugged into the device well Check if the volume is set to 0 Check if AUDIO is set to mute If you are experiencing trouble with your product try the following solutions You may co...

Page 27: ...Authorization number RMA You will be required to provide A copy of the dated sales receipt from Tatung Proof of Purchase Your Name or Company Name The model number and serial number of the product A...

Page 28: ...e serial number has been altered defaced or removed and 8 Products purchased outside of the United States Should any product submitted for warranty service be found ineligible for warranty service we...

Page 29: ...states that the writing is intended to modify alter or amend this warranty If any term of this warranty is illegal or unenforceable the legality and enforceability of the remaining provisions shall n...

Page 30: ...lease call us at 1 800 829 2850 ext 242 or email service tatungusa com or go to www tatungusa com click on Support then select either Online repair Request Form or Mail or Fax Repair Reques A e g i s...

Reviews: