background image

8

D338

Prior to Initial Start–Up

• Please clean the appliance interior and all accessories prior to initial start-

up (see section: “Cleaning and Care”).

Starting up and temperature regulation

• Insert the plug of the connection lead into the plug socket with protecti-

ve earth contact. When the refrigerator compartment door is opened, the
internal lighting is switched on. The temperature selector knob is located
on the RH side of the refrigerator compartment.

Setting „0“ means:

Off.

Setting „1“ means: 

Hightest temperature, (warmest setting).

Setting „6“ (end-stop) means:

Lowest temperature, (coldest setting). 

However, the exact setting should be chosen keeping in the mind that the
temperature inside the refrigerator depends on:
-the quantity of food stored
-how often the door is opened
The temperatures in the refrigerator and freezer compartment cannot be
independently regulated.
If you want the freeze fresh food rapidly, select setting „6“, ensuring that the
temperature in the refrigerator compartment does not drop blow 0°C. You
should also promptly reset the temperature regulator to setting „3“ or „4“.

Important!

High ambient temperatures (e.g. on hot summer days) and a cold setting on
the temperature regulator (position"5" to "6") can cause the compressor to
run continuously.
If this happens, turn the temperature regulator back to a warmer setting
(position "3" to "4"). At this setting the compressor will be switched on and
off as usual and automatic defrosting recommenced.

Interior Accessories

Storage shelves

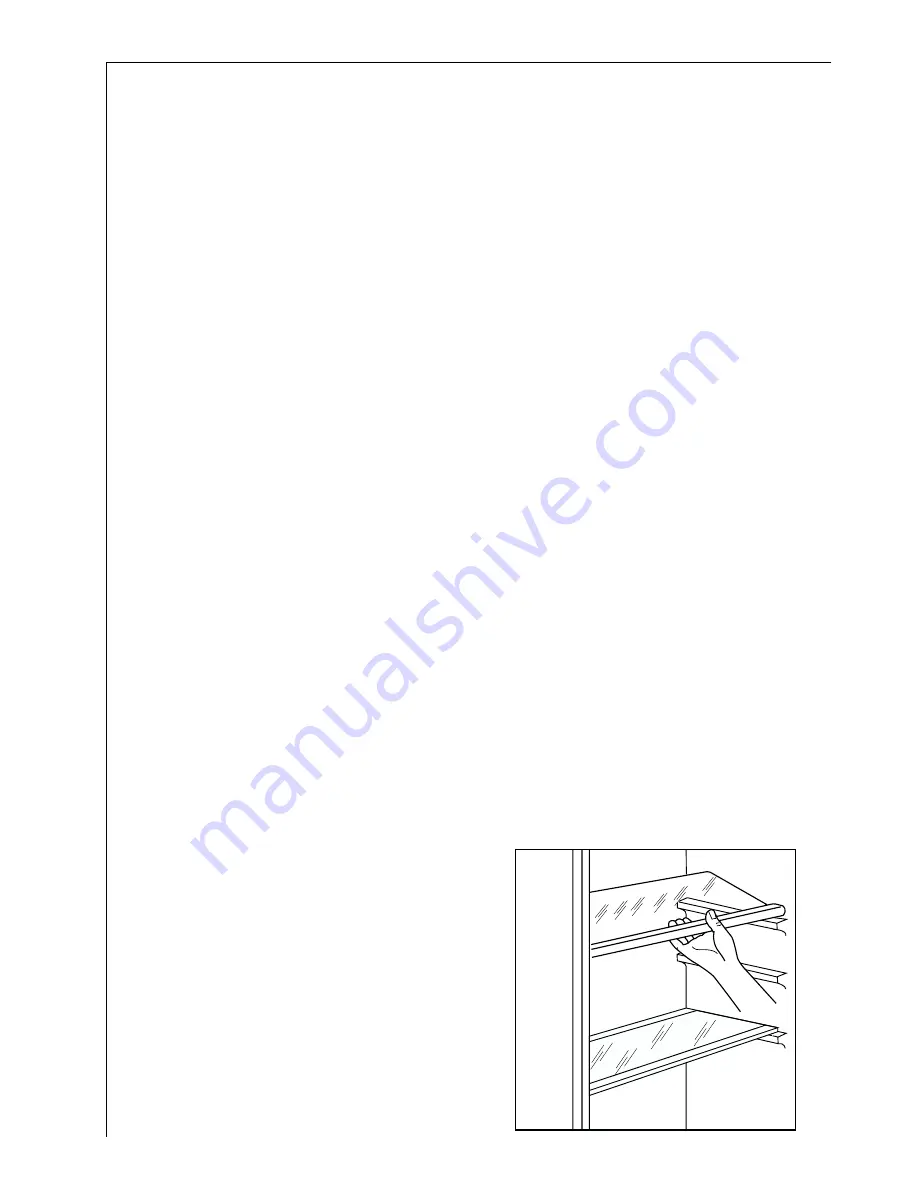
• You should always slide one of the

full size glass storage shelf into the
lowest  set  of  guides,  above  the
fruit and the vegetable containers,
and keep it in this position.

•  The  height  of  the  storage  shelves

can be adjusted:

17

GUARANTEE CONDITIONS

Standard guarantee conditions

We, AEG-Electrolux, undertake that if within 12 months of the date of the purchase this
AEG-Electrolux appliance or any part thereof is proved to be defective by reason only of
faulty workmanship or materials, we will, at our discretion repair or replace the same FREE
OF CHARGE for labour, materials or carriage on condition that:
· The appliance has been correctly installed and used only on the electricity or gas supply sta-
ted on the rating plate.
· The appliance has been used for normal domestic purposes only, and in accordance with
the manufacturer's operating and maintenance instructions.
· The appliance has not been serviced, maintained, repaired, taken apart or tampered with by
any person not authorised by us.
· All service work under this guarantee must be undertaken by a Service Force Centre.  Any
appliance or defective part replaced shall become the Company's property.
· This guarantee is in addition to your statutory and other legal rights.
· Home visits are made between 8.30am and 5.30pm Monday to Friday. Visits may be avai-
lable outside these hours in which case a premium will be charged.

Exclusions

This guarantee does not cover:

· Damage or calls resulting from transportation, improper use or neglect, the replacement of
any light bulbs or removable parts of glass or plastic.
· Costs incurred for calls to put right an appliance which is improperly installed or calls to
appliances outside the United Kingdom.
·  Appliances  found  to  be  in  use  within  a  commercial  environment,  plus  those  which  are
subject to rental agreements.

· Products of AEG-Electrolux  manufacture which are not marketed by AEG-Electrolux.

European Guarantee

If you should move to another country within Europe then your guarantee moves with you
to your new home subject to the following qualifications:
· The guarantee starts from the date you first purchased your product.
· The guarantee is for the same period and to the same extent for labour and parts as exists
in the new country of use for this brand or range of products.
· This guarantee relates to you and cannot be transferred to another user.
· Your new home is within the European Community (EC) or European Free Trade Area.
· The product is installed and used in accordance with our instructions and is only used dome-
stically, i.e. a normal household.
· The product is installed taking into account regulations in your new country.
Before you move please contact your nearest Customer Care centre, listed below, to give
them details of your new home. They will then ensure that the local Service Organisation is
aware of your move and able to look after you and your appliances.

France

Senlis

+33 (0)3 44 62 29 29

Germany

Nürnberg

+49 (0)800 234 7378

Italy

Pordenone

+39 (0)800 117511

Sweden

Stockholm

+46 (0)8 672 53 60

UK

Luton

+44 (0) 8705 350 350

Summary of Contents for SANTO 70288

Page 1: ...SANTO 70288 DT Fridge freezer Operating Instructions ...

Page 2: ... appliance are stressed with a warning triangle and or with signal words Warning Caution Attention Please observe the following carefully Additional information regarding operation and practical applications of the appliance appear after this symbol Tips and notes concerning economical and environmentally sound use of the appliance are marked with the flower In the event of a malfunction these ope...

Page 3: ...oor 8 Fresh food refrigeration 9 Freezing and storing frozen food 9 Preparation of Ice Cubes 10 Freezing Calender 10 Defrosting 11 Switching off the appliance 11 Cleaning and Care 12 Energy Saving Tips 13 What to do if 13 Correcting Malfunctions 13 Changing the light bulb 15 Service and Spare Parts 16 Customer Care Department 16 Guarantee Conditions 17 Installation Electrical Connection 18 Positio...

Page 4: ...ontact the vendor Refrigerant The refrigerant isobutane R600a is contained within the refrigerant circuit of the appliance a natural gas with a high level of environmental compa tibility which is nevertheless flammable During transportation and installation of the appliance be certain that none of the components of the refrigerant circuit become damaged If the refrigerant circuit should become dam...

Page 5: ...tc Before cleaning the appliance always switch off the appliance and unplug it or pull the house fuse or switch off the circuit breaker When unplugging always pull the plug from the mains socket do not pull on the cable Service Under no circumstances should you attempt to repair the appliance your self Repairs carried out by inexperienced persons may cause injury or serious malfunctioning Contact ...

Page 6: ... for the environment and human health which could otherwise be caused by inappropriate waste handling of this pro duct For more detailed information about recycling of this product please contact your local city office your household waste disposal service or the shop where you purchased the product Remove transport safeguard The appliance and the interior fittings are protected for transport Remo...

Page 7: ...ket on the lower left hand side of the door 2 2 Fit the top handle bracket on the top left hand side of the door 3 and screw the handle rod to the bot tom handle bracket 4 Attention Do not overtighten the screws max 2 Nm as you may damage the door handles Fitting the Door Handles ...

Page 8: ...door is opened The temperatures in the refrigerator and freezer compartment cannot be independently regulated If you want the freeze fresh food rapidly select setting 6 ensuring that the temperature in the refrigerator compartment does not drop blow 0 C You should also promptly reset the temperature regulator to setting 3 or 4 Important High ambient temperatures e g on hot summer days and a cold s...

Page 9: ...se should be covered and may be placed on any shelf Fruit and vegetables these should be thoroughly cleaned and placed in the special drawer s provided Butter and cheese these should be placed in special airtight containers or wapped in aluminium foil or polythene bags to exclude as much air as pos sible Milk bootles these should have a cap and should be stored in the bottle rack on the door Banan...

Page 10: ...o not dry out or lose their flavour and so that no flavour contamination of other frozen goods occurs Not open the door frequently or leave it open longer than absolutely necessary Unfrozen food must not touch items already frozen otherwise the frozen food could begin to defrost Caution Do not touch frozen food with wet hands Your hands could free ze to the food 1 Place the food to be frozen on th...

Page 11: ...pen 4 when defrosting is completed dry the interior thoroughly 5 turn the thermostat knob to the required setting or raplace the plug in the power socket Attention Never use sharp metal tools to scrape off frost from the evaporator as you could damage it Do not use a mechanical device or any artificial means to speed up the thawing process other than those recommended by the manufacturer A tempera...

Page 12: ... breaker or fuse Never clean the appliance with a steam cleaner Moisture could accumu late in electrical components danger of electrical shock Hot vapours can lead to the damage of plastic parts The appliance must be dry before it is placed back into service Attention Ethereal oils and organic solvents can attack plastic parts e g lemon juice or the juice from orange peals butyric acid cleansers w...

Page 13: ... Do not place warm foods into the appliance Allow warm foods to cool first Only leave door open as long as necessary Do not set temperature any colder than necessary Put frozen food in the fridge to defrost The cold in the frozen food will then be used to cool the fridge Always keep the heat emitting condenser the metall grille on the rear wall of your appliance clean What to do if Correcting Malf...

Page 14: ...nent out of the way Move the appliance slightly Readjust the feet See the Cleaning and Care section Water on the floor or on sto rage shelves Water drain hole is blocked Malfunction Possible Cause Remedy The food is too warm The appliance is near a heat source Temperature is not properly adjusted Please look in the Initial Start Up section Turn the temperature regula tor to a colder setting tempo ...

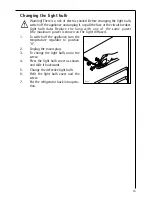
Page 15: ... lamp with one of the same power the maximum power is shown on the light diffuser 1 To switch off the appliance turn the temperature regulator to position 0 2 Unplug the mains plug 3 To change the light bulb undo the screw 4 Press the light bulb cover as shown and slide it backwards 5 Change the defective light bulb 6 Refit the light bulb cover and the screw 7 Put the refrigerator back into opera ...

Page 16: ... will need to give following details 1 Your name address and post code 2 Your telephone number 3 Clear and concise details of the fault 4 The model and serial number of the apliance found on the rating plate 5 The purchase date Please note that a valid purchase receipt or guarantee documentation is required for in guarantee service calls Customer Care Department For general enquiries concerning yo...

Page 17: ...ovable parts of glass or plastic Costs incurred for calls to put right an appliance which is improperly installed or calls to appliances outside the United Kingdom Appliances found to be in use within a commercial environment plus those which are subject to rental agreements Products of AEG Electrolux manufacture which are not marketed by AEG Electrolux European Guarantee If you should move to ano...

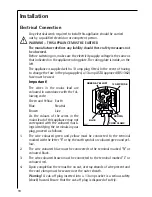
Page 18: ... the fol lowing code Green and Yellow Earth Blue Neutral Brown Live As the colours of the wires in the mains lead of this appliance may not correspond with the coloured mark ings identifying the terminals in your plug proceed as follows 1 The wire coloured green and yellow must be connected to the terminal marked with the letter E or by the earth symbol or coloured green and yel low 2 The wire col...

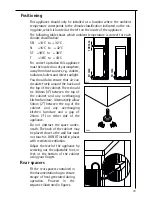
Page 19: ...eely around the back and the top of the cabinet There should be 100mm 4 between the top of the cabinet and any overhanging kitchenfurniture Alternatively allow 50mm 2 between the top of the cabinet and any overhanging kitchen furniture and a gap of 25mm 1 on either side of the appliance Do not obstruct the space under neath The back of the cabinet may be placed close to the wall but must not touch...

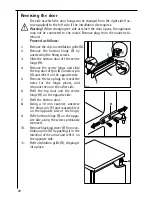
Page 20: ...e centre hinge H 4 Remove the centre hinge and slide the top door off pin G unscrew pin G and refit it on the opposite side 5 Remove the two plugs to reveal the holes for the hinge pivots and remount them on the other side 6 Refit the top door and the centre hinge H on the opposite side 7 Refit the bottom door 8 Using a 10 mm spanner unscrew the hinge pin E and reassemble it on the opposite side o...

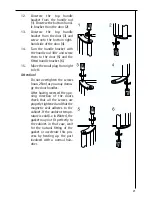
Page 21: ...t 6 15 Move the small plug from right to left Attention Do not overtighten the screws max 2 Nm as you may dama ge the door handles After having reversed the ope ning direction of the doors check that all the screws are properly tightened and that the magnetic seal adheres to the cabinet If the ambient tempe rature is cold i e in Winter the gasket may not fit perfectly to the cabinet in that case w...

Page 22: ...ent prevention regulations for refrigeration appliances VBG 20 and the regu lations of the German Society of Electrical Engineers VDE were observed in the manufacture of this appliance The refrigerant circuit has been checked for leaks This appliance is in accordance with the following EU guidelines 73 23 EWG dated 19 February 1973 low voltage guidelines 89 336 EWG dated 3 May 1989 including guide...

Page 23: ...To buy accessories consumables and spare parts at our online shop please visit http www aeg electrolux co uk ...

Page 24: ...AEG Hausgeräte GmbH Postfach 1036 D 90327 Nürnberg http www aeg hausgeraete de Copyright by AEG 2223 324 81 02 06 Subject to change without notice ...

Reviews: